Official Luthiers Forum!
http://w-ww.luthiersforum.com/forum/

Joining tops and backs
http://w-ww.luthiersforum.com/forum/viewtopic.php?f=10101&t=15677
Page 1 of 1

Author:  BrandonR [ Sat Feb 02, 2008 4:47 pm ]
Post subject:  Joining tops and backs

hey all, i am having a heck of a time finding a way to accurately join two piece tops and backs. i am wondering what have you found to be the easiest and most accurate way to do this. and for all the "funny guys" out there i am not talking about joining the top to the back...... :D thanks to anyone who can help......brandon.

Author:  KenH [ Sat Feb 02, 2008 5:07 pm ]
Post subject:  Re: Joining tops and backs

Here is how I do it... Keep in mind that I didnt take the time to book match these 2 pieces of walnut. I am doing this for demonstration purposes only.

First, I got a piece of granite countertop...a cutoff piece that is 1.5" thick and dead flat. On top of the granite I attach a piece of self adhesive sandpaper.

Attachment:
granite.jpg


Next, I hold both pieces of wood to be joined together and rub then on the sandpaper, holding the wood by the ends and with a end to end motion while pressing down on the sandpaper.

Attachment:
sanding.jpg


Then when I think it is sanded so that both sides are flat and smooth, I hold them up to a window, pressed together and check to see if I can see any trace of light between them.

Attachment:
window.jpg


If I see light, I sand some more until all light is gone. If there is no light showing, then I go place the 2 pieces of wood on three 24" pipe clamps, glue one side and spread the glue, then clamp the halfs together until I see squeeze out all the way down the seam. It works every time. The only hting you may have to watch for is that you want just enough clamping pressure to hold the wood together. If youuse too much, the wood may tend to bow on you. You can use your finger to make sure the two halfs are in line with each other and loosen the camp and press the wood down flat on the pipes to bring them together. I always let my joints dry in the clamps overnight... just for a secure joint.

Hope this helps!
Ken

Author:  Rod True [ Sat Feb 02, 2008 5:45 pm ]
Post subject:  Re: Joining tops and backs

Bandon, check out this thread on plate joining.

I posted pics of how I do it with wedge and rope. Some like this method, some don't. Some will tell you the easiest way is the stretched tape tent method, other's will tell you something else. You may have to try a few ways before you find the one that works best for you.

Having said that, the wedge and rope method is very easy. The most important part of joining plates is making sure the edge is closed along the entire length of the plate. Very little pressure should be required to join the plates.

Author:  martinedwards [ Sat Feb 02, 2008 5:56 pm ]
Post subject:  Re: Joining tops and backs

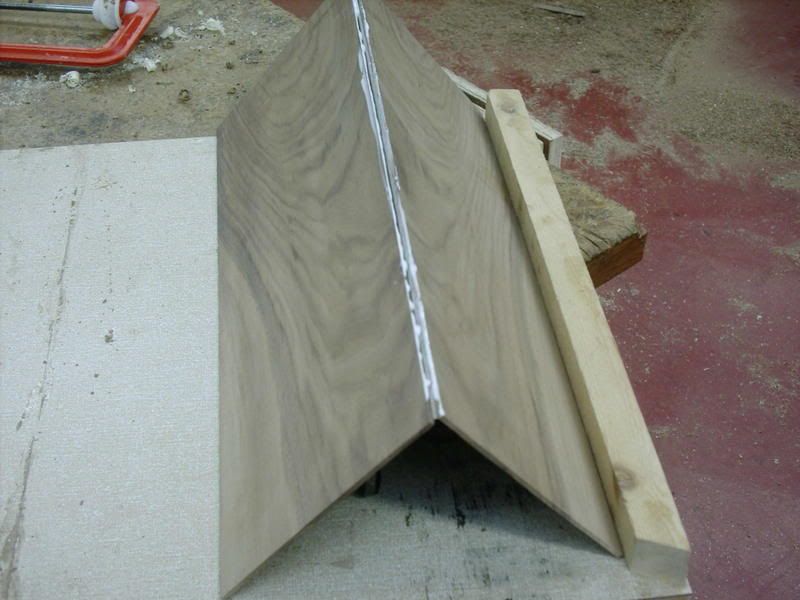
I use a shooting board and a LONG plane to get the edges right then the tent & tape method.

tilt to 30 degrees tape along the join.

glue on gap

open the "book"

and tape the other side

set a weight on it to ensure the join is flush

Image

Author:  BrandonR [ Sat Feb 02, 2008 6:34 pm ]
Post subject:  Re: Joining tops and backs

sorry about that guys, i am mainly talking about making the joint itself..... i can never seem to get the sides to evenly match up before i join them. thanks for the info so far though......brandon.

Author:  Sylvan [ Sat Feb 02, 2008 7:22 pm ]
Post subject:  Re: Joining tops and backs

Hide glue and heavy masking tape. Get Grumpy to tell you about it! That is where I first heard of the technique. Very simple and works very, very, well!

Author:  Frei [ Sat Feb 02, 2008 8:35 pm ]
Post subject:  Re: Joining tops and backs

I used sandpaper method, on a fresh joined edge 2X4, after 'close but not quite' with the plane alone, as it was a small handplane. The basics are covered in above posts. Or you could use sandpaper on a dead flat 24" level, you just need a straight flat edge and sandpaper.

Author:  Guest [ Sat Feb 02, 2008 8:53 pm ]
Post subject:  Re: Joining tops and backs

It really helps to have a good quality jointing plane. I use a number 6 Fore plane (18" long) by Lie-Nielsen and it makes the job pretty mindless. If you don't have much experience with using planes it really helps to have one of the longer ones. But practice makes perfect - so it probably will take some time to really get the hang of it. I can't recommend the plane I use enough tho' - it was well worth the money.

FWI, I also just use tape to join the plates - if the joint is perfect, you don't need much pressure.

Best of luck,
Simon

Author:  Richard Wilson [ Sat Feb 02, 2008 11:02 pm ]
Post subject:  Re: Joining tops and backs

Shooting board with a #7 (22" long). Some of the tops/backs I use are up to 42" and this plane makes a perfect join from two rough edges in under 5 minutes. I used to use a #4 (I think) but it was constantly checking the edge against a straightedge. With the #7 there's obviously still checking but for the most part it pretty much straightens itself.

To glue I tape the two sides together and clamp a board over the join to ensure it's flat. The whole process is about 10 minutes start to finish.

Author:  burbank [ Sat Feb 02, 2008 11:16 pm ]
Post subject:  Re: Joining tops and backs

If the edge is really curvy, I'll take a pass with the table saw first.

I use a well-tuned #5 Stanley style plane, or maybe it's a 6, with a shooting board, as shown here. There's a piece of 3/4" ply underneath to elevate the top wood off the bench that doesn't show in the photo. After a few passes to true up the edge, the ends sometimes show a gap when checking the joint against a light. Then I'll take a few more passes starting 2 or 3 inches from the end, and finish about the same amount from the other end. Then the last pass I do the whole length.

Page 1 of 1 All times are UTC - 5 hours
Powered by phpBB® Forum Software © phpBB Group
http://www.phpbb.com/