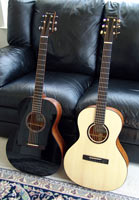
Here is a brown burst on mahogany I just did. It has not been wet sanded or buffed yet, so take the overall finish with a grain of salt. When done, this will be a deep rich burst. The mahogany was very simular in color to that redwood top. Also note, I darken the entire guitar up a little with brown and amber over-coats to make the colors on the sides and top match the dark mahogany back. The top and sides were very white.


The process on the back was:
1) amber coat to give the over-coat colors some depth. (Amber underneath tends to make the top coats more vibrant and 3D-ish)
2) Inside red/brown burst about 3"-4" wide fading to just a light red in the center
3) Outside dark brown edge color gone over and over to get the darkness desired.
4) An over all light brown coat to wash the burst a little (make it all blend)
5) Amber coat over the top to age the color to that antique look.
6) Final clear coats.
BTW: Just because I like looking at the front too...here is a picture of the same process over the white aspen top. You can see the difference the same process makes over the two different wood types. One thing to note, on the top, I did not get as much red near the center allowing more of the amber to shine thru. The back has more of the red burst color toward the center. (The red portion of the burst on the back is much wider and shaded)