Official Luthiers Forum!

Owned and operated by Lance Kragenbrink
It is currently Sat May 03, 2025 4:29 pm


All times are UTC - 5 hours


Post new topic Reply to topic  [ 16 posts ] 
Author Message
 Post subject:
PostPosted: Sat Aug 05, 2006 9:44 am 
Offline
Cocobolo
Cocobolo
User avatar

Joined: Thu Aug 03, 2006 4:48 pm
Posts: 204
Location: Wayne, NJ, United States
First name: Gary
Last Name: Lee
Status: Professional
    Thanks to everyone for the very warm welcome and incredibly kind words. I’m very happy to be in your company. Here are some comments in response to some members’ replies.

French Polish
    I closely follow the method by the Milburns. Their tutorial can be found at http://www.milburnguitars.com/fpbannerframes.html . I am indebted to the Milburns for preparing and sharing their very detailed document. This is a time-intensive process that results in a finish with high clarity, brilliance, and hardness. I spend about 15 hours per instrument. It is difficult to explain a very tactile process but I hope that these somewhat specific descriptions will help you. Aside from what is in the Milburn tutorial, here are things that I think are important during bodying.

1. Shellac preparation: The Milburn tutorial is vague about the shellac solution that is actually applied to the instrument. They talk about adding drops of a 2 lb cut of shellac onto the muneca and then adding what I interpret as an equivalent number of drops of pure ethanol. I eliminate the extra ethanol step by simply preparing a 1.33 lb shellac cut and applying this to the muneca. My 1.33 lb cut is prepared by dissolving 2 tsp of powdered shellac (LMI shellac flakes finely ground in a coffee grinder) in 45 mL of ethanol. My measurements show that powdered shellac is 3.0 g per tsp. [As a research scientist, I prefer to work in the metric system, but I have calculated the conversion to the lb cut convention.] I allow the sediment to settle overnight, then transfer the solution to a small squeeze bottle.

2. Loading the muneca: I apply approximately 8 drops of the 1.33 lb cut to the muneca, add 1 very small drop of purified olive oil to the center of the muneca, and then quickly spread the oil over the surface of the muneca with my index finger. [I wear latex gloves when polishing.] The size of the oil drop is about ? the size of the shellac drops, achieved by kissing the drop from the squeeze bottle tip onto the muneca surface. This amount of oil is just enough to lubricate but allows enough bite/friction during application to help amalgamate the finish. After wiping the oil, I firmly press the loaded muneca 2-3 times onto a white piece of paper to remove excess load. By the 2nd or 3rd blot, the muneca “fingerprint” will look incomplete and blotchy. A solid, circular print means it’s still too wet to apply.

3. Application: I polish with approximately 5-inch diameter circles. I want to emphasize that I use firm, vertical pressure during my circles. At the beginning I see a vapor trail of shellac behind the muneca which disappears in less than 4 seconds. If the trail persists longer, the muneca was overloaded and requires more blotting. The speed of the circular motion is important. At the beginning I move slower because there is less friction to grab the muneca and stop it (the kiss of death leading to wrinkles). The speed is about 2 circles per second. About 10-15 seconds into the application, the muneca noticeably starts to dry and the vapor trails disappear. Keep going--don’t stop at this point! The shellac continues to be applied in a burnishing process that leads to significant build and a very hard finish. I begin to speed up the circles to about 3 circles per second because the friction is increasing, and I must move faster to prevent the muneca from stopping. The point of diminishing returns begins about 30 seconds into the application where there is too much friction and heat that I must re-load the muneca and start the next round.

4. Order of coverage: I make sure that each square inch in the sector that I’m working has experienced about 5-8 passes of the muneca over the course of a session. When I’m polishing a completed box, the sectors and order are: one-half of the back, the other half of the back, one side, the two halves of top, and finally, the second side. This order ensures that a freshly-polished surface won’t be resting on the table as I polish the next surface. When I have completed a session on one-half of a back or a side, I will have re-loaded the muneca about 5 times. During each of these loadings, I concentrate my circles to a specific 40 square-inch region. By the time I have completed half a back or a side, the smaller regions overlap.

Rosette
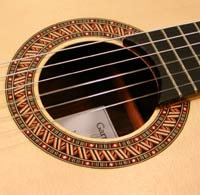
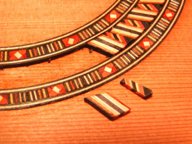
    My rosette’s helix motif is impressionistic of the DNA double helix inspired by my background in biochemistry. As you can see from the photo showing rosette inlay into a cedar top, the helix is composed of two types of tile cut from veneer logs. The outer helix is simply a parallelogram and the inner is an oblique trapezoid. Both are shaped with a chisel by placing the rectangular tile over a drawn pattern, and then cutting. Formation of the inner helix tile is very tedious. In American Lutherie #84, Greg Byers has recently described a method to produce a similar pattern, but his pleat motif is even smaller! See GAL’s luth.org.
    The tiles of white diamonds within the red rectangles start as a log produced by encasing a maple strip within strips of padauk. The maple/padauk log is turned 45 degrees (to turn the maple square into a diamond) and shaped into an altered rectangular log. This and other marquetry techniques were used by Torres and are described in the book Antonio de Torres, His Life and Work by Jose Romanillos. Romanillos devotes an entire chapter to explain how Torres prepared his inlays.
    To make the inlays sparkle, I go through different gymnastics to only expose side grain.


Neck
    The neck will be attached with a spline joint similar to Greg Byers’ joint. This will be my first elevated fingerboard. I plan to use a V-joint at the head because I feel that compared to a scarf joint, I can more precisely place the position of the headstock and nut after I set the angle and position of the fingerboard extension.

Move to Philly
    My wife and I moved from St. Louis to Philly because of a terrific job opportunity for my wife. St. Louis was great because Hibdon Hardwoods was downtown, and I could pick out some amazing ziricote and cocobolo. Now that I’m in the Philly area, I can visit Art Royter at Euro Tonewoods and pick out the best sets of the most beautiful Carpathian spruce.
Gary L38934.784537037


Top
 Profile  
 
 Post subject:
PostPosted: Sat Aug 05, 2006 10:46 am 
Offline
Brazilian Rosewood
Brazilian Rosewood
User avatar

Joined: Thu Aug 18, 2005 2:21 am
Posts: 2924
Location: Changes when ever I move..Australia
Focus: Build
Status: Amateur
Thanks for the post Gary, very informative, I will save and digest.

Good to have you aboard.

Cheers

Kim


Top
 Profile  
 
 Post subject:
PostPosted: Sat Aug 05, 2006 11:31 am 
Offline
Brazilian Rosewood
Brazilian Rosewood
User avatar

Joined: Mon Dec 27, 2004 3:50 pm
Posts: 4662
Location: Napa, CA
Gary...fantastic explanation. I can almost feel the procedure from reading your text. This, along with the Milburn tutorial will help immensely in starting my first trial. Thanks for the detail!!!

_________________
JJ
Napa, CA
http://www.DonohueGuitars.com


Top
 Profile  
 
 Post subject:
PostPosted: Sat Aug 05, 2006 12:39 pm 
Offline
Brazilian Rosewood
Brazilian Rosewood

Joined: Tue Feb 15, 2005 10:31 am
Posts: 3134
Location: United States
Gary,

Wow, above and beyond the call!!! Very clearly presented. Thanks!


Top
 Profile  
 
 Post subject:
PostPosted: Sat Aug 05, 2006 12:39 pm 
Offline
Brazilian Rosewood
Brazilian Rosewood
User avatar

Joined: Fri Jun 10, 2005 9:51 am
Posts: 2148
Location: San Diego, CA
First name: Andy
Last Name: Zimmerman
City: San Diego
State: CA
Zip/Postal Code: 92103
Country: United States
Focus: Build
Thanks for the info
Awesome work

_________________
Andy Z.
http://www.lazydogguitars.com


Top
 Profile  
 
 Post subject:
PostPosted: Sat Aug 05, 2006 12:44 pm 
Offline
Brazilian Rosewood
Brazilian Rosewood

Joined: Sun Dec 25, 2005 6:32 am
Posts: 7774
Location: Canada
Thanks Gary, lots of complementary information saved!


Top
 Profile  
 
 Post subject:
PostPosted: Sat Aug 05, 2006 4:17 pm 
Offline
Koa
Koa
User avatar

Joined: Fri Jan 13, 2006 5:35 pm
Posts: 1021
Location: United States
Gary,
You form your rosettes in the 5' to 3' direction, correct. Just wanted to
make sure you are making them the right way.


I think there are many of us French polishers (freedom polish to the anti-
French among us) who owe a great deal to the Milburn clan.

Gary, your classicals look very fine - beautiful and elegant.

--
Simon Fay

Fay GuitarsSimonF38935.0554166667


Top
 Profile  
 
 Post subject:
PostPosted: Sun Aug 06, 2006 12:07 am 
Offline
Cocobolo
Cocobolo

Joined: Wed Jul 19, 2006 12:59 pm
Posts: 262
Location: United States
Thank you Gary for taking the time to write this out and for sharing with the OLF

Very succinct, informative, and useful.

Another save to file!

Again, welcome


Top
 Profile  
 
 Post subject:
PostPosted: Sun Aug 06, 2006 12:20 am 
Offline
Brazilian Rosewood
Brazilian Rosewood

Joined: Tue Nov 29, 2005 11:44 am
Posts: 2186
Location: Newark, DE
First name: Jim
Last Name: Kirby
Focus: Build
Status: Amateur
Thanks for the FP info. On number 1, I think my main difficulty has been with grain filling. I was using pumice (way too much, I assume) and had difficulties with build-ups of little spots and mounds in the finish at the start. These I had to sand off. The finish is looking better now, after a couple of sessions building the finish with shellac, but my grain filling was not careful enough, particularly on the sides. Oh well, a first time for everything.

Philly area:

If you are looking for lumberyards that carry hardwoods, head west beyond West Chester. Hearne's Hardwoods in Oxford is good, along with Grof and Grof in Quarryville.
Delaware County Supply (just off 95 near DE border) sometimes has really interesting stuff, but it seems to come and go based on whatever commercial-sized job they are milling lumber for at that point. I still regret
a big Wenge board that didn't come home with me.

I don't know much about what is north of the city. If you find anything cool, please let me know.

Jim


_________________
Jim Kirby
kirby@udel.edu


Top
 Profile  
 
 Post subject:
PostPosted: Sun Aug 06, 2006 1:22 am 
Offline
Cocobolo
Cocobolo

Joined: Mon Jun 26, 2006 11:49 am
Posts: 115
Location: United States
Thanks for sharing, Gary. This is going to keep me busy for awhile...


Top
 Profile  
 
 Post subject:
PostPosted: Sun Aug 06, 2006 11:48 am 
Offline
Cocobolo
Cocobolo
User avatar

Joined: Thu Aug 03, 2006 4:48 pm
Posts: 204
Location: Wayne, NJ, United States
First name: Gary
Last Name: Lee
Status: Professional
That's a good one, Simon! I can always appreciate some good molecular biological humor!


Top
 Profile  
 
 Post subject:
PostPosted: Sun Aug 06, 2006 11:51 am 
Offline
Cocobolo
Cocobolo
User avatar

Joined: Thu Aug 03, 2006 4:48 pm
Posts: 204
Location: Wayne, NJ, United States
First name: Gary
Last Name: Lee
Status: Professional
Jim,
   Thanks for the lumberyard tips. I'll have to check them out.


Top
 Profile  
 
 Post subject:
PostPosted: Mon Aug 07, 2006 12:53 am 
Offline
Cocobolo
Cocobolo

Joined: Thu Jan 06, 2005 2:40 am
Posts: 148
Location: United States
How much shellac does everyone use to complete a single guitar. The Milburn tutorial says that a pint is sufficient for one guitar. Isn't that alot?


Top
 Profile  
 
 Post subject:
PostPosted: Mon Aug 07, 2006 6:12 am 
Offline
Cocobolo
Cocobolo
User avatar

Joined: Tue Jul 11, 2006 4:19 am
Posts: 493
Location: United States
Hi Gary,

You might check out Talarico Hardwoods in PA. also.
www.talaricohardwoods.com

Cheers

_________________
Horton, MI


Top
 Profile  
 
 Post subject:
PostPosted: Mon Aug 07, 2006 11:02 pm 
Offline
Cocobolo
Cocobolo
User avatar

Joined: Thu Aug 03, 2006 4:48 pm
Posts: 204
Location: Wayne, NJ, United States
First name: Gary
Last Name: Lee
Status: Professional
I haven't kept records on the total volume but I estimate for a whole instrument including wash coat inside and out, no more than 150 mL of a 1.33 lb cut. That's approximately 18 g of shellac.


Top
 Profile  
 
 Post subject:
PostPosted: Mon Aug 07, 2006 11:03 pm 
Offline
Cocobolo
Cocobolo
User avatar

Joined: Thu Aug 03, 2006 4:48 pm
Posts: 204
Location: Wayne, NJ, United States
First name: Gary
Last Name: Lee
Status: Professional
Thanks, Kirt.


Top
 Profile  
 
Display posts from previous:  Sort by  
Post new topic Reply to topic  [ 16 posts ] 

All times are UTC - 5 hours


Who is online

Users browsing this forum: No registered users and 21 guests


You cannot post new topics in this forum
You cannot reply to topics in this forum
You cannot edit your posts in this forum
You cannot delete your posts in this forum
You cannot post attachments in this forum

Jump to:  
Powered by phpBB® Forum Software © phpBB Group
phpBB customization services by 2by2host.com