Official Luthiers Forum!

Owned and operated by Lance Kragenbrink
It is currently Wed May 07, 2025 9:54 pm


All times are UTC - 5 hours


Post new topic Reply to topic  [ 21 posts ] 
Author Message
 Post subject:
PostPosted: Sun Aug 27, 2006 5:33 am 
Offline
Koa
Koa

Joined: Wed Dec 29, 2004 3:25 am
Posts: 886
Location: United States
Ok one last question and I'm ready to start cutting my very first parts on the CNC, I have a template and a new mold ready to be made. I drew them out, tested the G-Code and it does what I want, so I should have no surprises there...

How do you hold down your parts?? I have to raise the piece a little over the table so I don't mar it, do I use turners tape? clamps?, I'm just looking for ideas. I have some ideas for necks that I think will work, I was thinking of making a universal holder I could bolt to the table for most items..

Thanks for everyones help so far, I'm going to document all this on my website once I get it all going, so others who start from scratch like I am can have a resource to use. The hardest part of all this has been the learning curve, the great people here have been a wonderful resource, along with that finding the right resources on the net have made all the difference....

Thanks

-Paul-

_________________
-Paul-
Image
Patriot Guitars


Top
 Profile  
 
 Post subject:
PostPosted: Sun Aug 27, 2006 7:49 am 
Offline
Contributing Member
Contributing Member
User avatar

Joined: Thu May 12, 2005 5:46 am
Posts: 2989
Location: United States
Paul,
You can make little fixtures that pin and bolt into you table, so they go up in the same place every time. these same fixtures then become vacuum chucks for your parts.
Naturally there are many ways to do this and you certainly don't have to pin and bolt fixtures to your table but this is a good time saver for continued use of the same fixtures.
I like vacuum because you don't risk running into clamps.
there's my $.02.
I can post a picture of a vacuum clamp if you want.

_________________
Jim Watts
http://jameswattsguitars.com


Top
 Profile  
 
 Post subject:
PostPosted: Sun Aug 27, 2006 8:02 am 
Offline
Koa
Koa

Joined: Wed Dec 29, 2004 3:25 am
Posts: 886
Location: United States
Pictures would be awesome Jim, John had a cool picture of a jig he had bolted to the table and I'm going to try and copy that one as well.

Thanks

-Paul-

_________________
-Paul-
Image
Patriot Guitars


Top
 Profile  
 
 Post subject:
PostPosted: Sun Aug 27, 2006 9:14 am 
Offline
Koa
Koa
User avatar

Joined: Sat Jan 08, 2005 4:19 am
Posts: 1534
Location: United States
First name: Nelson
Last Name: Palen
CA works good for making a one-off part or fixturing. A few small "spot welds" will hole amazingly well. Slip a knife under the part to break it loose after machining.
I use it also for some production parts being cut on aluminum fixture plates. I do rough the aluminum with coarse sandpaper though so the CA has something to bite into.
Nelson


Top
 Profile  
 
 Post subject:
PostPosted: Sun Aug 27, 2006 12:14 pm 
Offline
Walnut
Walnut

Joined: Tue Feb 28, 2006 10:20 am
Posts: 24
Location: United States
I always use some kind of fixture or scrap wood as a base. Carbide bits will cut aluminum although at wood plunge speeds a booboo can do a number on bearings in the router

I use a universal fixture base with all kinds of holes for dowels and threaded inserts to which stock is bolted to or sub-fixtures attached.

Rand Kennedy38964.4234143519


Top
 Profile  
 
 Post subject:
PostPosted: Sun Aug 27, 2006 1:39 pm 
Offline
Contributing Member
Contributing Member
User avatar

Joined: Thu May 12, 2005 5:46 am
Posts: 2989
Location: United States
Paul, I was trying to discribe something like rand posted. He appears to using some vacuum also.
Here's a picture of an archtop vacuum chuck. It has a couple of holes to locate it on the table, you only see one as the other is blind hole on the back side. It uses 1/8 o-ring cord stock for the seal.
Hope this gives some ideas.

_________________
Jim Watts
http://jameswattsguitars.com


Top
 Profile  
 
 Post subject:
PostPosted: Sun Aug 27, 2006 1:42 pm 
Offline
Koa
Koa

Joined: Wed Dec 29, 2004 3:25 am
Posts: 886
Location: United States
Very Cool...

That gives me lots and lots of ideas, just what I needed 
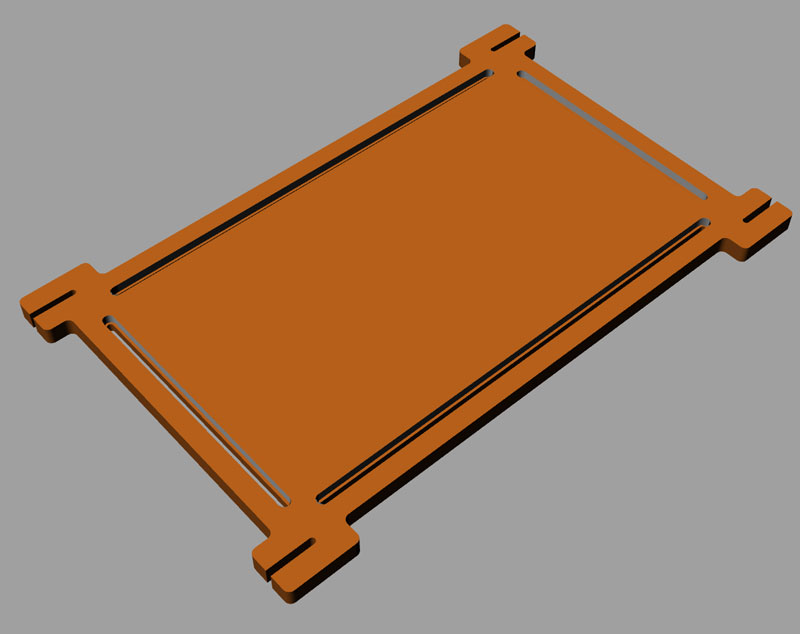
, I created this in Rhino this evening and am fighting with Rhino-Cam to do the inner pocket edges:


I got it to cut all the other pockets just not the inner lip ones. Once I get that figured out I'm going to add some stuff like Rand has. The picture here is upside down, I was going to use some floating clamps in those edges to hold things down (if I have a free edge). I'll have to stock up on rubber gasket material

I was going to put the knobs at the end of mine but after seeing yours I might just change that and flush in some hex bolts. As I start to pull in more and more parts to the CNC I'll start making vaccum jigs, I already have one to clamp my braces so I have a vaccum source in the shop...

What is that made out of? Looks like plastic or a composite??

Thanks A million

-Paul-Sprockett38956.9503240741

_________________
-Paul-
Image
Patriot Guitars


Top
 Profile  
 
 Post subject:
PostPosted: Sun Aug 27, 2006 11:10 pm 
Offline
Koa
Koa
User avatar

Joined: Thu Jun 23, 2005 7:46 am
Posts: 580
Location: United States
First name: John
Last Name: Watkins
City: Lake Zurich
State: IL
Focus: Build
Status: Professional
I'm doing the same thing.


_________________
John Watkins
CNC Guitar Parts


Top
 Profile  
 
 Post subject:
PostPosted: Sun Aug 27, 2006 11:16 pm 
Offline
Koa
Koa
User avatar

Joined: Thu Jun 23, 2005 7:46 am
Posts: 580
Location: United States
First name: John
Last Name: Watkins
City: Lake Zurich
State: IL
Focus: Build
Status: Professional
Here's a quick and dirty way to setup a repeatable fixture.

1. Take a piece that's plenty big enough for your fixture and drill holes in it for your t-slot table.
2. Bolt it down to the table.
3. Cut a clean edge down the left side and call that zero (don't forget the cutter offset and the fact that you're cutting in Y, but setting X)
4. Cut a clean edge down the front and call that zero.
5. Jog your spindle to a logical location for the part's datum and write the coordinates of that spot right on the fixture with a sharpie.
6. Set everything to zero.
7. You now have a way of finding that exact spot after the fixture has been removed and replaced by indicating the side (to make sure it's straight) and then edge-finding the side and front. Jog to the coordinates that are written down and reset to zero.

Viola!

_________________
John Watkins
CNC Guitar Parts


Top
 Profile  
 
 Post subject:
PostPosted: Mon Aug 28, 2006 1:21 am 
Offline
Walnut
Walnut

Joined: Tue Feb 28, 2006 10:20 am
Posts: 24
Location: United States
John - you've got lots of cool fixtures there !

Paul - I'm using 3/4" Garolite XX for the base but you just want something that doesn't move with humidity and need to be faced all the time. It's pretty flat but I use the middle hold-downs to help. It's flat enough that I haven't faced it yet but it isn't as flat as my table so I will some day. My base stays on the table and the positioning pins keep subfixtures exactly where I expect them to be.


Top
 Profile  
 
 Post subject:
PostPosted: Mon Aug 28, 2006 2:05 am 
Offline
Koa
Koa
User avatar

Joined: Sat Jan 08, 2005 4:19 am
Posts: 1534
Location: United States
First name: Nelson
Last Name: Palen
Another method of establishing X0Y0 on a fixture is with a strategically placed tooling hole. The hole may or may not be placed at "program zero" but will be a known location so that program zero can be set using G92. An edge finder that has a pointed end can be use to center on the hole to set zero. The only problem I have with this method is the collet runout in the router head--not real precise.
Removing and reinstalling the fixture will require making the location pickup again unless the fixture is doweled to the table to that it's location repeats.
Nelson


Top
 Profile  
 
 Post subject:
PostPosted: Mon Aug 28, 2006 2:59 am 
Offline
Koa
Koa

Joined: Wed Dec 29, 2004 3:25 am
Posts: 886
Location: United States
WOW!!!

John the one hanging off the end closest to the camera, what is it used for?

Yours also has an A-Axis right? Necks are the one thing I've been thinking about, I have a couple of ideas in mind that I've been kicking around. The two problems areas for a neck are the headstock and the tenon, I have not fully worked out how to fit them up just yet but my initial thoughts go like this:

1. Take the neck blank and clamp it in square with just basic machining (just a standard 3x4x30 block cut to 4S tolerance), route both top sides for the truss and CF rods.

2. Using a vaccum clamp that registers on the truss slot, clamp the neck in on one side, profile the headstock, neck, heel and tenon on one side (pocket the bolt holes). Flip it over and profile the other side.

3. Using an angled jig that would hold the headstock flat, cut the headstock shape and pocket the tuner holes.

So that's three steps and four tool changes, obviously it's just a mental exercise but without an extra axis I have to get creative in doing necks. From what I can imagine now doing a neck blank is the most complicated part I'll have to machine, and in fact I'm not going to do a finish pass on them, I just want to hog off the main wood close to shape so I can finish them by hand and adjust the neck shape as I go.

Nelson I like that idea, if all your jigs are in known locations on the main fixture board then you would only need to set the offset location to the edge of the board once and you would be good to go. I have a tool I got from woodcraft that's basically a center finder (looks like a top with a sharp point) and if you put a precise register hole for that you should be able to hit it each time. Either that or find a centered laser pointer you could chuck in, that would work too. Then you could easily calculate the offsets for each jig, in fact you could write a script that would do it in MachII and MachIII and automate the whole process, a plug in screen would be very cool that you could go to and pick a tool holder button and it would set your offsets for you automatically... Hmmm... might be time to break out a compiler and play with Mach custom screens

I got a message back from Rhino-Cam and I'm pushing them a little bit, it seems that if you have a .25 tool and try to make a .25 pocket the program gives you an interal error and will not create the tool path (it's a size issue they said). Their suggestion was to mark the tool as smaller but that would mean that it would make a large diameter pocket which is not what I want, I could go down to a smaller diameter bit but why?? I should be able to cut a straight line pocket with the same size bit. Plus I don't have a smaller downcutter right now and don't want to run the store today

I am learning so much, you guys are great. I really want to take everything I'm learning and pass it on to others who are looking to do this...

Thanks

-Paul-

_________________
-Paul-
Image
Patriot Guitars


Top
 Profile  
 
 Post subject:
PostPosted: Mon Aug 28, 2006 3:15 am 
Offline
Koa
Koa
User avatar

Joined: Sat Jan 08, 2005 4:19 am
Posts: 1534
Location: United States
First name: Nelson
Last Name: Palen
Something that I would like to do with my CNC Router is add a pivoting feature to the head mounting. Reason being that I would like the capability of tilting the head slightly so as to not cut on exact center of a ball nose cutter.
Nelson


Top
 Profile  
 
 Post subject:
PostPosted: Mon Aug 28, 2006 3:46 am 
Offline
Koa
Koa
User avatar

Joined: Thu Jun 23, 2005 7:46 am
Posts: 580
Location: United States
First name: John
Last Name: Watkins
City: Lake Zurich
State: IL
Focus: Build
Status: Professional
I've considered doing that also, Nelson.

Paul, I don't have a fourth axis. The fixture hanging off of the table is for cutting tenons. It's hinged with Thompson bearings for a quick setting of neck angle. Works like a champ.

For your .25 pocket, just draw a line where you want the pocket and either run an engraving cut on it, or profile it with a negative stock offset (of .125"). Of course, it will be a more accurate width if you cut a pocket using a smaller cutter.

By the way, the four holes you see in that fixture are for all of the different sized truss rods that my customers prefer. I've turned indexing pins on the lathe that make for very little play.

John Watkins38957.5342824074

_________________
John Watkins
CNC Guitar Parts


Top
 Profile  
 
 Post subject:
PostPosted: Mon Aug 28, 2006 4:37 am 
Offline
Koa
Koa

Joined: Wed Dec 29, 2004 3:25 am
Posts: 886
Location: United States
Thanks John I'll try that, the suggestion from MecSoft was to make my bit diameter .249 and it would work. To be blunt... that seems like a hack to me and I'm not happy about it. I'm not doing anything special and as far as I'm concerned this is a bug, I certainly CAN make a .25 hole or slot with a .25 bit. So if their software can't figure that out then I'm starting to wonder if I my $900 was spent on the correct software. Because if that is there solution to something this obvious I'm wondering what others problems exist I could actually write the g-code to do this on my own, it's not hard but I paid money to not have to do that... Sorry but being a software engineer I don't have much tolerance for such obvious bugs, complicated ones I can handle.

Since I currently have no plans to make necks for anyone but me I don't have to be so creative , if you don't mind giving away 'secrets' how are you cutting the headstock angle?? The one issue I figured out was that my neck blank width has to be spot on or my neck will be off slightly, I'm thinking of using a flat mill to surface the blank to the exact size... still working that out :)

Thanks

-Paul-

_________________
-Paul-
Image
Patriot Guitars


Top
 Profile  
 
 Post subject:
PostPosted: Mon Aug 28, 2006 5:09 am 
Offline
Koa
Koa
User avatar

Joined: Thu Jun 23, 2005 7:46 am
Posts: 580
Location: United States
First name: John
Last Name: Watkins
City: Lake Zurich
State: IL
Focus: Build
Status: Professional
Well, I hate to tell you this, but it's not a bug.

You can't put a .25 object in a .25 hole because the outside wall of the object and the inside wall of the hole would have to occupy the same space which is not possible.

I cut the headstock angle as part of the neck shaft operation and then face the other side parallel in a separate operation.

I used to do it the way you described on it's side, but I find this way faster and more accurate for me.


_________________
John Watkins
CNC Guitar Parts


Top
 Profile  
 
 Post subject:
PostPosted: Mon Aug 28, 2006 5:28 am 
Offline
Koa
Koa

Joined: Wed Dec 29, 2004 3:25 am
Posts: 886
Location: United States
Hehehehe... well actually I tried their solution and it still failed, I even made a .125 bit and it failed so I sent the whole thing off to them to validate for me what the issue is.

I see what your saying though, it does make sense...

I'm waiting to see what they say...

-Paul-

_________________
-Paul-
Image
Patriot Guitars


Top
 Profile  
 
 Post subject:
PostPosted: Mon Aug 28, 2006 5:41 am 
Offline
Koa
Koa
User avatar

Joined: Sat Jan 08, 2005 4:19 am
Posts: 1534
Location: United States
First name: Nelson
Last Name: Palen
Whether or not you can put a .25 object in a .25 hole is all relative to the size of the hammer.


Top
 Profile  
 
 Post subject:
PostPosted: Mon Aug 28, 2006 6:43 am 
Offline
Koa
Koa

Joined: Wed Dec 29, 2004 3:25 am
Posts: 886
Location: United States
So my laugh for the day is I sent the drawing over to mecsoft and explained the general error I was getting, I had everything in nice neat little layers and color coded the whole nine-yards...

They took my tools library and the drawing and made it work with the .249 tool, but never explained how or why I was getting the error!!! even though I explained my steps in great detail. All I got back was the drawing with the new tool paths... Hahahahahaha...

So I had to write back to them again and ask HOW they did it, the drawing is the same so what did I do wrong or not right?? Unless of course they want to offer me a free service for toolpaths on everything I draw from now on... hehehehehehe...

The whole thing makes me smile....

-Paul-

_________________
-Paul-
Image
Patriot Guitars


Top
 Profile  
 
 Post subject:
PostPosted: Mon Aug 28, 2006 12:28 pm 
Offline
Walnut
Walnut

Joined: Tue Feb 28, 2006 10:20 am
Posts: 24
Location: United States
Paul - I like John's suggestion best, and in fact use that kind of toolpath quite often, not because pocketing or profiling doesn't work right but because it's the right tool for the job so to speak. Most CAM packages will require a slight tool clearance for pocketing and especially for surfacing operations with cavities etc. KISS applies to toolpath strategies; the simpler ones may be less automatic but are the most accurate and by far the quickest.

I used to machine necks three sided but I strongly encourage you to go top & bottom if you can. I know the factories do 3 sided. Run the numbers on how much Z travel you'll need for that. More than 5".


Top
 Profile  
 
 Post subject:
PostPosted: Mon Aug 28, 2006 1:45 pm 
Offline
Koa
Koa

Joined: Wed Dec 29, 2004 3:25 am
Posts: 886
Location: United States
I'm pretty sure I can do top and bottom, but will have to add one step to make the tenon, that's the killer part for me. I'm going to have to figure something out for doing those, but the other parts should be straightforward...

After a torrent of emails we worked out the issue with the tool paths, I'm going to try Johns idea and see how that works...

Thanks

-Paul-

_________________
-Paul-
Image
Patriot Guitars


Top
 Profile  
 
Display posts from previous:  Sort by  
Post new topic Reply to topic  [ 21 posts ] 

All times are UTC - 5 hours


Who is online

Users browsing this forum: No registered users and 23 guests


You cannot post new topics in this forum
You cannot reply to topics in this forum
You cannot edit your posts in this forum
You cannot delete your posts in this forum
You cannot post attachments in this forum

Jump to:  
Powered by phpBB® Forum Software © phpBB Group
phpBB customization services by 2by2host.com