Official Luthiers Forum!

Owned and operated by Lance Kragenbrink
It is currently Tue May 20, 2025 4:31 pm


All times are UTC - 5 hours


Post new topic Reply to topic  [ 21 posts ] 
Author Message
 Post subject:
PostPosted: Fri Feb 23, 2007 11:51 pm 
Offline
Koa
Koa

Joined: Mon Sep 04, 2006 10:55 pm
Posts: 698
Location: Australia
Hi Everyone

Well, Trev and Cheryl got some nice Paua shell purflings over the last few days so I thought I'd post a few pics of how (or how not to) do it.

Dave did one during the week and I did this one today   

Firstly we fitted a mixture of straight and curved Paua strips to the already cut purfling channels and attached them with masking tape.


The next step was to add the BWB purfling on the inside of the Paua shell. We did this by lifting each piece of masking tape, laying a small section and re-taping.


Step 3 was the BWB on the outside of the Paua shell, again lifting the tape laying the purfling and re-taping.


While doing this we also checked that the shell pieces were in tightly by giving them a shove with a bradawl and any that had dodgy joints were re-sanded.


The next step was to install the maple bindigs and BW purflings on the sides. This was the trickiest and most frustrating part of the process.

The bindings were taped on with LMI binding tape so as we taped them on, the masking tape was replaced with the LMI tape.

I haven't got any pics of this part of the process as this was when the shell pieces started popping out when removing the masking tape and the BW purfling twisted and wasn't noticed until you'd taped down most of the lower bout. Dave did a whole side before he realised that that the BW purfling was upside down.

So late in the afternoon on a hot day photography was the last thing on my mind.

Le fridge was looking nervous.


However here's a pic of the side with the binding and purfling when finished.


Very fiddly, frustrating work but the end result was worth it. This is a pic of Cheryl that Dave finished a couple of days ago.


And a few more pics of the general progress of the twins.


I now understand why solid shell purfs cost so much.

Would we do it this way again? NO WAY.

The next order that I get from LMI will have some of those teflon strips which we reckon would be much easier than doing it this way.

We got the results that we wanted but also ended up with sore fingers, stiff necks and uneven tempers so I hope this helps anyone who wants to have a crack at this.

Apologies for the photography. I really struggle with close ups with my camera. I might just read the manual one day.

Cheers

Bob

_________________

------------------------------------------------------
Bob Connor
Geelong, Australia


Top
 Profile  
 
 Post subject:
PostPosted: Sat Feb 24, 2007 12:09 am 
Offline
Cocobolo
Cocobolo

Joined: Sun Jan 28, 2007 4:43 am
Posts: 219
Location: United States

really cool,Clap


the butt joint is really cool, and the shell is inspiring


Top
 Profile  
 
 Post subject:
PostPosted: Sat Feb 24, 2007 12:14 am 
Offline
Koa
Koa
User avatar

Joined: Sun Jun 12, 2005 11:46 am
Posts: 720
Location: Australia

G'day Bob & Dave !
                      Man O Man , They look fantastic guys. You guys don't need no stinkin teflon .

They really are first class guitars and very attractive. The end graft rocks ! as does the rosette.
Great craftsmanship . I'm really impressed.

Congrats Guys ,, and L F

Cheers , Craig

_________________
CRAIG LAWRENCE of AUSTRALIA
_____________________________________________


Top
 Profile  
 
 Post subject:
PostPosted: Sat Feb 24, 2007 12:53 am 
Offline
Koa
Koa

Joined: Mon Sep 04, 2006 10:55 pm
Posts: 698
Location: Australia
Craig

I need teflon. I need teflon. I need ...
I think I need a beer.

Thanks for the thumbs up mate.

Cheers

Bob


_________________

------------------------------------------------------
Bob Connor
Geelong, Australia


Top
 Profile  
 
 Post subject:
PostPosted: Sat Feb 24, 2007 1:36 am 
Offline
Koa
Koa

Joined: Fri Jun 30, 2006 4:23 pm
Posts: 1694
Location: United States
First name: Lillian
Last Name: Fuller-Watson
State: WA
Country: USA
Focus: Build
Status: Amateur
The twins are looking quite spiffy, especially for bogans.       
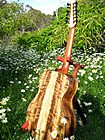
I know I am not the only one sitting on pins and needles awaiting their first notes. I am anxious to hear what you and Dave have to say about their similarities and their differences in tone and projection.

_________________
Aoibeann


Top
 Profile  
 
 Post subject:
PostPosted: Sat Feb 24, 2007 2:03 am 
Offline
Koa
Koa
User avatar

Joined: Thu Jul 13, 2006 6:17 am
Posts: 1937
Location: Evanston, IL
First name: Steve
Last Name: Courtright
Focus: Build
Status: Amateur
Lovely work, Bob!

My camera has a little flower icon, which when engaged provides a macro photo setting. Maybe yours has something similar.

_________________
"Building guitars looks hard, but it's actually much harder than it looks." Tom Buck


Top
 Profile  
 
 Post subject:
PostPosted: Sat Feb 24, 2007 2:36 am 
Offline
Brazilian Rosewood
Brazilian Rosewood
User avatar

Joined: Sat Feb 12, 2005 1:07 am
Posts: 2281
Location: Jones, OK
Bob, it looks as if the bogans might have to move to a better neighborhood. They are both looking very classy!

Nice work, but get some teflon strips they do make things a lot easier.

_________________
Dave Rector
Rector Guitars


Top
 Profile  
 
 Post subject:
PostPosted: Sat Feb 24, 2007 3:01 am 
Offline
Brazilian Rosewood
Brazilian Rosewood
User avatar

Joined: Thu Oct 06, 2005 1:05 pm
Posts: 3350
Location: Bakersville, NC
Focus: Build
Status: Professional
Not how I do it but I guess in the end the results were the same!

_________________
Peter M.
Cornerstone Guitars
http://www.cornerstoneukes.com


Top
 Profile  
 
 Post subject:
PostPosted: Sat Feb 24, 2007 3:18 am 
Offline
Mahogany
Mahogany

Joined: Thu Jan 25, 2007 5:41 am
Posts: 61
Location: Chi. N/W Burbs Illinois
They are looking great Bob.  You are a better man than I taping all of that 3 times.  About 1/2 way through I would have listened to Le fridge and opened at least one beer.

Kirby


Top
 Profile  
 
 Post subject:
PostPosted: Sat Feb 24, 2007 3:23 am 
Offline
Brazilian Rosewood
Brazilian Rosewood

Joined: Tue Feb 15, 2005 10:31 am
Posts: 3134
Location: United States
Worth it, indeed! Leaping shell! Recalcitrant purfling! Thanks for the reminder that, even with frustrating setbacks, stunning results are possible.


Top
 Profile  
 
 Post subject:
PostPosted: Sat Feb 24, 2007 3:36 am 
Offline
Brazilian Rosewood
Brazilian Rosewood
User avatar

Joined: Mon Dec 27, 2004 3:50 pm
Posts: 4662
Location: Napa, CA
Great execution, Bob...in the tradition of the pre-Teflon days. I agree...Teflon spacers are the bees knees!

Keep up the posts on the twins. Like Heshie...I love this thread and look forward to your results.

_________________
JJ
Napa, CA
http://www.DonohueGuitars.com


Top
 Profile  
 
 Post subject:
PostPosted: Sat Feb 24, 2007 4:31 am 
Offline
Koa
Koa

Joined: Wed Mar 16, 2005 2:30 pm
Posts: 1041
Location: United States
Bob,
   You can't argue with the results. It looks very nice. Beautiful job on the
rosette, too. I'm sure your experience in the old school installation of that
beautiful Paua purfling was one that you'll never forget and will
appreciate as one that gives an insight to the patience and diligence of
the guys that did it every day before Teflon spacers were available. They
really worked harder than we have to today....and I'm thankful for any
tool that I use every time I use it.

   If you do it again, try the Teflon strips. You'll be amazed at the ease
with which the same very difficult task can be completed....as well as how
quickly compared to the method you used this time.

Great work!
Kevin Gallagher/Omega Guitars


Top
 Profile  
 
 Post subject:
PostPosted: Sat Feb 24, 2007 4:31 am 
Offline
Koa
Koa

Joined: Tue Mar 14, 2006 11:42 pm
Posts: 565
Location: United States
Great work!
The results look outstanding!

Please explain the process of inlaying that curved end graft.

John


Top
 Profile  
 
 Post subject:
PostPosted: Sat Feb 24, 2007 7:03 am 
Offline
Brazilian Rosewood
Brazilian Rosewood
User avatar

Joined: Thu Aug 18, 2005 2:21 am
Posts: 2924
Location: Changes when ever I move..Australia
Focus: Build
Status: Amateur
Great work Bob and Dave,

As others have suggested, old school may have been a little frustrating, but hard won victories are most often the sweetest.

Cheers

Kim


Top
 Profile  
 
 Post subject:
PostPosted: Sat Feb 24, 2007 9:38 am 
Offline
Koa
Koa

Joined: Sun Feb 26, 2006 10:21 pm
Posts: 1055
Location: Australia
[QUOTE=bob_connor] Craig

I need teflon. I need teflon. I need ...
I think I need a beer.

[/QUOTE]

Get a grip on yourself man....Beer FIRST...then Teflon.


Top
 Profile  
 
 Post subject:
PostPosted: Sat Feb 24, 2007 10:35 am 
Offline
Koa
Koa
User avatar

Joined: Mon Oct 23, 2006 1:46 am
Posts: 588
Location: Is this heaven? "No, it's Iowa."
Nice work guys!! If I remember right, these are your first guitars???   
WOW. Keep up the good work and, keep the photos coming...

Long

_________________
"No man ever steps in the same river twice, for it's not the same river and he's not the same man.” -Heraclitus of Ephesus


Top
 Profile  
 
 Post subject:
PostPosted: Sat Feb 24, 2007 1:09 pm 
Offline
Cocobolo
Cocobolo

Joined: Fri Jul 28, 2006 1:09 pm
Posts: 163
Location: Australia
well bob the end result is what matters and it looks great....
I used to do a lot of abalone work when i was at maton and we used the teflon....did all the inner /outer /purfling in one go then just pull the teflon strip out and start laying in the abalone...
we never had any curved pieces just straight pieces and when you got to tighter curves we'd just snap off shorter bits in the channel to get the curve....then just cover it all in super-glue..then knock it down with a slack belt sander ..it was all quite quick...
I think this is how I'll do mine...stick with what i know.


Top
 Profile  
 
 Post subject:
PostPosted: Mon Feb 26, 2007 3:12 am 
Offline
Contributing Member
Contributing Member

Joined: Tue Nov 21, 2006 4:02 pm
Posts: 801
Location: United States
First name: Gene
Last Name: Zierdt
City: Sebastopol
State: CA
Zip/Postal Code: 95472
Country: USA
Focus: Build
Status: Amateur
They look fantastic... As one who has yet to do my first pearl inlay, I appreciate the insite to how much easier the teflon method will be. I'll definately order the teflon now.

_________________
Gene

Politicians and diapers must be changed often, and for the same reason- Mark Twain


Top
 Profile  
 
 Post subject:
PostPosted: Mon Feb 26, 2007 3:32 am 
Offline
Koa
Koa

Joined: Sat Jan 15, 2005 7:24 am
Posts: 830
Location: United States
Hey Guys...
You did a great job!
I'm getting ready to do the same and am really apprehensive about the outcome.
Anyways, no apologies, you did good.

walter


Top
 Profile  
 
 Post subject:
PostPosted: Mon Feb 26, 2007 8:25 am 
Offline
Koa
Koa

Joined: Mon Sep 04, 2006 10:55 pm
Posts: 698
Location: Australia
Thanks everyone.

Lillian, Dave and I are also getting keen to get them strung up to hear what they sound like.

We're waiting on some vulcanised fish paper to arrive from the Zootman so we can glue up the necks. (which will hopefully arrive today)

They both had the first coat of Z-poxy yesterday. So I'm thinking we might have some action by the end of next week.

Dave, Peter, Kevin, Kim and Grant the teflon spacers will the first item on the next LMI order. I've been trying to source something here in Oz but have had no luck. There is some measure of satisfaction though, seeing the results after the amount of time and frustration that went into getting it all in place.

Dave did the first one and didn't realise that I'd started the second. He was rapt when I rang him and told him the second one was finished.

I always get nervous when things are taking a looooong time to get done. More time, more room for errors I guess.

Jonhfry and John K, the end grafts are deceptively easy to produce. We've just started another two OM's, a maple and a mahogany one so I'll take some pics when we get to that step.

Bob Long, I think we're up to about number eight or nine. I did four some years ago and Dave had done some electrics. Since November last year we've done 3 dreads (one which is half way through being shellaced), two tele thinlines half completed, the twins and two more OM's started.

We haven't posted finished pics as we've had a huge hold up on our headstock logos, so the first couple haven't had the headstock finished and haven't been buffed out yet They'll be nicely cured though .

So there'll be a flurry of pics when the logos go in.

Thanks for the encouraging words everyone.

Cheers

Bob


_________________

------------------------------------------------------
Bob Connor
Geelong, Australia


Top
 Profile  
 
Display posts from previous:  Sort by  
Post new topic Reply to topic  [ 21 posts ] 

All times are UTC - 5 hours


Who is online

Users browsing this forum: No registered users and 35 guests


You cannot post new topics in this forum
You cannot reply to topics in this forum
You cannot edit your posts in this forum
You cannot delete your posts in this forum
You cannot post attachments in this forum

Jump to:  
Powered by phpBB® Forum Software © phpBB Group
phpBB customization services by 2by2host.com