Official Luthiers Forum!

Owned and operated by Lance Kragenbrink
It is currently Tue May 20, 2025 5:39 pm


All times are UTC - 5 hours


Post new topic Reply to topic  [ 49 posts ]  Go to page Previous  1, 2
Author Message
 Post subject:
PostPosted: Thu Mar 29, 2007 12:41 am 
Offline
Cocobolo
Cocobolo

Joined: Fri Mar 09, 2007 1:40 am
Posts: 134
Location: United States
Wow, thank you for sharing that. The tape tip is an awesome idea.


Top
 Profile  
 
 Post subject:
PostPosted: Thu Mar 29, 2007 12:41 am 
Offline
Koa
Koa
User avatar

Joined: Fri Apr 08, 2005 2:44 am
Posts: 987
Location: United States
First name: Joe
Last Name: Breault
City: Merrimack
State: NH
Status: Amateur
Nice job Ron. Good advice on the tape too.

_________________
Joe Breault
Merrimack, NH
Perpetual novice


Top
 Profile  
 
 Post subject:
PostPosted: Thu Mar 29, 2007 1:04 am 
Offline
Brazilian Rosewood
Brazilian Rosewood
User avatar

Joined: Mon Jul 04, 2005 7:13 am
Posts: 3270
Location: United States
[QUOTE=blindreality] Wow, thank you for sharing that. The tape tip is an awesome idea.[/QUOTE]


The tape tip actually came from Andy himself.

Ron

_________________
OLD MAN formerly (and formally) known as:

Ron Wisdom

Somewhere in the middle of Arkansas......


Top
 Profile  
 
 Post subject:
PostPosted: Thu Mar 29, 2007 1:05 am 
Offline
Brazilian Rosewood
Brazilian Rosewood
User avatar

Joined: Mon Jul 04, 2005 7:13 am
Posts: 3270
Location: United States
[QUOTE=Daniel M] Very Cool. And a little scary!
Good idea using the duck tape.
Just a little aside... If you mix your Epoxy with black Tempra paint powder, it flows out more smoothly & you may have less filling to do. It doesn't take a lot, & it sets up very black.
[/QUOTE]


Thanks, Daniel, I will give tempera a try.

Ron

_________________
OLD MAN formerly (and formally) known as:

Ron Wisdom

Somewhere in the middle of Arkansas......


Top
 Profile  
 
 Post subject:
PostPosted: Thu Mar 29, 2007 1:07 am 
Offline
Brazilian Rosewood
Brazilian Rosewood
User avatar

Joined: Mon Jul 04, 2005 7:13 am
Posts: 3270
Location: United States
[QUOTE=Dave White] Ron,

That looks fabulous Another of those "take a deep breath and pray" guitar making rites of passage under your belt.

The bearclaw top looks fabulous too - I am a sucker for bearclaw.[/QUOTE]


Thanks, Dave, it is a fabulous top, I hope I don't screw it up. It is from Steve at colonial and is master grade with very pronounced figure.

Ron

_________________
OLD MAN formerly (and formally) known as:

Ron Wisdom

Somewhere in the middle of Arkansas......


Top
 Profile  
 
 Post subject:
PostPosted: Thu Mar 29, 2007 1:11 am 
Offline
Brazilian Rosewood
Brazilian Rosewood
User avatar

Joined: Mon Jul 04, 2005 7:13 am
Posts: 3270
Location: United States
[QUOTE=Peter J] Looks great Ron !! I really like the second photo and the way it reflects the light from a different angle. It's bound to be a real eye-catcher.

I'm not clear on how you got the duct tape to release. Did you clamp it with the rosette as you epoxied it into the top? A few photos for some clarification would be great.


Regards,
Peter[/QUOTE]


Peter, I didn't take any other progress photos, sorry. I left the tape on until the glue dried and the clamps removed. The tape can then just be pulled off, or scraped off.

Ron

_________________
OLD MAN formerly (and formally) known as:

Ron Wisdom

Somewhere in the middle of Arkansas......


Top
 Profile  
 
 Post subject:
PostPosted: Thu Mar 29, 2007 1:16 am 
Offline
Brazilian Rosewood
Brazilian Rosewood
User avatar

Joined: Mon Jul 04, 2005 7:13 am
Posts: 3270
Location: United States
[QUOTE=Anthony Z] Ron that rosette looks terrific up against that bearclaw top. I really like celtic art.

Question -- why did you use epoxy and ebony dust as opposed to CA and ebony dust?[/QUOTE]


Anthony, I use both methods, but this was such a large cavity doing the whole rosette as one piece that I needed plenty of working time. I used slow set epoxy and dust and filled the cavity about half way full so it could squish up between all the hundreds of openings. I did use CA and dust touching up the pinholes.

Ron

_________________
OLD MAN formerly (and formally) known as:

Ron Wisdom

Somewhere in the middle of Arkansas......


Top
 Profile  
 
 Post subject:
PostPosted: Thu Mar 29, 2007 1:22 am 
Offline
Koa
Koa
User avatar

Joined: Thu Jul 13, 2006 6:17 am
Posts: 1937
Location: Evanston, IL
First name: Steve
Last Name: Courtright
Focus: Build
Status: Amateur
Stunning! What amazing work.

_________________
"Building guitars looks hard, but it's actually much harder than it looks." Tom Buck


Top
 Profile  
 
 Post subject:
PostPosted: Thu Mar 29, 2007 1:26 am 
Offline
Cocobolo
Cocobolo
User avatar

Joined: Tue Nov 14, 2006 4:10 am
Posts: 151
Location: United States
First name: Kevin
Last Name: Mason
City: Wheeling
State: IL
Zip/Postal Code: 60090
Country: USA
Focus: Build
Status: Semi-pro
That is just downright beautiful. How did you keep the black epoxy from smearing and discoloring the lighter wood of the rings and the top? Did you try to set the inlay flush, or leave it a bit proud and then scrape and sand it level?

Do you plan use complementary celtic style inlays on the fingerboard and/or the head stock?

_________________
Kevin Mason
Mason Guitars and Ukuleles on Facebook
http://masonguitars.net


Top
 Profile  
 
 Post subject:
PostPosted: Thu Mar 29, 2007 4:13 am 
Offline
Brazilian Rosewood
Brazilian Rosewood
User avatar

Joined: Mon Jun 13, 2005 6:53 am
Posts: 2104
Location: Toronto, Ontario, Canada
First name: Anthony
Last Name: Zlahtic
City: Toronto
Country: Canada
Focus: Build
Status: Amateur
Thanks for the explanation Ron.

Okay if I test your patience with another question?

After you made up the slurry of epoxy and ebony dust how did you apply it and tamp it down?

The other thing that occured to me is that the epoxy/ebony dust slurry probably has a nice sheen to it that you would not get using CA and ebony dust.


Top
 Profile  
 
 Post subject:
PostPosted: Thu Mar 29, 2007 4:25 am 
Offline
Cocobolo
Cocobolo
User avatar

Joined: Mon Nov 14, 2005 8:30 pm
Posts: 497
Location: United States
Status: Amateur
Ron,

Great Job!!! I really appreciate the information on how you accomplished this task. I have been dreading (in my case dreding) an attempt at humming bird headstock inlay. That may not be daunting to you who have experience but all those tiny pieces scare the you know what out of me. Using your method I will tape and remove the cardboard and glue. Then I will make a pattern for the outside of the two major components the bird and the flower. After filling with black epoxy I will inset the inlay still on the tape. Sand, scrape, and be done (hopefully). I kind of wish now that I had just chosen one of Andy’s new disks with an inlayed letter but my Father loves hummingbirds and Andy has them on his site.

What kind of epoxy should be used for the inlay?

Regards,

Philip

_________________
aka konacat

If you think my playing is bad you should hear me sing!
Practice breeds confidence and confidence breeds competence. Unfortunately, I'm stuck in practice.


Top
 Profile  
 
 Post subject:
PostPosted: Thu Mar 29, 2007 5:43 am 
Offline
Brazilian Rosewood
Brazilian Rosewood
User avatar

Joined: Fri Jun 10, 2005 9:51 am
Posts: 2148
Location: San Diego, CA
First name: Andy
Last Name: Zimmerman
City: San Diego
State: CA
Zip/Postal Code: 92103
Country: United States
Focus: Build
Ron
What kept the glue from the duct tape from coming off when soaking in hot
water. Also where and what brand of clear duct tape did you use?
Thanks
Andy

_________________
Andy Z.
http://www.lazydogguitars.com


Top
 Profile  
 
 Post subject:
PostPosted: Thu Mar 29, 2007 5:47 am 
Offline
Brazilian Rosewood
Brazilian Rosewood
User avatar

Joined: Mon Jul 04, 2005 7:13 am
Posts: 3270
Location: United States
[QUOTE=azimmer1] Ron
What kept the glue from the duct tape from coming off when soaking in hot
water. Also where and what brand of clear duct tape did you use?
Thanks
Andy[/QUOTE]


Beats me, Andy. I was worried that the tape would release also, but it didn't. I have no idea what brand it is, there are no marks on it and I've had it for a while. It's two inches wide and just a little bit cloudy looking.
Ron

_________________
OLD MAN formerly (and formally) known as:

Ron Wisdom

Somewhere in the middle of Arkansas......


Top
 Profile  
 
 Post subject:
PostPosted: Thu Mar 29, 2007 5:52 am 
Offline
Brazilian Rosewood
Brazilian Rosewood
User avatar

Joined: Mon Jul 04, 2005 7:13 am
Posts: 3270
Location: United States
[QUOTE=kmason] That is just downright beautiful. How did you keep the black epoxy from smearing and discoloring the lighter wood of the rings and the top? Did you try to set the inlay flush, or leave it a bit proud and then scrape and sand it level?

Do you plan use complementary celtic style inlays on the fingerboard and/or the head stock?[/QUOTE]


Kevin, I sprayed around the area with shellac before starting. The inlay was a little proud. There was glue everywhere, but it scraped and sanded down without a problem.

Here's the FB that goes with it: Not a great picture, though.


Ron

_________________
OLD MAN formerly (and formally) known as:

Ron Wisdom

Somewhere in the middle of Arkansas......


Top
 Profile  
 
 Post subject:
PostPosted: Thu Mar 29, 2007 5:57 am 
Offline
Brazilian Rosewood
Brazilian Rosewood
User avatar

Joined: Mon Jul 04, 2005 7:13 am
Posts: 3270
Location: United States
[QUOTE=Anthony Z] Thanks for the explanation Ron.

Okay if I test your patience with another question?

After you made up the slurry of epoxy and ebony dust how did you apply it and tamp it down?

The other thing that occured to me is that the epoxy/ebony dust slurry probably has a nice sheen to it that you would not get using CA and ebony dust.[/QUOTE]


Anthony, the way this inlay is made there is as much open space as there is MOP. I filled the cavity with slurry and when clamped down it squished up through the openings. When I later filled the pin holes that were left, I used 5 min. epoxy and dust and spread it on with an old credit card. I also did one fill where I covered it with ebony dust, put a few drops of CA on it and immediately sanded with 400 grit to rub it in.

Ron

_________________
OLD MAN formerly (and formally) known as:

Ron Wisdom

Somewhere in the middle of Arkansas......


Top
 Profile  
 
 Post subject:
PostPosted: Thu Mar 29, 2007 6:15 am 
Offline
Brazilian Rosewood
Brazilian Rosewood

Joined: Tue Feb 15, 2005 10:31 am
Posts: 3134
Location: United States
Nice job, Ron! The rosette looks great and the top is cool, but looking through the soundhole, I think your label is a bit wordy....

Duct--the miracle tape!


Top
 Profile  
 
 Post subject:
PostPosted: Thu Mar 29, 2007 9:09 am 
Offline
Brazilian Rosewood
Brazilian Rosewood
User avatar

Joined: Mon Jul 04, 2005 7:13 am
Posts: 3270
Location: United States
[QUOTE=azimmer1] Ron
What kept the glue from the duct tape from coming off when soaking in hot
water. Also where and what brand of clear duct tape did you use?
Thanks
Andy[/QUOTE]


Andy, I checked again and there is a label. It is Scotch brand. It's called Scotch Transparent Duct Tape.

Transparent Duct Tape


Ron

_________________
OLD MAN formerly (and formally) known as:

Ron Wisdom

Somewhere in the middle of Arkansas......


Top
 Profile  
 
 Post subject:
PostPosted: Thu Mar 29, 2007 12:07 pm 
Offline
Contributing Member
Contributing Member
User avatar

Joined: Thu Feb 09, 2006 2:35 pm
Posts: 2951
Location: United States
First name: Joe
Last Name: Beaver
City: Lake Forest
State: California
Focus: Build
Beautifull work Ron

It looks great in the bearclaw top. I'd love to see the completed instrument.

_________________
Joe Beaver
Maker of Sawdust


Top
 Profile  
 
 Post subject:
PostPosted: Thu Mar 29, 2007 12:22 pm 
Offline
Mahogany
Mahogany

Joined: Wed Jan 03, 2007 8:26 am
Posts: 49
Location: United States

Ron,


How did you make sure the MOP rosette set right in the middle of the purfling boundaries? I am assuming you had a little wiggle room to move the MOP in the channel? 


Top
 Profile  
 
 Post subject:
PostPosted: Thu Mar 29, 2007 1:41 pm 
Offline
Contributing Member
Contributing Member
User avatar

Joined: Wed Jan 05, 2005 3:45 pm
Posts: 4337
Location: United States
[QUOTE=CarltonM] Nice job, Ron! The rosette looks great and the top is cool, but looking through the soundhole, I think your label is a bit wordy....

[/QUOTE]


Ron, that really is a striking rosette. Nice job inlaying, too.
What will the body wood be?

Steve

_________________
From Nacogdoches...the oldest town in Texas.

http://www.stephenkinnaird.com


Top
 Profile  
 
 Post subject:
PostPosted: Thu Mar 29, 2007 2:35 pm 
Offline
Brazilian Rosewood
Brazilian Rosewood
User avatar

Joined: Mon Jun 13, 2005 6:53 am
Posts: 2104
Location: Toronto, Ontario, Canada
First name: Anthony
Last Name: Zlahtic
City: Toronto
Country: Canada
Focus: Build
Status: Amateur
Ron thank you for indulging my questions so graciously.

Much appreciated!


Top
 Profile  
 
 Post subject:
PostPosted: Thu Mar 29, 2007 2:44 pm 
Offline
Brazilian Rosewood
Brazilian Rosewood
User avatar

Joined: Mon Jul 04, 2005 7:13 am
Posts: 3270
Location: United States
[QUOTE=Steve Kinnaird] [QUOTE=CarltonM] Nice job, Ron! The rosette looks great and the top is cool, but looking through the soundhole, I think your label is a bit wordy....

[/QUOTE]


Ron, that really is a striking rosette. Nice job inlaying, too.
What will the body wood be?


Steve[/QUOTE]


Thanks, Steve.   The b/s are madagascar rosewood.

Ron

_________________
OLD MAN formerly (and formally) known as:

Ron Wisdom

Somewhere in the middle of Arkansas......


Top
 Profile  
 
 Post subject:
PostPosted: Thu Mar 29, 2007 2:51 pm 
Offline
Brazilian Rosewood
Brazilian Rosewood
User avatar

Joined: Mon Jul 04, 2005 7:13 am
Posts: 3270
Location: United States
[QUOTE=microsmurf]

Ron,


How did you make sure the MOP rosette set right in the middle of the purfling boundaries? I am assuming you had a little wiggle room to move the MOP in the channel?

[/QUOTE]


I measured and calculated about 97 times. 
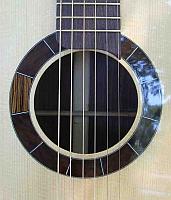
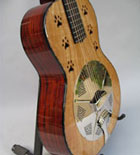
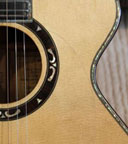
The cavity was less than 1/16" wider than the inlay, so I knew with only 1/32 on either side that it whould look centered. Any wider and it would have been nearly impossible to get it centered.

Ron

_________________
OLD MAN formerly (and formally) known as:

Ron Wisdom

Somewhere in the middle of Arkansas......


Top
 Profile  
 
 Post subject:
PostPosted: Sat Mar 31, 2007 1:55 am 
Offline
Brazilian Rosewood
Brazilian Rosewood
User avatar

Joined: Mon Jul 04, 2005 7:13 am
Posts: 3270
Location: United States
[QUOTE=ToddStock] Looks great, Ron, and thanks for the pics - I've been eying this rosette, but with green-tinted epoxy and green body purfling for a Saint P's Day parlor. No shamrocks, but might think about snakes for fret markers.[/QUOTE]


That's a good idea, Todd. I might have to do something like that for my personal guitar. I'm part Irish and me birthday is St. Patrick's Day.

Ron

_________________
OLD MAN formerly (and formally) known as:

Ron Wisdom

Somewhere in the middle of Arkansas......


Top
 Profile  
 
Display posts from previous:  Sort by  
Post new topic Reply to topic  [ 49 posts ]  Go to page Previous  1, 2

All times are UTC - 5 hours


Who is online

Users browsing this forum: No registered users and 30 guests


You cannot post new topics in this forum
You cannot reply to topics in this forum
You cannot edit your posts in this forum
You cannot delete your posts in this forum
You cannot post attachments in this forum

Jump to:  
Powered by phpBB® Forum Software © phpBB Group
phpBB customization services by 2by2host.com