Official Luthiers Forum! http://w-ww.luthiersforum.com/forum/ |
|
Headstock Binding http://w-ww.luthiersforum.com/forum/viewtopic.php?f=10102&t=10285 |
Page 1 of 2 |
Author: | JJ Donohue [ Wed Jan 10, 2007 4:03 am ] |
Post subject: | |
Does anyone have some good closeups of how they match up the headstock side bindings with the bindings on the fingerboard? TIA |
Author: | Pwoolson [ Wed Jan 10, 2007 4:21 am ] |
Post subject: | |
JJ, I don't understand the question. Are you using purflings under the binding? And is that what you are trying to ling up? Because bindings will be split up by the nut. I'll assume you are wondering how to do purflings. If you want them to meet at the break angle, you'll need to build a fingerboard stop (see Benedetto's book). This allows you to run the purflings under the nut. Otherwise, just run everything up to the nut and cut it at the same angle as the nut. Then then will continue on the other side of the nut. |
Author: | JJ Donohue [ Wed Jan 10, 2007 4:27 am ] |
Post subject: | |
Paul...In the past, I haven't stopped at the nut and tried to run a small portion of the binding under the nut. I don't like that look and was wondering how others approach this. You answered that question. This time, I'll have purfs under the binding on both the headstock as well as the FB and was wondering how to pull off something more elegant looking. I don't have the Benedetto book but I'll search around. Can you expand on what you mean by a "fingerboard stop"? |
Author: | Anthony Z [ Wed Jan 10, 2007 5:21 am ] |
Post subject: | |
JJ how big a hurry are you in? I am just heading out of town for the balance of the week and can post photos or email you pictures and diagrams on Friday evening or Saturday. Paul/Hesh if you've got the Benedetto book -- there is a good description as to how to do it in there that could be shared with JJ. |
Author: | JJ Donohue [ Wed Jan 10, 2007 5:50 am ] |
Post subject: | |
Hurry?...me, hurry? I can always wait for good information, Anthony. Thanks for the offer. With 3 going at once I always seem to have something to do while I'm waiting for glue to set or materials to arrive or doing color trials on shellac or repairing dropped guitars...you know, the usual stuff. |
Author: | JJ Donohue [ Wed Jan 10, 2007 5:56 am ] |
Post subject: | |
Cool Flippo...nice pic. I absolutely love slotheads and yours is a beauty...nice ramps and tuners...are those waverly's? That's what I'm looking for. Thanks! |
Author: | John Watkins [ Wed Jan 10, 2007 6:18 am ] |
Post subject: | |
This is how the fingerboard stop works. It effectively lowers the fingerboard in relation to the face of the headstock, allowing the headstock binding to be the same height as the fingerboard binding, which in turn allows the side purflings to meet up. ![]() |
Author: | MSpencer [ Wed Jan 10, 2007 6:21 am ] |
Post subject: | |
Thats cool Mike |
Author: | Howard Klepper [ Wed Jan 10, 2007 6:22 am ] |
Post subject: | |
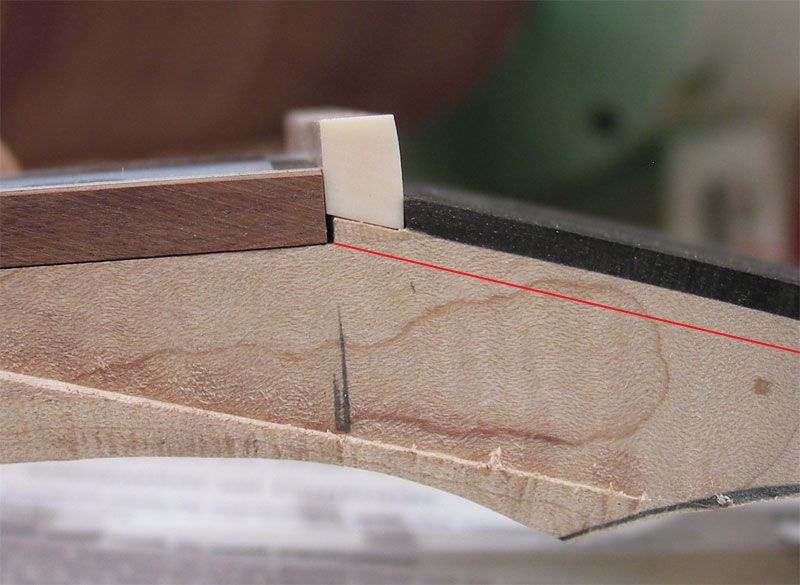
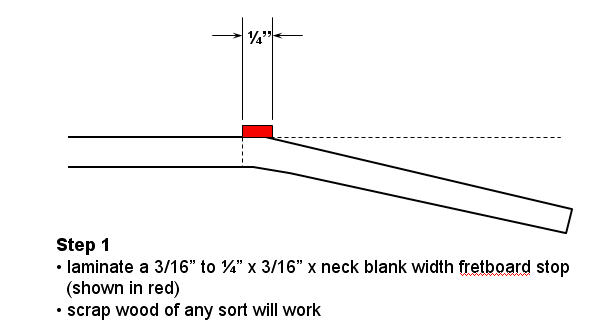
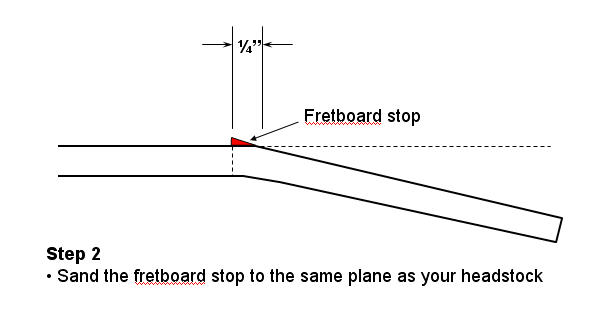
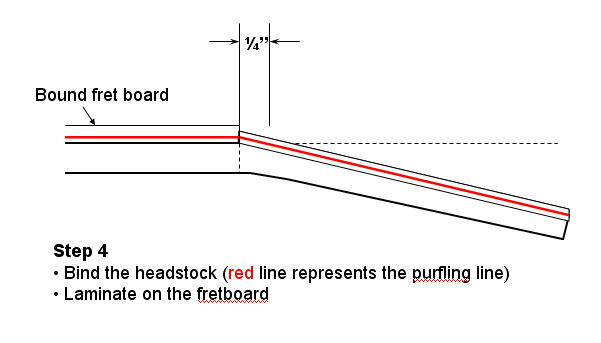
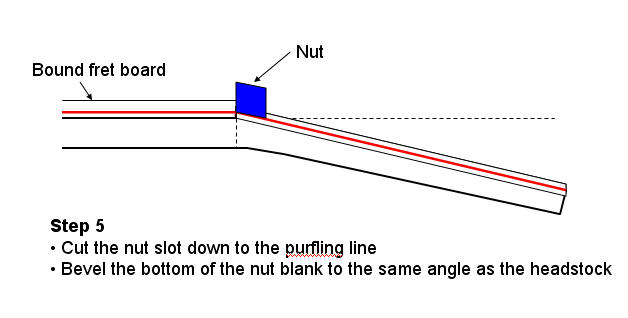
Get a look at Benedetto. As far as I know that is the only book which even mentions the problem, which is to get enough room for the side purflings to continue under the nut (where the bindings will stop for a break. Benedetto, however is not very clear in his description or drawings. The stop is glued to the plane of the neck that the board will be on, and its effect is to extend the plane of the headstock over that part of the board, thus setting the nut (which will rest on the stop) a little lower into the headstock face. The nut will have the headstock angle cut on its bottom. So initially, before installing the stop, the plane that the board will be on should go at least 3/16" beyond the end of the board; 1/4" is better. When you are all done, looking from the side, the plane of the neck under the board will appear to end at the end of the board. 
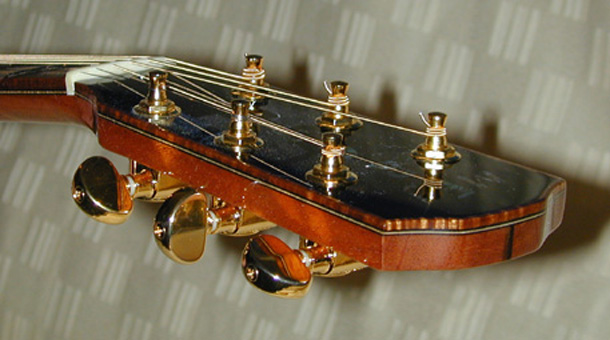
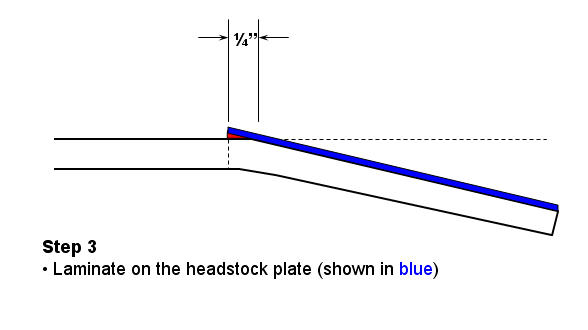
A thicker headstock veneer will also give you more room for your binding and side purfling. When you look at Benedetto, the above will, I hope, make sense. 
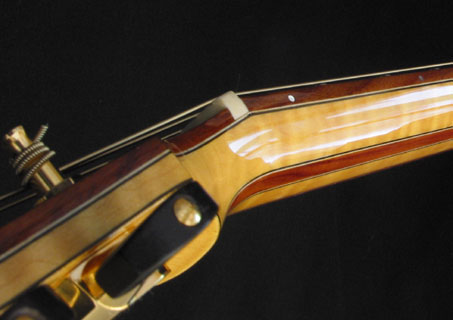
And bind your headstock before you glue the fingerboard on. Don't ask my why I know this. [edit] uh-oh. What John does is the opposite of what I do, and why I found Benedetto misleading. But I have to run now, I'll check in later. |
Author: | Serge Poirier [ Wed Jan 10, 2007 9:31 am ] |
Post subject: | |
Fillipo and John, those are very nice! Great thread and timely, i will attemp that on my current build, thanks folks! ![]() |
Author: | JJ Donohue [ Wed Jan 10, 2007 11:01 am ] |
Post subject: | |
Very cool pic, John. Unfortunately for me, it'll have to wait for my next effort since the plane of my neck is already established... truss rod slot in and CF rods glued in place. Since you're the neck guru, do you have any finished pics showing the effect in all it's glory? Howard, thanks for chiming in. As an exercise on this one, I'm going to bind the headstock as you recommend and then lay out where the purflings should meet and where the plane of the neck needs to be established. Hopefully, next time I'll be prepared to lay everything out in advance and be able to pull it off. Seems like these little details have a way of getting me side-tracked into exploring projects of their own. No wonder it takes me so long to build a guitar! |
Author: | TonyKarol [ Wed Jan 10, 2007 11:14 am ] |
Post subject: | |
I personally like the binding and side purf to both stop, and be divided by the nut ... way easier IMO, and most factory guitars (non archies) I believe are done this way if they are doing it. It looks like this at the nut.. so what we did here was to bind the fretboard with a binding purf combo, then on the headstock, in order to not have to worry about the purf at all, was to laminate it full headstock size under the headplate - so black/maple/ebony headplate on top of the neck blank in the headstock area. Then all you have to do is route away the ebony edge (we left some so it looks like its blk/maple/blk purf) and bind it in koa - no worry about purfling delamination, or mitering the purf - its perfect, and jointless, because its a full sheet. ![]() |
Author: | JJ Donohue [ Wed Jan 10, 2007 11:24 am ] |
Post subject: | |
Nice Tony...that's definitely KISS at it's finest. That's a great look! Thanks for posting...lot's of ideas surfacing! |
Author: | Dave Rector [ Wed Jan 10, 2007 11:25 am ] |
Post subject: | |
That looks great Tony! And the finish is so shiney I thought I was looking at a 7-string for a minute there. ![]() |
Author: | TonyKarol [ Wed Jan 10, 2007 11:27 am ] |
Post subject: | |
A student and I did that one together last year .. it was a first for both of us !!! He will be back starting next week for another ... and wanting to bind the darn headstock again !!! |
Author: | John Watkins [ Wed Jan 10, 2007 11:55 am ] |
Post subject: | |
JJ, I think I'm a ways off from "guru", but here's that same guitar finished. ![]() |
Author: | JJ Donohue [ Wed Jan 10, 2007 12:20 pm ] |
Post subject: | |
John...That's what I'm talking about! Absolutely gorgeous. You're too modest...I've never seen anybody who makes complex necks better...or even attempts such complexity! Very inspiring ![]() ![]() |
Author: | Howard Klepper [ Wed Jan 10, 2007 5:44 pm ] |
Post subject: | |
First off, my earlier post should have said the stop raises the nut in relation to the headstock face, not lowers it. As far as John's first photo goes, I now see what the issue was. I saw the ebony headstock veneer as the board and the bound fingerboard as the headstock. The scarfed headstock threw me so I reversed the two in my quick look at it. We do the same thing, after all. Tony, the point isn't to make the job easier, it's to make the result more elegant. Or so some of us think. |
Author: | John How [ Wed Jan 10, 2007 9:17 pm ] |
Post subject: | |
I have simplified this step. A picture says more than words so here it is. ![]() |
Author: | JJ Donohue [ Thu Jan 11, 2007 2:00 am ] |
Post subject: | |
John How...In your procedure, do you bind your FB first and then determine the height of your headstock binding channel by projecting a line onto the side of the headstock? Is your nut line varied (depending on binding considerations) or is it established at the transition? This also has me thinking about my neck layout sequence in general. I've always done the following: 1) Establish the nut line at the transition of where the headstock meets the FB plane. 2) Measure to where the join fret meets the body 3) Lay out the cut line and tenon detail 4) Drill holes for the barrell bolts and cut the tenon 5) Glue on the headstock and rout the binding channel. 6) Curse when the bindings don't meet properly! Is there a more logical sequence? Seems like it might be better to work on the north end to establish the nut line based on binding considerations before locking in the tenon area. How do others do it? |
Author: | Howard Klepper [ Thu Jan 11, 2007 7:18 am ] |
Post subject: | |
If you do it as in John How's photo (nice looking git, John), you will not get a continuous line of side purfling, because of the lap over of the board purfling with the headstock purfling. Avoiding that is the point of the fingerboard stop. JJ, I always do (2) before (1), above. When you use the stop, you will initially layout the point where the headstock plane begins as if the nut is going to rest on the fingerboard plane. After the stop is installed, the nut will be on the headstock plane, which is extended over the stop. |
Author: | JJ Donohue [ Thu Jan 11, 2007 9:20 am ] |
Post subject: | |
Thanks, Howard...I realize the difference now with your explanation and after "Archtop Anthony" Z. emailed me a Powerpoint series of sketches describing the stop procedure. Now I believe I understand how to pull it off as well as to better execute the standard method from John and Tony's post. I'm realy impressed with how clever you alpha-builders are at the fine details! Thanks all for the help! |
Author: | TonyKarol [ Thu Jan 11, 2007 9:46 am ] |
Post subject: | |
You must be talkin bout Howard JJ ![]() |
Author: | Anthony Z [ Fri Jan 12, 2007 10:58 pm ] |
Post subject: | |
Here are the steps JJ was referring to in the email sent that will result in a nut installment as shown in John Watkin's second posted picture. ![]() [/IMG] ![]() ![]() ![]() ![]() |
Author: | JJ Donohue [ Sat Jan 13, 2007 2:16 am ] |
Post subject: | |
That was a tremendous help, Anthony...thanks. It's now in my reference book for the next opportunity. |
Page 1 of 2 | All times are UTC - 5 hours |
Powered by phpBB® Forum Software © phpBB Group http://www.phpbb.com/ |