Real shell and straight pieces is what I use. Even on a tight curve you can get decent results.
| Official Luthiers Forum! http://w-ww.luthiersforum.com/forum/ |
|
| First time pearl Purfling http://w-ww.luthiersforum.com/forum/viewtopic.php?f=10102&t=10409 |
Page 1 of 1 |
| Author: | Dave Rickard [ Tue Jan 16, 2007 2:35 am ] |
| Post subject: | |
I want to try a pearl purfling on the sound board of my current project. Stew Mac has a laminate called "Abalam". Has anyone used this? I've done some inlay work before and think I'm up for it. I plan on getting the no stick filler strip. I seem to remember reading some where that the pearl strips are broke into short peices to make the curves, but that doesn't sound right to me. Do you guys have any suggestions? |
|
| Author: | Dave Rector [ Tue Jan 16, 2007 3:30 am ] |
| Post subject: | |
Dave, I have used the abalam for purfs before and recommend the filler strips as well. I just glued everything up with the filler strips in place and when dry (next day) I yanked out the fillers and started poking the abalam in the slot. I used all straight strips and broke them to fit the curves as I went. Using an old butter knife or a small hardwood block make it a little easier to push the abalam into the slots as you go. |
|
| Author: | Bruce Dickey [ Tue Jan 16, 2007 3:45 am ] |
| Post subject: | |
Thanks Dave, and Dave, I'm getting ready to top one with pearl. I'm using the "other" pearl, so a comparision of how it goes would be of interest. I'll let you know how mine turns out too. Bruce |
|
| Author: | af_one [ Tue Jan 16, 2007 4:01 am ] |
| Post subject: | |
Good topic--when you break the pieces to curve, how do you ensure the correct angle as as to not leave gaps??? |
|
| Author: | Barry Daniels [ Tue Jan 16, 2007 4:09 am ] |
| Post subject: | |
The broken ablam pearl doesn't leave a gap. It sort of breaks at different points in the layers so there is no visible gap. The only gaps will be at the ends of the pieces, and you can use a file or sanding stick to make those match up. |
|
| Author: | csullivan [ Tue Jan 16, 2007 4:23 am ] |
| Post subject: | |
Hi Dave, I have used the filler strips to create a channel for the pearl, but I shaped each piece to fit the inner and outer curves, squared off the ends with a sanding block and butted each piece to the next. I now glue in the inner strip (like B/W/B purfling) and shape each piece of pearl to fit against it, leaving the outer curve rough cut and slightly oversize. I carefully butt each piece to the next. Once all the pearl pieces are glued in I run my binding router jig (Williams-type) around to true up the outer curve of the pearl. You can use either Ablam or solid shell, but in this application the Ablam tends to give a more consistent color/look over such a large area. This is just what works for me. Craig S. |
|
| Author: | SteveCourtright [ Tue Jan 16, 2007 7:10 am ] |
| Post subject: | |
If memory serves, be careful when you are sanding the Ablam. Sanding too much can change the look if you sand too deeply. I think that the shiny part is not very thick. |
|
| Author: | matt jacobs [ Tue Jan 16, 2007 8:02 am ] |
| Post subject: | |
Dave, I do it like Dave Rector says. Abalam is a breeze and you can use all straight strips, unless you have a horrible gap between pieces you won't see the breaks. |
|
| Author: | Steve Kinnaird [ Tue Jan 16, 2007 9:51 am ] |
| Post subject: | |
Dave--what everyone else said. When I first tried this, I was told that the pearl is "self-mitering". Just break it, they said, and it'll all work out fine. My carpentry brain couldn't get around that concept, so I just had to try it. And you know, "they" were right. Well, for the most part. On gentle curves, the breaks will be all but invisible. On more severe curves, you can try breaking the piece, and if the gap is too great, a little file work makes it all right. But with black purfling (of some sort) either side of the pearl, and with super glue binding the whole sandwich together, it's amazing how fluid those individual pieces end up looking. Once you try it, you'll see how easy it is. Good luck, Steve |
|
| Author: | TonyKarol [ Tue Jan 16, 2007 10:46 am ] |
| Post subject: | |
I and a couple students did our firsts a coupel years back with just straight pieces - I now recommend to use a 70/30 split of straight and radiused (soundhole arc is fine) ot do the job - its a must to have some curved on tighter cutaways, and it helps greatly on the upper bout and waist area. |
|
| Author: | JJ Donohue [ Tue Jan 16, 2007 12:23 pm ] |
| Post subject: | |
Dave...I've used both products. While the Abalam is slightly easier to install, Steve is correct about excess sanding. Having used the real stuff it has a significantly richer look IMO. Whichever way you go it will look great! |
|
| Author: | Alan Carruth [ Wed Jan 17, 2007 9:15 am ] |
| Post subject: | |
I prefer the look of solid shell as well. The most time consuming part of the job, I found, was matching the pieces up to begin with. On my first, I just grabbed the next piece in the pile and slapped it in, and that's what it looked like in the end. I thought that doing it at random would maximise the 'sparkle', as there would be a lot of difference between adjascent pieces. You get a lot of sparkle, alright, but you also see all the joints, and it looks haphazard. These days I dump all the strips out on the bench top, and put a few strips of double stick tape on a piece of plywood. I pick up one strip of shell, and try to find the one that matches best with it at one end. I mark the left hand ends of those two strips with a 'Sharpie', and stick the first one in the upper left corner of the double stick tape. Then I find the best match for the right hand end of the second strip, and, when found, mark it and 'archive' the second one. Keep marking and sticking until you've got a bit more than enough strips laid out to do the whole edge. It's really handy to have more strips on hand than you're going to need; some of them will be nearly impossible to match. Those will be useful next time, of course. As you put them in you go in the same order. You really have to spend some time at this: the pieces will look different in different lights and different angles, and is can be tough sometimes to get a close match. Once in a while I've gone back a few strips and started over to get around a dead end. In the end, the 'sparkle quotient' is the same, it just flows better. Ablam does change appearance if you sand it too deeply, and you can lose the match easily. This is less of a problem with solid shell of most sorts, IMO. |
|
| Author: | WalterK [ Wed Jan 17, 2007 9:32 am ] |
| Post subject: | |
real mop |
|
| Author: | Dave Rickard [ Thu Jan 18, 2007 1:26 am ] |
| Post subject: | |
Thanks for all your input. Before I order, who do you all consider to be the best source for pearl? |
|
| Author: | Dave Anderson [ Thu Jan 18, 2007 1:32 am ] |
| Post subject: | |
Andy DePaul has the best that I've seen. |
|
| Author: | Steve Kinnaird [ Thu Jan 18, 2007 6:04 am ] |
| Post subject: | |
Dave, I've been pleased with Andy as well. He'll color-match for you if asked politely! Steve |
|
| Author: | Dave Rector [ Thu Jan 18, 2007 6:25 am ] |
| Post subject: | |
Andy is a great guy and I always recommend him. Don't call him if you are looking for abalam though, he doesn't carry anything but the real stuff. |
|
| Author: | Alan Carruth [ Thu Jan 18, 2007 7:01 am ] |
| Post subject: | |
I've been happy with the products and service I've gotten from Rescue Pearl. |
|
| Author: | 1bordeaux [ Sat Jan 20, 2007 2:27 am ] |
| Post subject: | |
Dave, All great info in this post. As for abalam, It's personal choice. If it's under a finish, abalam can be terrific. Abalam is real shell, just in .003- .005 inch veneer feathers pressed / glued together. There are many posts on the pros- cons of abalam vs. solid shell. I often use a small spoon to break the shell as it's fed into the channel, and wick a bit of cyano in every few inches, making sure not to over do the glue! With the abalam, sometimes the veneer will separate horizontally when you break it, so you need to watch out for missing pieces in the slot prior to glue up. (Solid shell can also fracture, sometimes called shaling, which is just separation of shell sections on natural "fault lines" , usually at a 45 degree angle from the flat surface!) Alan brings up a crucial point: matching the shell. I clear the bench when doing this and lay out the shell with a good light souce on it. If using "solid shell", I use a shallow pan filled with water, and put all the blanks in it, checking both sides and orientation for best color and refraction. This allows the best match as you work around the borders. Sometimes, I'll just use accelerator, or zip kick, to spray the shell to quickly check color without dealing with the water method. I too will sometimes file segments, depending on the length of the piece and fit, particularly on tighter curves. The nice thing about using abalones is the changing color allows slight gaps to fill in with glue and appear as a subtle color shift. A mother of pearl border would require filing and fitting of every piece as it's not so forgiving. Another "trick" I use sometimes is to use a permanent marker to line the bottom and sides of the strips with the predominant shell color,(I typically use either blue or red). I would test this on scrap first to be sure the color doesn't bleed into the surrounding surface when glue is applied. I'll try and post some photo examples once the OLF web site is repaired. Suppliers: I use several, including MOP supplies in Australia, Duke of Pearl, ( whom supplies rescue pearl), and Andy DePaule. Some may have minimum $ rates, so check each as necessary! Good luck! Paul |
|
| Author: | peterm [ Sat Jan 20, 2007 9:15 am ] |
| Post subject: | |
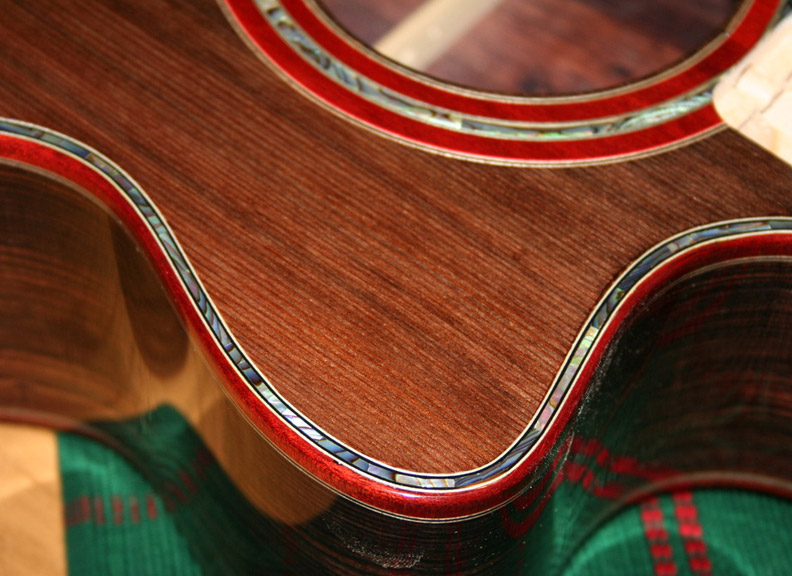
Real shell and straight pieces is what I use. Even on a tight curve you can get decent results.
|
|
| Author: | Serge Poirier [ Sat Jan 20, 2007 5:21 pm ] |
| Post subject: | |
Peter,  once again, she's just sooo gorgeous! once again, she's just sooo gorgeous!
|
|
| Page 1 of 1 | All times are UTC - 5 hours |
| Powered by phpBB® Forum Software © phpBB Group http://www.phpbb.com/ |
|