Official Luthiers Forum! http://w-ww.luthiersforum.com/forum/ |
|
That invisible top Joint... http://w-ww.luthiersforum.com/forum/viewtopic.php?f=10102&t=10791 |
Page 1 of 1 |
Author: | Irwin R [ Wed Feb 07, 2007 1:29 am ] |
Post subject: | |
I am wondering if there is a secret to obtaining the invisible joint? I have just done 2 but both seem dicoloured and somewhat evident..my first 
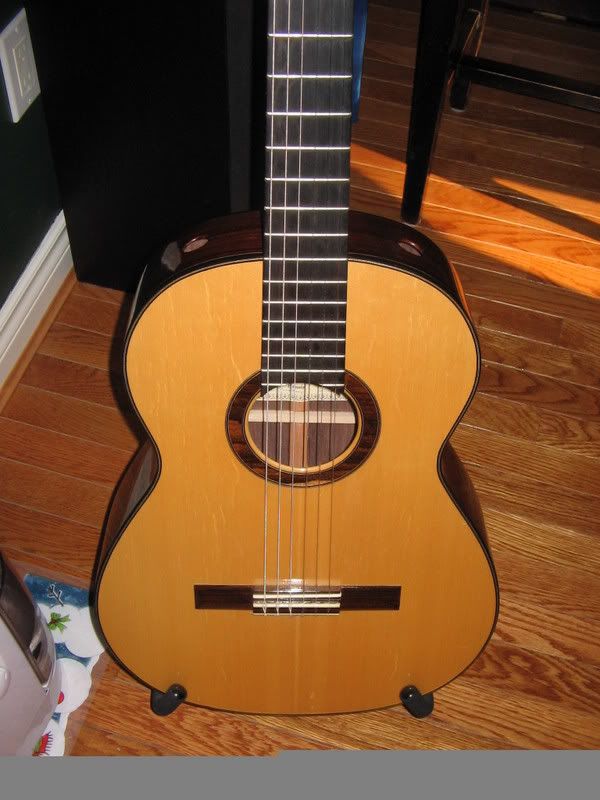
This seem is very evident, the guitar was made 5 years ago and is holding together pretty well. At first I wondered if the wood just happened yo be a little lighter where it was jointed..it still bothers me every time I look at it but now #2 two also shows some discolouration within an inch of the seem.(not the pencil line but the shaded area.. ...the joint Any theories...thanks
|
Author: | JJ Donohue [ Wed Feb 07, 2007 1:35 am ] |
Post subject: | |
What glue was used? |
Author: | Irwin R [ Wed Feb 07, 2007 1:41 am ] |
Post subject: | |
[QUOTE=JJ Donohue]What glue was used?[/QUOTE] Hey JJ, I can't remember the first, it was on a course and everyone elses seemed Ok...the second was Tite-bond original...
|
Author: | Irwin R [ Wed Feb 07, 2007 1:46 am ] |
Post subject: | |
Thanks Hesh.... I just jointed with my plane, but I will in future keep your hints in mind ..I will probably inspect the wood a little closer and step back and see if there appears a change in colour before I glue. Could glue be a factor as JJ asks?.. |
Author: | LanceK [ Wed Feb 07, 2007 1:48 am ] |
Post subject: | |
I've had stuff like this appear after its been glued up and I start thinning it down. The color difference becomes more visible as you surface it. |
Author: | Dave Rector [ Wed Feb 07, 2007 2:16 am ] |
Post subject: | |
[QUOTE=Hesh1956] One day I looked really close at the joint area and noticed that the frequency of gain lines was different in that area too adding to the slightly different look.[/QUOTE] I noticed the same thing as Hesh. If you are careful when joining the pieces together you can plane away one of the darker grain lines on one side and end up with a match that looks quite a bit better. In other words, before you glue them together you have a dark grain line on one half and a light line on the other. Makes the grain pattern look more consistant as it goes across the top. Be careful though, I joined one like that and had a devil of a time finding the centerline again. ![]() I now notch the top and bottom corners so it is easy to find center again. |
Author: | JJ Donohue [ Wed Feb 07, 2007 2:17 am ] |
Post subject: | |
Irwin...I'm not so sure about glue being the cause. I was just wondering whether CA might have been used as a repair. In that case it might have been possible for the thin CA to absorb and show a discoloration. I just looked at 4 of mine that I recently finished and I can't see what you're seeing so I have no clue. The adhesive question was just a thought that there might be some areas along the joint that could be more "absorbant" than the rest of the surface. Those areas might have picked up more shellac or glue or whatever might have been applied. Of course, this is purely conjecture. |
Author: | Howard Klepper [ Wed Feb 07, 2007 5:24 am ] |
Post subject: | |
I have noticed darkening around the joint with red spruce, and not with any other top wood. It extends about 1/4" on either side of the join line. Anyone else find red spruce especially prone to this? |
Author: | charliewood [ Wed Feb 07, 2007 5:41 am ] |
Post subject: | |
Ive nothing to add but GO LEAFS!! Hopefully the Canucks will meet you in the Final this year! Nice guitars - very sweet - I wouldnt be disappointed with them if I were you - be proud! Cheers Chariewood |
Author: | Wade Sylvester [ Wed Feb 07, 2007 6:27 am ] |
Post subject: | |
Irwin, Sometimes taking every precaution you can think of can help make a tight glue joint. I like to start with a basic thickness sanding to get the plates flat and the same thickness. Mark the grain ends of your plates with circles and exes so you can find your book-matched faces easily. Take the minimum material off the matched face surfaces so the symmetry is still visible. Plan your joint surface to fallow the grain line as closely as possible. I use a sharp,long plain to shoot the glue surface and do a candle check to look for gaps. I use a florescent lamp and set it on the floor propped up against the wall to candle check. I keep shooting until I get it absolutely tight. Also, I would do all these steps the same day. I would not, say, thickness the plates and then leave them to glue up later. Granted this may not work with all top woods but it made my last few builds fairly clean. Good luck, Nice instruments BTW. Wade |
Author: | Bob Garrish [ Wed Feb 07, 2007 7:15 am ] |
Post subject: | |
I've gotten beautiful (ie: invisible) lines on my jointer and trust it more than a hand plane (at least in my hands) as it has no tendency to 'follow' the wood. It does require equal caution and tool setup to get a great joint on a machine, though. Wade's note about making sure the glueup happens immediately after jointing is sound advice. I've seen pieces move overnight, even just the littlest bit, and now I always glue joints immediately after jointing. |
Author: | tippie53 [ Wed Feb 07, 2007 9:05 am ] |
Post subject: | |
Getting a joint perfect is an art and one that will come with practice. I use a jointer to get it close then use a granite plate to perfect it. A granite surface plate is flat to within .0005 . The jointer can get me to about .010. Since I have used the plate I love making joints. john hall blues creek guitars |
Author: | peterm [ Wed Feb 07, 2007 3:11 pm ] |
Post subject: | |
I use a jointer and glue right away with LMI white and my joints are pretty clean. As a matter of fact I have missed a few center lines and ruined a couple of tops cause I forgot to mark the center prior to gluing... ![]() |
Author: | John How [ Wed Feb 07, 2007 3:12 pm ] |
Post subject: | |
[QUOTE=Hesh1956] John how do you use the surface plate for this - attach sand paper to it and sand the two halves edgs against that? Thanks![/QUOTE] Hi Hesh, I do pretty much as John Mayes does. First I look at the top and see if there are any color fluctuations near where the joint will be and try to remove the discolored wood if I can. I also use a straight edge and mark a line down the grin to make sure my center seem is parallel to the grain. Then I use a jointer or sometimes just the table saw and then a granite plate with sandpaper on it. I recently bought a new plane to try this but haven't finished setting it up yet. Sometimes it's easy to get a joint and sometimes it's not but persistance pays dividends here. Light check your joint and keep going until you get it right and tight. Also don't be in a hurry to surface the top or back. Let it sit for a day or two to make sure the glue completely cures and has done any srinking that it may do or it might shrink back into the joint and cause a line after you have it surfaced. |
Author: | John How [ Wed Feb 07, 2007 3:15 pm ] |
Post subject: | |
[QUOTE=Hesh1956] John how [/QUOTE] Hey Hesh, I just realized that you were asking John Mayes a question inshead of me, Sorry. Well there you have my method anyway ![]() ![]() |
Author: | Kim [ Wed Feb 07, 2007 7:23 pm ] |
Post subject: | |
Folks, I have been doing a few test runs and had very good results by placing a well tuned Stanley No6 with freshly honed blade onto it's side and then using those quick clamps with the rubber jaw caps which protect the ductile cast of the plane from damage, I clamp the plane securely to a piece of MDF. This piece of MDF is a little wider than the plate halves plus the plane when clamped in position and it is a little longer than the overall length of the plates themselves. I then place the plates directly onto a smaller piece of MDF that is just a little narrower than the plates are wide. This smaller piece of MDF is used as a kind of sled that rides upon the larger piece to which the plane is already clamped, so it can be waxed on the bottom if desired. Holding the plates firmly to the sled piece of MDF with just a little overhang, I then push the edge of the plates along the sole of the plane. Simple and effective, this method is very quick, very easy, and very accurate. You could glue abrasive to the top of the sled piece if you wanted or add toggle clamps to hold the plates down or a fence or what ever. But the system seems to work fine in the basic form described so I see no need to make things too complexed. Cheers Kim |
Author: | Glen H [ Thu Feb 08, 2007 1:11 am ] |
Post subject: | |
One time I had a very visible glue joint and believe it was caused by my thickness sander getting gummed up slightly with glue residue. I avoid this now by using fresh sandpaper on my sander before sanding a top and making sure to pass the top through at different places so the seam is not being sanded by the same area of sandpaper. |
Author: | tippie53 [ Thu Feb 08, 2007 9:53 am ] |
Post subject: | |
I use a 120 grit PSA backed paper that is attached to the granite plate. I also use a squaring block and sand them true. This will give you a perfect joint. I use this for all my butt joints. Gives a perfect joint every time. john Hall Blues Creek Guitars |
Author: | Howard Klepper [ Thu Feb 08, 2007 1:22 pm ] |
Post subject: | |
Good thinking, Glen. That might be it. |
Page 1 of 1 | All times are UTC - 5 hours |
Powered by phpBB® Forum Software © phpBB Group http://www.phpbb.com/ |