Official Luthiers Forum!
http://w-ww.luthiersforum.com/forum/

slotted head tutorial
http://w-ww.luthiersforum.com/forum/viewtopic.php?f=10102&t=11545
Page 1 of 1

Author:  Brad Goodman [ Sat Apr 07, 2007 11:37 am ]
Post subject: 

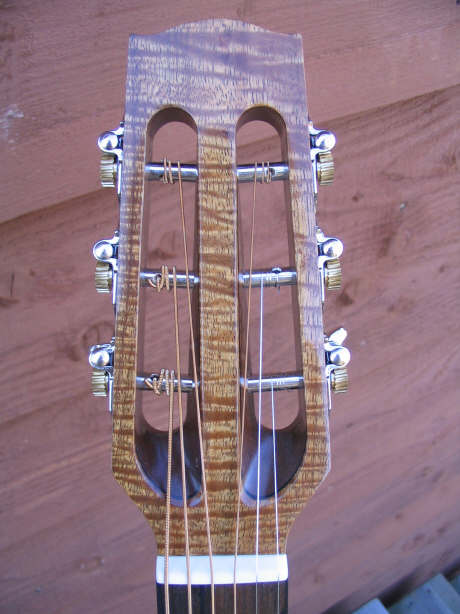
This is the way I am now doing my slotted heads with a jig I made:
The jig is pretty simple-just some scraps of wood and polycarbonate (Lexan)and a couple of toggle clamps.

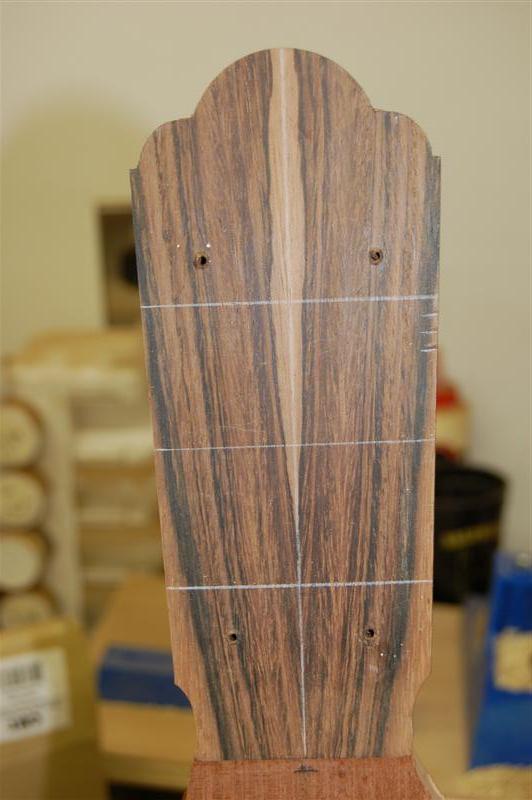
The first step is to drill the tuning machine holes.
I first mark the centers out on one side and then transfer the holes to the other side by drawing perpendicular lines across the head:


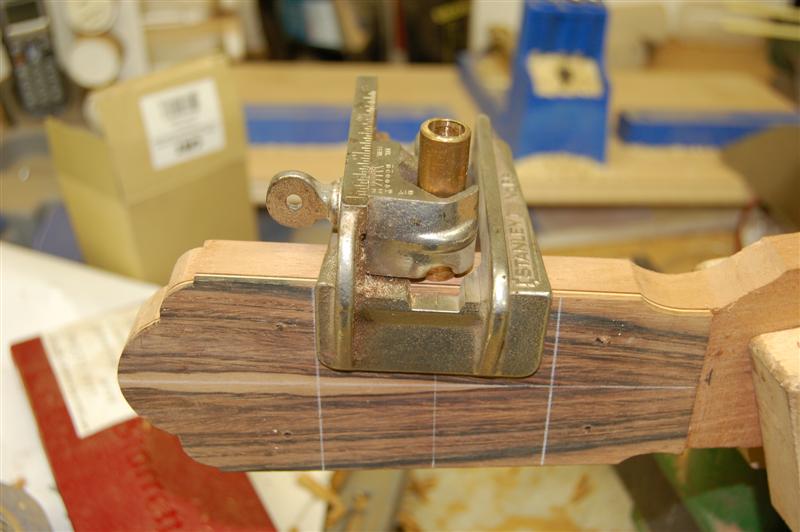
Next,I use a Stanley doweling jig to drill the holes:


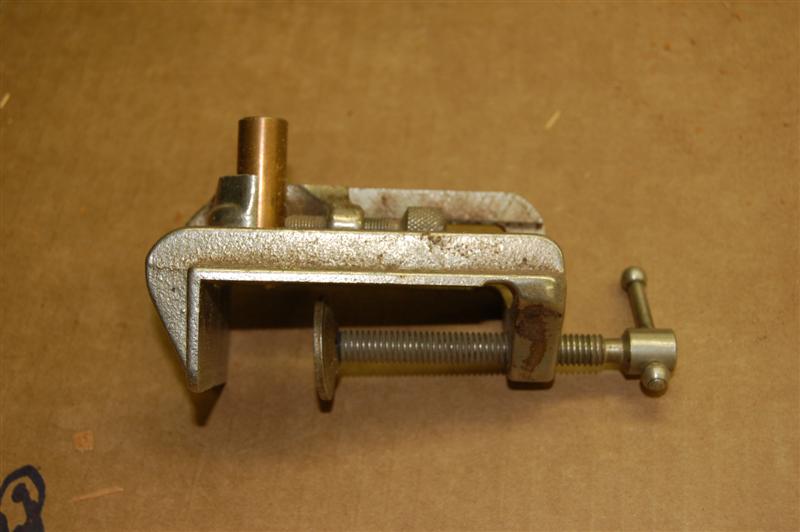
Notice that the drill bushing is a piece of brass plumbing pipe.You need to custom make a bushing in order to get the exact size drill bit for the tuning machines.
I mark the bit with tape in order to stop at the correct depth.

Then I simply line up the index mark on the jig with my reference lines and drill the holes:


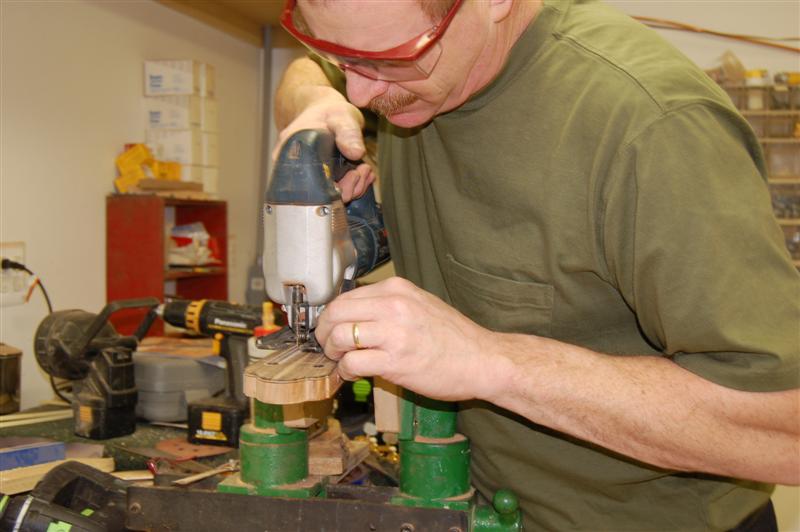
Next, I mark the slots and cut out the bulk of the wood with a jig saw:
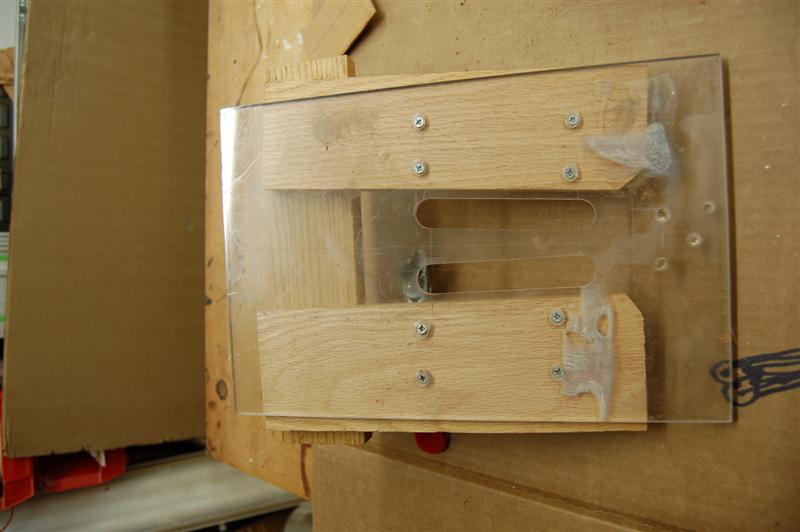
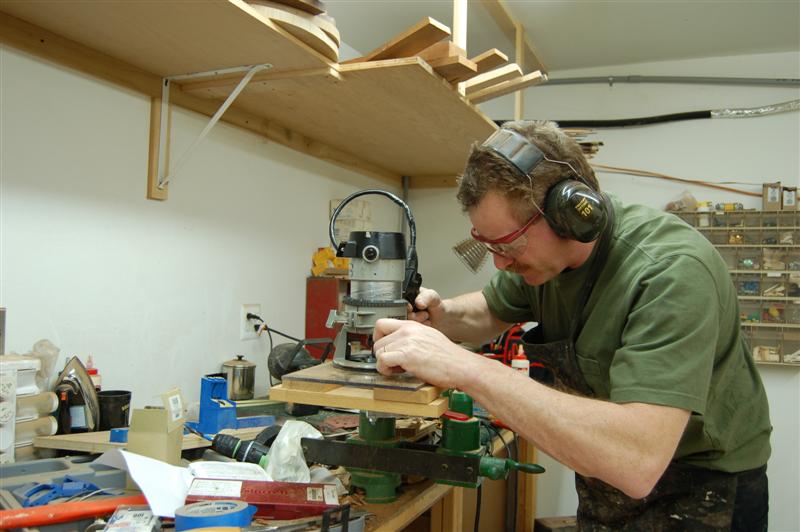


Here's the jig:


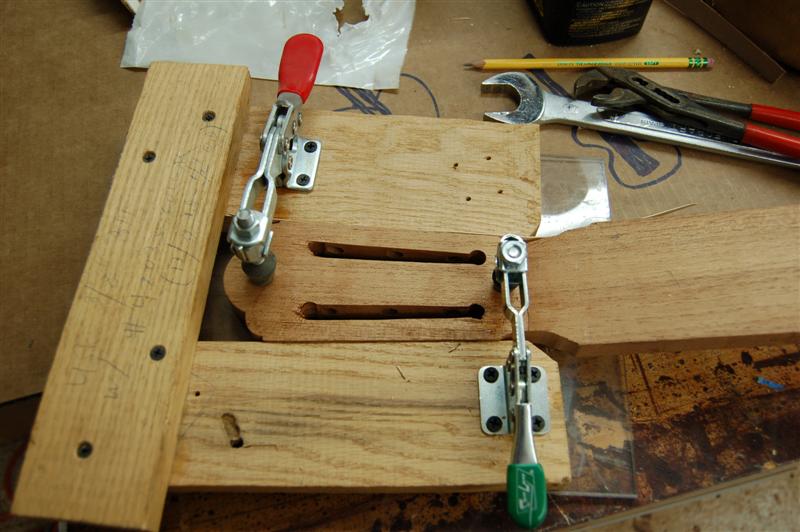
I clamp it to the head:


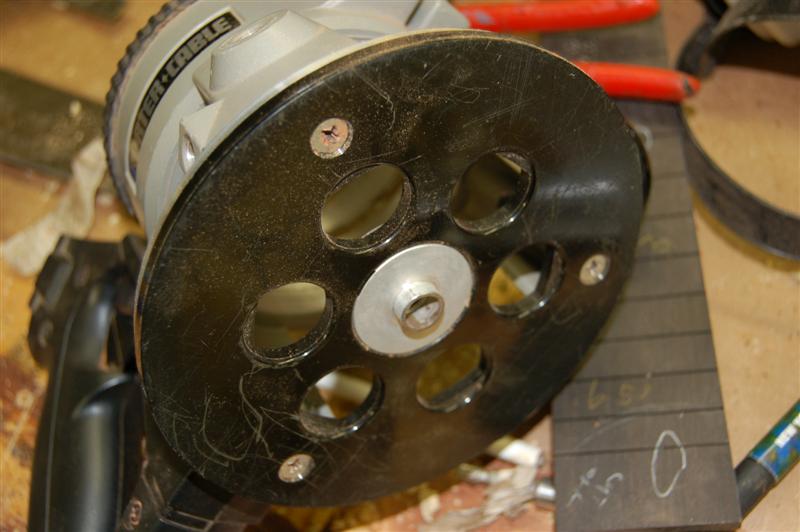
I then install the proper bushing on the router base-notice that I write down the size of the router bit and bushing on the jig for future reference.(I think the last time I used this jig was 4 years ago!)


I route the slot in 3 passes. A plunge router would be better for this,but I don't have one (yet!-I have every other tool known to man though!).


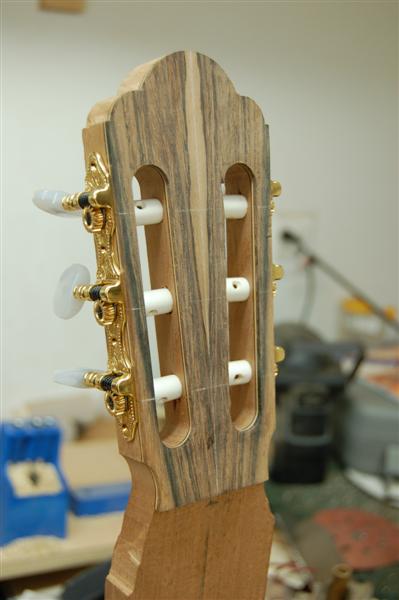
Here are the finished slots-all they need is a little clean up with some fine sandpaper.


Author:  Shane Neifer [ Sat Apr 07, 2007 12:16 pm ]
Post subject: 

AWESOME Brad! I am gonna have to get one of those Stanley jigs. They look like the cat's pajamahs!

By the way your bench is right up there with Hesh's for the clean award! It looks just like mine!

Shane

Author:  John Mayes [ Sat Apr 07, 2007 12:28 pm ]
Post subject: 

very cool pictorial brad!

Author:  Brad Goodman [ Sat Apr 07, 2007 12:32 pm ]
Post subject: 

Shane,
My Stanley doweling jig is at least fifty years old-I think they still make the same one.
Yeah,my bench was a little out of control in that shot!-I have cleaned it up since then.
It always amazes me that such beautiful finely crafted things can come out of total chaos!!

Author:  peterm [ Sat Apr 07, 2007 12:36 pm ]
Post subject: 

Awesome Brad...
Thanks for sharing!

Author:  Irwin R [ Sat Apr 07, 2007 1:47 pm ]
Post subject: 

Super Brad!..Newbe question..Is there a reason for using the Jig saw instead of just drilling the pilot holes, securing the template and routing away?...Cheers...beautiful head plate!! 


oh... Do you adjust ( or shim)the Stanley drill guide to ensure you are drilling in straight and not perpendicular to the sides of the headstock which appear tapered  ....or does that even matter??


Great tutorial...I hope to be using a slotted headstock on the OM I trying to build...tI think they look so elegent..Thanks again!!


Author:  DannyV [ Sun Apr 08, 2007 7:47 am ]
Post subject: 

That's great Brad. That's an excellent way to secure the jig to the headstock.
I thought about it briefly when I cut mine. The clamps would have been in
the way of the router so I cut it with a copeing saw and chisel. I like that
much better! Very clean and fast. Thanks!

You could probably use a flush trim bit with a jig like that if the slots were
the finished size? If you could, show us how you do the ramps on the nut
end of the slot.

Danny

Author:  davidO [ Sun Apr 08, 2007 2:08 pm ]
Post subject: 

I love the top of your bench Brad. Makes me feel much better about the state of mine.
Especially after that last set of "show me your shop" pictures! You guys do have one shop to show and one to work in right?

Author:  Brad Goodman [ Mon Apr 09, 2007 12:47 am ]
Post subject: 

Irwin,
You can drill holes to hog out the bulk of the wood insted of using the jig saw. I just find it quicker,cleaner and easier to us the jig saw-less chance of splintering.
The drill jig assures that you are perpendicular to the edge of the head (not the centerline of the head).

David,
You certainly could use a flush bit,if you make the jig the same size,that's how I cut the head shape.
I don't have any pictures of making the ramps.
I put tape on the inside of the slots amd use a rat tail rasp and file and sandpaper-takes me about 15 minutes.

Author:  Arnt Rian [ Mon Apr 09, 2007 9:35 pm ]
Post subject: 

Good stuff, thanks for the tutorial Brad!

Author:  John K [ Mon Apr 09, 2007 10:52 pm ]
Post subject: 

Great tutorial Brad. And, a really pretty headstock as well.

John

Author:  curtis [ Mon Apr 09, 2007 11:02 pm ]
Post subject: 

excellent stuff, thanks Brad!


i was shocked however by the state of your bench!?


...i mean, c'mon - where's the mug of cold tea? i thought it was manditory!? together with unpaid bills, and a huge pile of 'stuff i should really be doing instead of working'?


nice work, looking fwd to seeing the finished product


Author:  Dave Anderson [ Mon Apr 09, 2007 11:07 pm ]
Post subject: 

Thanks much Brad, very nice headstock and excellant
Tutorial!

Author:  Todd Rose [ Tue Apr 10, 2007 12:12 am ]
Post subject: 

[QUOTE=ToddStock]
One idea to prevent any lap marks from the multiple passes... I use three wraps of blue tape around the guide and make two 3/8" deep cutting passes (no hogging out the waste first). Final pass is made after I strip the tape off the guide, which gives a nice, clean, full-depth cut to final dimensions even if a 7310 or other non-recentering laminate trimmer or router is used.
[/QUOTE]

Great idea, Todd! Thanks!

I have that file, too, and love it. It's one of my most used tools for shaping details of the headstock volute and slot ramps like these:


Author:  Brad Goodman [ Tue Apr 10, 2007 12:33 am ]
Post subject: 

Todd,
Using the tape sounds like a great idea-I will have to try it next time.
I shape the ramps before attaching the fretbord so I don't have to worry about protecting it.

John,
I can't take credit for the head shape-it is a Torres shape.

Todd,
I really like your head designs.


Curtis,
Believe me,my bench can get much worse than that-when it gets filled up,I move to my other one!!
Hopeflly this guitar will be done in about two weeks and of course I will post plenty of pics.

Author:  Todd Rose [ Wed Apr 11, 2007 2:23 am ]
Post subject: 

Brad and Todd, thanks for your positive comments.

Brad, I appreciate seeing your slot routing jig. I'll have to take another look at mine with ideas from yours in mind. Thanks.

Page 1 of 1 All times are UTC - 5 hours
Powered by phpBB® Forum Software © phpBB Group
http://www.phpbb.com/