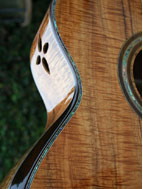
A few days ago I completed my first armrest bevel and I'm pleased with it.

http://mustapickguitars.com/45alder/1/index.htm
On the APM Forum Tim asked me how I did so I started typing, and typing, and typing...half an hour later I was done typing Step 23...
I may as well post it here to in case it's useful for anyone...
------------
Regarding the carpentry of it...here's what I did...the trick is to end up with a solid beveled surface for the veneer, and yet to have good right-angle purfling ledges.
1) With the rim assembled and in my outside mold I took a bit of mahogany neck blank and traced the outline of the inner surface of the side side in the area that was to become the bevel onto the neck blank. Then I sanded cut and sanded the neck blank into the shape of the side so that it matched the shape of the side.
2) On a belt sander, sand away the the side to a nice smooth graceful line that looks right to you.
3) The edge where you sanded will be about 10 degrees off square relative to the side. This edge is going to serve as your purfling ledge...so use a scraper to square it.
4) Put the profiled piece of neck-blank-becoming-solid-lining back where it was, and, with a pencil, trace the profile of the sanded out side onto the mahogany lining.
5) Doing your best to maintain a steady angle for the bevel, use a belt sander (I have an edge sander) to sand to the line. If your traced pencil line of the side profile is smooth and your hand is steady with respect to the angle of the bevel your sanding in...you'll naturally get a nice smooth curve for the top as well. Just keep an eye on that as you're going along.
6) Now you have a smooth curve on the top-side of your mahogany reinforcement that will establish the shape of the top. With a pencil, draw a line offset from this 1/4" in. This is the ledge where your top purfling and top will glue onto. Cut and sand to that line. Make the cut perpendicular to the top (parallel to the side) so that it's easier to clamp to the side.
8) Sand the side-height of your reinforcement to whatever makes sense to you, (perhaps no less than 3/16" below the lowest point of the bevel).
9) Glue-clamp the side reinforcement onto the side. Glue the kerfing/lining on elsewhere as you normally do.
10) Hog off all that unecessary wood from the part of the reinforcement that's inside the guitar that was left square for clamping purposes.
11) Trace the profile of the kerfing-lining and bevel reinforcement onto the underside of your top...very precisely.
12) Brace the top and prepare it for assembly to the rim. I did not tuck the x-brace into the bevel reinforcement...I let it thin down to nothing at that juncture.
At this point, the *exact* location of the top needs to be nailed down without margin for error so the next two steps ensure that it will glue down without the least uncertainty...
13) With the top in it's exact place, drill two holes down through the top and into the headblock. Use toothpicks that can stick into the headblock and up through the top to lock in this location.
14) Glue three tiny pieces of thin veneer onto the underside of the top so that the bevel reinforcement can rest against them for a precise backstop while gluing.
15) Before gluing the top into the rim, very slowly and carefully sand away the area of the top at the bevel so that it's line matches the presented by the line presented by the top of the reinforcement. Continue sanding to this contour until enough room is left that presents a ledge for your top-side purfling to rest on.
16) Glue your top on oh-so-precisely so that the purfling ledge you've left for the top is lined up just right.
17) After you've glued on the back, rout your binding and purfling channels in the usual way so that the channels disappear into the void left by the bevel platform.
18) Trim-sand your binding at the proper sharp angle so that it will intersect properly bevel veneer. It's hard to talk about clearly, but not so hard to visualize when you're standing there playing with the ledges and purfling and the binding and making things fit.
19) Glue the binding-purfling on in the usual way. You'll be starting at the tailblock with just a short piece of binding that quickly dies away. In the area of the bevel you'll need to continue glueing on the purfling but without the binding there to act as a clamping call. I found that I could easily just "massage" it into place as the wood glue tacked up. Once your past the bevel, you just continue with the other side with the binding that you've prepared.
20) Thin your venner for the bevel. I found that with koa I could thin it to .060". This was thin enough so that it flexible enough to just flop in without any prebending, but thick enough to fill the space left for bevel.
20) This is slightly tedious...you've got to shape that bevel venner so that it just fits inside the area left between the binding, with the backside of it beveled to rest against the the side and top purfles. In order to arrive at the approximate shape for my venner I put a piece of butcher paper over the area and used a pencil to creating a rubbing shape of the bevel. Then a cut out a piece of construction paper a bit oversize to this shape. Having shaped the construction paper, just a wee bit oversized, I then cut out a piece of practice veneer and got it just so....lots of patience, a belt sander, a spindle sander, one inch at a time. Then I traced this outline on my final piece of veneer, but it a bit oversized and repeated. I won't need to do the practice step next time, I just didn't want to learn on a pretty piece of koa.
21) Glue in the veneer with wood glue, holding it down with masking tape the way you ordinarily would for binding.
22) Wait an hour...remove the tape...sand things flush.
23) Pat yourself on the back, show your girlfriend.
Gimme a ring if I didn't explain anything well.
--------------
Cheers,
Matt :)


 You even found some Zooty fabric to photograph it on!