Official Luthiers Forum!
http://w-ww.luthiersforum.com/forum/

Kerfing breakage
http://w-ww.luthiersforum.com/forum/viewtopic.php?f=10102&t=11925
Page 1 of 1

Author:  Chansen [ Sun May 06, 2007 4:54 pm ]
Post subject: 

When the kerfing is installed around the rim, is it imperative that it is one continuous piece? I was showing a friend all the pieces that will one day be a guitar and he picked up a kerfing strip to take a closer look and comment on it's flexibility. Right about the time he said "its just like rubber" it snapped.  I'm not at all concerned because its cheap and I won't be to that step for a while anyway, but do I need to get some more or do broken pieces work just fine as well.
Christian


Author:  Kim [ Sun May 06, 2007 5:30 pm ]
Post subject: 

Should not matter too much Christian, just use it up where you can. You could always build your own kerfing jig and make as much as you want from scrap.


HERE is a link to a tutorial I done for the Ksled some time back.

Did anyone ever make this besides me and Daniel????

Anyhow, enjoy.

Cheers

Kim

Author:  bob_connor [ Sun May 06, 2007 5:45 pm ]
Post subject: 

You should be fine using short lengths Christian.

I would try and make the the linings that join the back to the sides one continuous length, as much of it is visible through the sound hole. Purely a cosmetic thing.

A lot of places sell the linings only long enough to get half way around the lower bout. So you've got a join there anyway.

I seem to remember reading an article which had a pic of an old Martin where the linings were individual pieces of wood.

Kim, we ended up not buiding your jig (as magnificent as the engineering and instructions were) You'd laugh your head off if you saw what we were using.

Cheers

Author:  Kim [ Sun May 06, 2007 6:10 pm ]
Post subject: 

[QUOTE=bob_connor]
I seem to remember reading an article which had a pic of an old Martin where the linings were individual pieces of wood.

Cheers
[/QUOTE]

Yeah I think they are called tentelons (spl) or what ever HERE is an image of an early Martin pictured at Frets.com with single block.

Should try the jig Bob, it works a treat

Cheers

Kim

Author:  Jim Kirby [ Sun May 06, 2007 9:04 pm ]
Post subject: 

The tentalones are feasible with HHG - you need to be able to just press them in place and then move on to the next one. There is no clamp time involved, and they are usually put in with the guitar sides and top already assembled on a workboard (solera). The guitar back gets a different lining (usually solid on a classical, but reverse or regular kerfing works fine too.

Author:  John Mayes [ Sun May 06, 2007 9:47 pm ]
Post subject: 

if it is standard kerfing you an can make the seam between the two pretty
dang seamless. If it is reverse kerfing then it is pretty much impossible to
join two pieces without the joint being seen....I know I tried..

Now I just go with one continuous piece...

Author:  LanceK [ Sun May 06, 2007 10:06 pm ]
Post subject: 

Yeah! What Hesh said!
I got that tip years ago from Kathy Wingert, (incredible guitar builder she is!) It works well with the reverse kerf'ed style strips, no need to do it with the traditional style.

Author:  bob_connor [ Sun May 06, 2007 11:26 pm ]
Post subject: 

I wrap wet, reversed kerfing in aluminium foil and throw it on the side bender for a few minutes.

Remove the foil, then clamp it on to the sides while it is still hot and let it cool.

Then glue it.

Haven't had a breakage since doing it this way.

We tried glueing while it was still hot once but even with Dave and I both going flat stick the Titebond was drying too quickly.

Cheers


Author:  Mattia Valente [ Mon May 07, 2007 12:46 am ]
Post subject: 

Kim: it's on my ever-growing 'jigs I want to build' list, but I haven't gotten around to it yet. Thickness sander and binding router setup come first!

Author:  Bill Greene [ Mon May 07, 2007 1:42 am ]
Post subject: 

I take a razor (exacto knife) and have a swipe, or three, inside the kerf lines where the kerfing will fall in the tightest part of the bend. Not enough to cut through the wood, but enough to give it a bit more flex...sometimes it still breaks, but most of the time not. Just a thought.

I do like the soaking in hot water idea though.

Author:  Chansen [ Mon May 07, 2007 2:12 am ]
Post subject: 

Thanks for the tips guys, I think I'll just make sure this bit of kerfing stays on the top side of the rim. It sounds like it doesn't matter too much except for visually.
I'm a non-practicing perfectionist, so I'll probably give a valiant effort in making it look like it never happened but then give up when it doesn't work right away. 

Thanks again for all the tips! 

Author:  Barry Daniels [ Mon May 07, 2007 3:04 am ]
Post subject: 

A word of caution. Wetting wood directly before gluing with Titebond will seriously weaken the joint. I did some testing a few years ago and I quickly saw fairly dramatic results. When I dampen the kerfing to help it bend, I clamp it to the rim, let it dry overnight, and glue the next day.

Author:  Arnt Rian [ Mon May 07, 2007 11:55 am ]
Post subject: 

[QUOTE=larkim] Should not matter too much Christian, just use it up where you can. You could always build your own kerfing jig and make as much as you want from scrap.
[/QUOTE]

Here is another kerfing jig, by Bob Gleason of pegasus Guitars and ukuleles. I made a version of it; of course you need a table saw, but one saw blade is enough and it goes pretty fast.

Kerfing Jig

Author:  Kevin Gallagher [ Mon May 07, 2007 4:08 pm ]
Post subject: 

    Since I use very light Cedar kerfing, it is almost impossible to keep it in
one continuous strand along the entire length of a side, especially on the
back with its more redical arch and taper.

    I don't worry about breaks and do my best to keep the edges as close
to being butted together, but the breaks can be seen of you look closely.

    I had a customer who wanted to return a guitar once when he noticed
the breaks in the kerfing at the waist of the guitar. After explaining the
installation process and the geometry of the guitar with the various radii
being addressed in several directions, he understaood them being there
and that they didn;t affect the integrity of the guitar at all and was fine
with it.

Regards,
Kevin Gallagher/Omega Guitars

Author:  Bob Long [ Mon May 07, 2007 4:41 pm ]
Post subject: 

[QUOTE=larkim]
HERE is a link to a tutorial I done for the Ksled some time back.

Did anyone ever make this besides me and Daniel????


Kim[/QUOTE]

Kim, I did make a ksled. I made it complete with the "self-indexing" device. It was really fun to build. However, I have since gone to indexing it manually. doing it by hand seems work more reliably for me. (just like a lot of thing in my life)

Long

Author:  JJ Donohue [ Mon May 07, 2007 9:59 pm ]
Post subject: 

Similar to Bob Connor...I spray all 4 pieces of reversed kerfed liners after wrapping in craft paper and bend in the Fox bender at 250*. Make sure they are oriented properly. Works like a charm.


Author:  Dave White [ Mon May 07, 2007 10:16 pm ]
Post subject: 

In my current build using my own home made Spanish cedar reverse kerf linings, I taped the 4 sets together, gave them a light spritzing, covered them with that useful brown paper that Stew Mac wraps things in and bent them to shape in the Fox-bender. You don't have to leave them in to set and I took them out after the blanket cooled. Perfect fit.

Just like bindings though you have to remember to set to give you the right fit for upper and lower bout, top and bottom.

Author:  Kevin Gallagher [ Mon May 07, 2007 11:28 pm ]
Post subject: 

    I think you'll find, too, that the taper and complexed radii combinations
of the body will make it necessary to have a few separations if you you
want to maintain the full height of the kerfing along its who length.

    Bending them on the bender isn't necessary for me since they are
kerfed to a depth that leaves a spine of only .020". With that thin spine
and the fact that they're made in my shop from Spanish Cedar, they are
exceptionally flexible. It is impossible to bend them along their height to
accommodate the taper and radii so I use a blade to cut them as I install
them to allow them to follow the taper of the sides.

    A dread body with it easy waist and gentle bends is much easier to
avoid any separations on, but the tighter wists present in alot of
contemporary designs make it more difficult.

Regards,
Kevin Gallagher/Omega Guitars

Author:  Dave White [ Mon May 07, 2007 11:53 pm ]
Post subject: 

Kevin,

Having the kerfing the same depth all around the rim is not something that bothers me either structurally or aesthetically. I have the kerfing the full depth at the waist and keep it as high as I can on the other parts as you can get a little flex with the linings. Then I sand down to match the rims meaning it is narrower at the widest parts of the upper and lower bouts.

My guitars tend to have lots of curves in them - particularly the guitar-bouzouki I'm building at the moment that in addition to a narrow waist, has the upper bout curving round to meet the neck at the 16th fret. I can hardly ever get the lining round these bends without a break. Usually the kerfing doesn't fully break off and the join is not that obvious when you glue it up.

The lovely thing about instrument making is that everybody has their own method and they all work!! Choices, choices . . .

Author:  Kevin Gallagher [ Tue May 08, 2007 12:21 am ]
Post subject: 

Dave,

     Are you using a tapered kerfing that is wider at the glue joint areas
that contact the top and back or a kerfing that is more square with a
consistent width out to the edge away from those plates?

     I use the tapered kerfing similar to what Martin uses. but to slightly
different dimensions. Mine is 5/8" high and tapers from 5/16" wide where
it will provide the glues surfaces for the top and back down to about .
030" at the edge away from them. My kerf slots are cut to .040" wide and
are 3/16" apart. I use to cut them 1/4" apart, but found that the smaller
segments allow for much sharper bends in tight waist and cutaway areas
so they've become my default standard.

   With the taper, if I were to leave it proud and straight to allow the
radius sanding to bring it down to the sides, I'd be losing a significant
amount of width and its glue surface so I try to maintian the height for
that reason.

   You're right, though, I love seeing how many different methods and
philosophies show up on every topic of building. It's cool to see how
innovative everyone is as they experience the craft and begin to analyze
and innovate to make their instruments unique to them. Luthiers
continually amze me with their great ideas that seem to have no end.

    Your work is beautiful and I look forward to being able to play some of
your instruments in the future. I'm sure that they sound great.

Thanks,
Kevin Gallagher/Omega Guitars

Author:  Dave White [ Tue May 08, 2007 12:31 am ]
Post subject: 

Kevin,

You are very kind about my building and it's mutual - I'd love to play some of yours, your reputation is awesome.

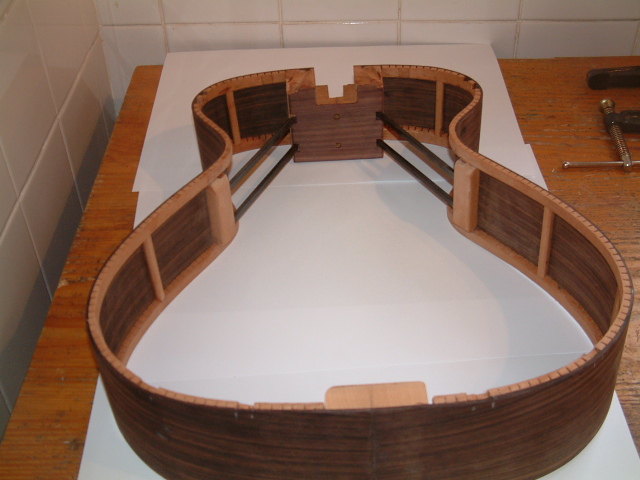
I use reverse kerf-lining which is pretty much a constant width apart from the "quadrant" rebate at the bottom so the gluing width remains constant as it is sanded down to meet the rims. I like the look and the stiffness I get with this kerfing. Plus I can use the quadrant part to inlet my side braces and the braces I use to support the cf rods for my flying buttress braces. This makes for a very stiff rim-set like this on my current guitar-bouzouki build:


Page 1 of 1 All times are UTC - 5 hours
Powered by phpBB® Forum Software © phpBB Group
http://www.phpbb.com/