Official Luthiers Forum! http://w-ww.luthiersforum.com/forum/ |
|
Laskin inspired Armrest/Ribrest tutorial http://w-ww.luthiersforum.com/forum/viewtopic.php?f=10102&t=12468 |
Page 1 of 2 |
Author: | TonyKarol [ Fri Jun 15, 2007 1:06 pm ] |
Post subject: | |
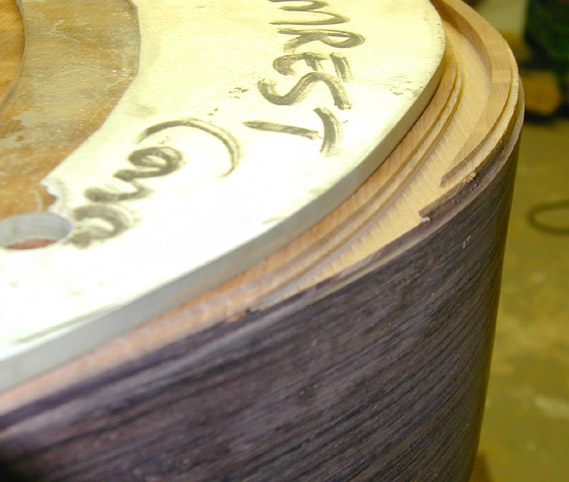
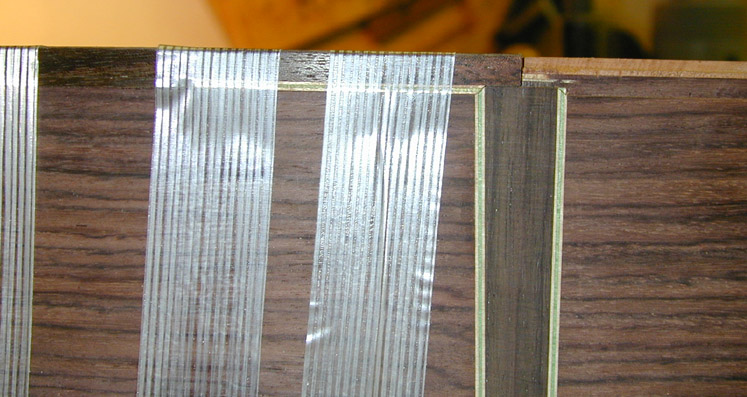
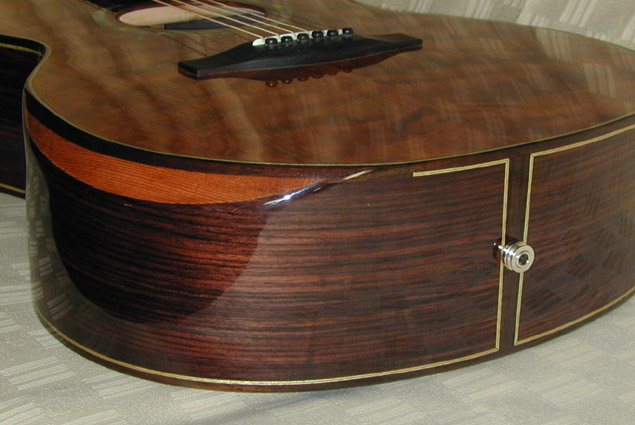
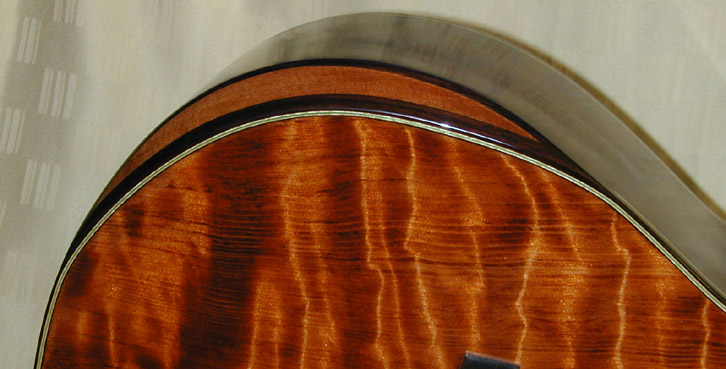
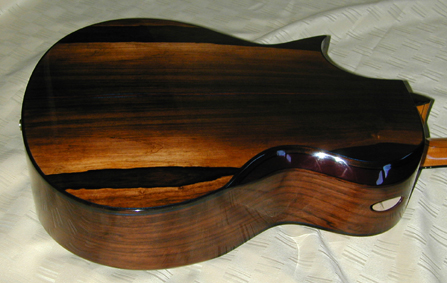
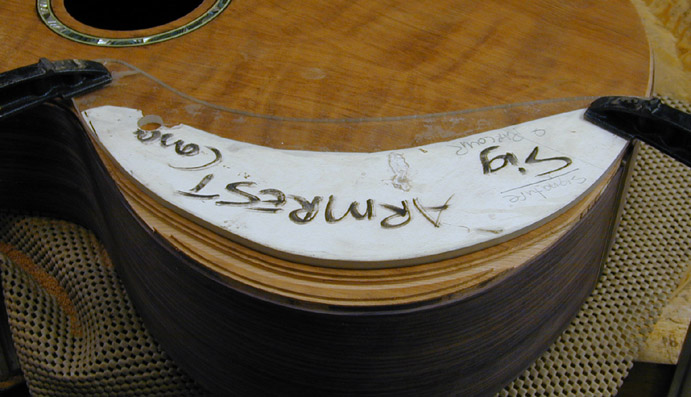
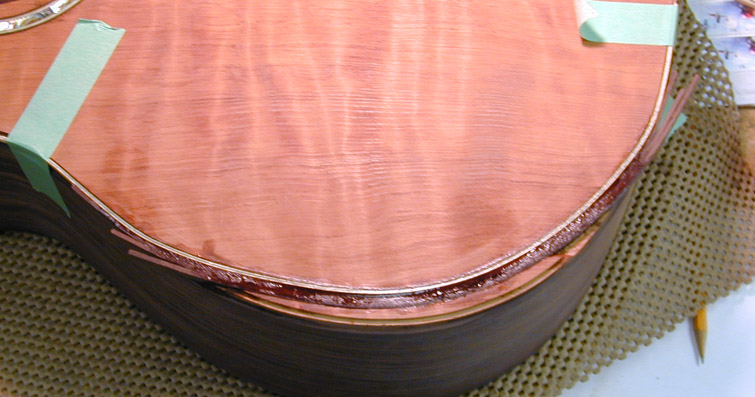
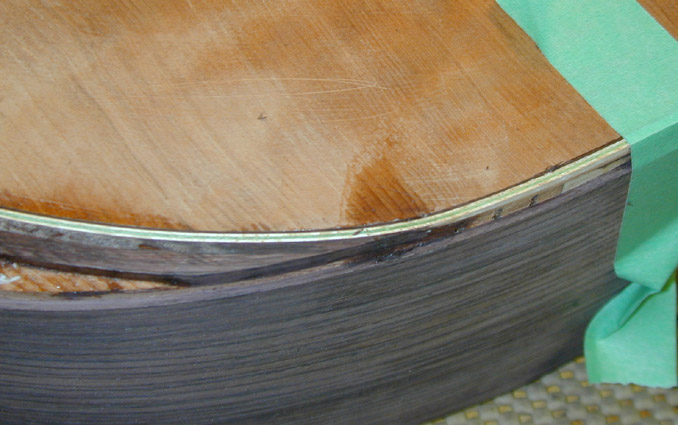
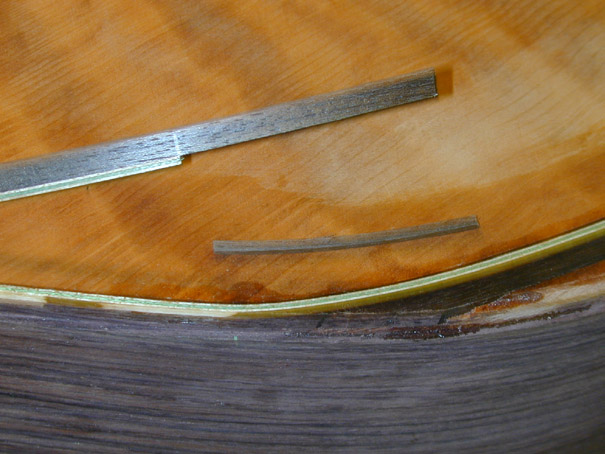
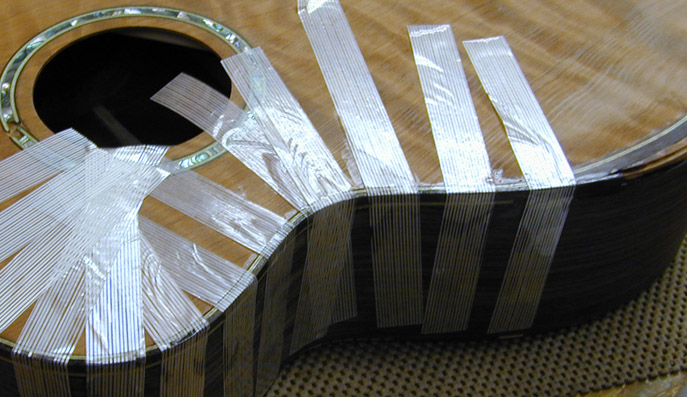
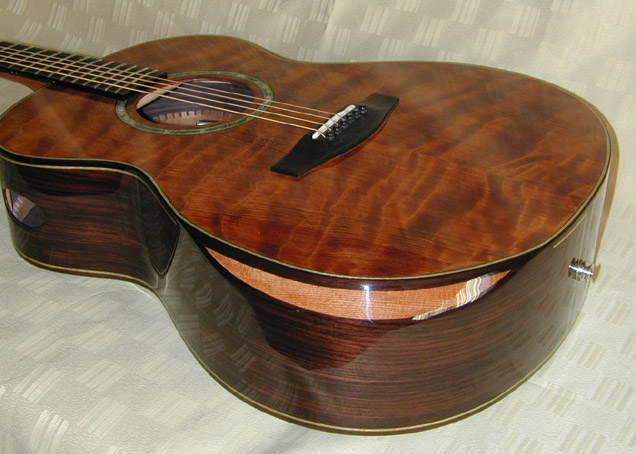
Hi all, As I was mentioning in the other thread, here is a small tutorial on making an armrest or ribrest in a guitar, as I now do it. The original inspiration for these was of course Grit Laskin, and in an early Guitarmaker which I have, he authored a short description of how he does it. There was only a drawing of the rest's cross section, which I have also redrawn for the way I do them at the end - beyond that simple drawing, I had to figure it out on my own. So here goes .... This is an armrest being installed into a EI rw and culry redwood top Karol Signature style - I have templates for the various lower bout shapes which correspond to the armrest shapes I make. I will assume that you have chosen a shape and installed the actual block into the gutiar, and the box is now closed and ready to be bound. For those unfamiliar with putting the block in, check Tracy's Luthier Supply website, he has a page there with an older tutorial I did o the MIMF, and it shows the internals of the block - I didnt take pix of this one (sorry). So, the first thing to be done once the box is closed, is to route all the top binding and purfling channels - this will usually expose the ends of the internal rest block, so you will know where to place you template. If not, you can always reach inside and check by hand where the ends are (I also ALWAYS make a paper tracing of the block before I glue it in, then you know exactly what he shape is) The template is 1/4 plexi, and has been curved to the shape of the binding/purfling ledge of the rest (it could be either an armrest or ribrst, the procedure is the same), which I have sitting about 1/4 inch in from the inside edge of the internal block - use the template to give you the rough dimensions of the block, adding in the gluing surfaces - you obviously dont want to route thru the top !!! So, place your template in the correct location, you can see the ledges for the top are already routed .. Once you have it clamped in place, you are ready to route the armrest binding and purf ledges - I use a lam trimmer, and template guides to give me the offsets I need, depending on the binding/purfling scheme. You may need to route the ledges best you can, and then trim up the purf ledge narrower with a chisel if required. This scheme was pretty wide, blk/maple/green/maple, then EI rw binding, so it worked out pretty good. I also like to bind in the same material as the sides, especially if the rest is not being blacked out (some will veneer the rest to match the binding, I have yet to do that, but that is what Ryan does). So, the purf ledge is the same as the rest of the top purf ledge in depth, the binding can be shallower than the top binding ledge, but still must go thru the top into the rest block - you want the armrest binding to transition neatly into the block, and not have a sliver of topwood showing thru, especially if the rest will be finished natural, as this one is, its a piece of redwood. You can see the grain lines of the rest piece are different in pix 2 and 3 here, from that of the top, showing how I have routed deep enough. Now you are ready to begin binding ... I used to have sharper corners at the ends of the rest, and thus the required mitres - I modded the template so that the ends are now rounded, and the top half of the purf can be one piece - no mitres required, and a smooth look. The armrest binding is done in three pieces usually to get the width, each typical binding width, pipe bent to fit the channel - route the channel for the binding slightly wider than its depth - if you dont, you will have a tough time keeping the transition line even, and still have some binding left on the top surface. So fit the purf and binding in, it needs to fit SNUG ... you may need to scrape a piece thinner to make it all fit dry, then CA it all in. Now the binding ends need to be trimmed off - but you mustnt touch the purfling - I have a dedicated lam trimmer set up for only binding ledge depth, so I use this to trim the excess off, laeving a smooth binding ledge again, just like the armrest wasnt even there ... You are almost home free ... you now need to fit the remainder of the top binding in place. Since I dont bind or use any side purfling in the rest area, I chop the binding, and then stop the side purf on that binding right where the rest starts or ends. There will be a gap the height of the side purf once the purf is removed, and this will be filled with a fillet of binding wood, salvaged from the binding cutoff that is also conveniantly bent to shape .... hopefully the pic will help the explanation Fit and glue these up, tape in place, and CA ... Now the same is done at the tail block, and if required, its also mitred into the tailwedge as this one is ... Now the binding of the rest is done, and you can carve the rest to shape. I use a block planne, rasp and sanding blocks to bring it to its final shape. Watch your angle, keep the rest about 45 degrees to the top, and once you have a smooth transition line from the rest block to the rest binding, and the corners look neat, you are DONE Carry on and finish up the rest of the binding, and then finish ... hopefully it looks like this .... Almost forgot .. here is my armrest in cross section. |
Author: | TonyKarol [ Fri Jun 15, 2007 1:10 pm ] |
Post subject: | |
For a ribrest, the procedure is exactly the same, but fitting the internal block, and then the binding and purfling, is more difficult with the extra curves involved. Carving the ribrest is also tougher as you now have a valley to contend with ... enjoy |
Author: | Steve Saville [ Fri Jun 15, 2007 4:28 pm ] |
Post subject: | |
Tony, Thank you. Great tutorial. That made it perfectly clear. I think I am going to try it soon. |
Author: | robertD [ Fri Jun 15, 2007 11:09 pm ] |
Post subject: | |
Tony, That was a fantastic tutorial! It adds a whole new look to a guitar! I really like it! When I get a little more proficient at guitar building, I will definitely give it a try! Questions please; I didn’t quite understand, When you said that one would have to contend with a valley for a ribrest. Could you explain a little more on that? Also, I'm assuming that the block for either armrest or ribrest should be carved and not bent? Thanks for sharing, Robert |
Author: | Anthony Z [ Sat Jun 16, 2007 12:19 am ] |
Post subject: | |
Tony, many thanks bro for the excellent tutorial. I know that your arm rest and rib rest have become something of a signature on your guitars. Accordingly, it is most kind of you to share your technique. |
Author: | TonyKarol [ Sat Jun 16, 2007 12:45 am ] |
Post subject: | |
Hi Robert, Yes, the rest block is carved/sanded to its internal shape before gluing in - you couldnt bend something thats this thick and wide ... As can be seen here, this is a ribrest block (and an armrest as well, but you only see the top of it) - it has a more complex set of curves to match up before gluing the block in. I glue them in square, then use a small chisel, or if its a hardwood block like curly maple or walnut, a kutzall burr in a dremel, to carve it to a 45 degree inside bevel. Then finish up the inside with sandpaper. On the curly ribrest blocks, I also sometimes like to give a quick wipe with french polish as it highlights the curl when you look at it thru the soundhole. Couple of other things of note in this body are the slanted upper back brace, to get around the florentine cut, plus the way I add blocks to the points of cutaways and at the neck joint - this one is done on the router table, the cutaway point is done with a plane. There is also the black veneer patch support for the sideport. The valley occurs on both the inside and outside of a ribrest, that is if you make the shape go completely around the waist and then over the upper bout as I do. On an armrest, you only have to contend with carving out a valley on the inside of the guitar. Here is the peak and valley on the outside of the above ribrest guitar. Yes, thats braz back and sides .... |
Author: | Dave Anderson [ Sat Jun 16, 2007 1:13 am ] |
Post subject: | |
I've never played a guitar with a rib-rest but it does look very comfortable indeed. Thanks for the great tutorial Tony.....Someday I will give it a try! |
Author: | WaddyThomson [ Sat Jun 16, 2007 1:59 am ] |
Post subject: | |
That is really beautiful work. Thanks for the tutorial. It adds a whole new dynamic to the appearance and, I assume, the comfort of playing. Very nice. |
Author: | WaddyThomson [ Sat Jun 16, 2007 2:00 am ] |
Post subject: | |
I forgot: Killer Zoot too!! |
Author: | Kelby [ Sat Jun 16, 2007 3:07 am ] |
Post subject: | |
Wow, Tony, thanks for posting this! Can you explain what you meant by the following: "especially if the rest is not being blacked out (some will veneer the rest to match the binding, I have yet to do that, but that is what Ryan does." I didn't understand what this meant. |
Author: | Kelby [ Sat Jun 16, 2007 3:51 am ] |
Post subject: | |
Tony, one more question. On the MIMF, you have a thread from 2005 in which you used a different method --- you first shaped the bevel with a chamfer bit on your router table, then used a knife and chisel to cut in the binding channels. Putting aside the cosmetic differences in the armrest, which method do you think would be easier for someone tackling an armrest for the first time. |
Author: | TonyKarol [ Sat Jun 16, 2007 4:28 am ] |
Post subject: | |
Without a doubt this way ... the channels are done with a safe and repeatable template and router, and the depth is always the same as the setting - the other way its all cut by hand, very risky - the old way took me almost two days to get the armrest completed - routing, cutting the channels and binding. With a smooth ended template, there are no mitres on the armrest itself either. Use a 1/4 inch downcut spiral, and you also get very clean ledges, no tearout. |
Author: | Sam Price [ Sat Jun 16, 2007 4:39 am ] |
Post subject: | |
Brilliant tutorial! |
Author: | charliewood [ Sat Jun 16, 2007 4:54 am ] |
Post subject: | |
Tony Amazing tutorial man, you are the man! I really wish I lived closer to you - Id for sure take your course, hell Id bug the @#$%^&* outta you until you lety me work there! Seriously though your guitars rock, and I hear they play and sound as good as they look too! you are definitely one of the best builders in Canada these days, and destined to be a Larivee or Orme one day in the future.. Thanks again! Cheers charliewood |
Author: | Kelby [ Sat Jun 16, 2007 5:20 am ] |
Post subject: | |
Tony, you have inspired me. Today I am going to remove some of the kerfing from a set of sides I have in the shop and put in an armrest. Here's the question: I am not planning to use the same wood for binding as I'm using for sides, and I'd like to veneer the armrest to match the binding. Can anyone suggest how to do that? Tony's method seems like it would not work for that --- you can't install the veneer before routing the channels, because the armrest is not shaped at that point, but you can't install the veneer after you shape the armrest, or the veneer will sit proud of the binding. Any ideas? |
Author: | TonyKarol [ Sat Jun 16, 2007 6:35 am ] |
Post subject: | |
Kelby .. if I were veneering it, I would add the veneer on last - you want to have the armrest bevel bound and sanded FLAT before gluing the veneer piece on. Make a paper template of the shape of the veneer piece you will glue on. Then you need to feather the edges of the veneer into the top binding and the side wood - it will work out fine. Search around, there are other who do this ... |
Author: | Anthony Z [ Sat Jun 16, 2007 6:36 am ] |
Post subject: | |
Dave if you ever play a large body sized flattop with an armrest it'll be hard to go back. It really is way more comfortable. After seeing this tutorial I may just have the intestenal fortitude to give it a try! |
Author: | robertD [ Sun Jun 17, 2007 12:40 am ] |
Post subject: | |
Tony, Thank you for that very detailed explanation! And, I’m with Charlewood! If I lived closer, I would be very interested in taking one of your courses also. Robert |
Author: | Chris Oliver [ Mon Jun 18, 2007 1:21 am ] |
Post subject: | |
Tony, Excellent execution. Thank you for including the profile. A picture really is worth a thousand words... especially if it is the right picture! By the way, on the photo of your model with the rib relief. Is the ebony binding continued on both sides of the rest? It seems to be. If so, did you cut the channel for that underside binding before shaving out your valley? Also, have you tried this for the armrest? thanks, chris |
Author: | Kim [ Mon Jun 18, 2007 1:31 am ] |
Post subject: | |
Thanks Tony, Huge value post as per usual. cheers Kim |
Author: | peterm [ Mon Jun 18, 2007 2:04 am ] |
Post subject: | |
Great tutorial! Thanks for sharing! |
Author: | TonyKarol [ Mon Jun 18, 2007 5:06 am ] |
Post subject: | |
Hi Chris .. no, there is no binding on the guitar's SIDE piece where a rest is , as I do them. What you are seeing is the blending in of the binding wood and the side wood, as they are the same species. |
Author: | James Ringelspaugh [ Mon Jun 18, 2007 6:09 am ] |
Post subject: | |
Thanks for the tutorial, it is much appreciated |
Author: | Chris Oliver [ Mon Jun 18, 2007 7:10 am ] |
Post subject: | |
Thanks Tony, I was about to be more impressed with what I am already really, really impressed with. I think my arm would thank me if I were able to create that type of rest. By the way, I tried you website and it seems to be currently out of service. thanks, chris |
Author: | TonyKarol [ Mon Jun 18, 2007 8:21 am ] |
Post subject: | |
Thanks Chris .. website is down - yeah, thats because I am so busy building and then posting here I forgot to pay the bill Hey, but the thickness sander is still working, they havent cut the power off yet .. |
Page 1 of 2 | All times are UTC - 5 hours |
Powered by phpBB® Forum Software © phpBB Group http://www.phpbb.com/ |