Official Luthiers Forum! http://w-ww.luthiersforum.com/forum/ |
|
neck joint http://w-ww.luthiersforum.com/forum/viewtopic.php?f=10102&t=12599 |
Page 1 of 1 |
Author: | jonhfry [ Mon Jun 25, 2007 1:52 pm ] |
Post subject: | |
Well, I took the plunge. I bought a jet 16-32, a jet 1 hp 650 cfm cannister dust collector, and a jet air filter last week. All these months of researching lead me to believe at least with jet you get your money's worth. I must say, good tooling has allowed my progress to jump forward. I don't have to scrape and plane away on a top for days, or wonder how to efficiently thin my sides. So this past weekend, I was able to thin my sides precisely and bend them (thanks to John Hall's heating blanket that has been patiently waiting use for a month or so.) questions: 1. EIR sides, i am getting little tiny spots of black, well what appears to be resin. It is not the end of the world, and actually I was happy to just not break them. What can I do to prevent those tiny scorch/resin dots. I did not wrap the wood. My sandwich on the mold was, steel, wood, steel, blanket. 2. NECK JOINT. After bending those first sides and putting them in the mold, i glued in a tail block. I am going to do the neck block next. I am going to do a tenon to block type joint so the block will be the typical u shape that is common around here and the latest cumpiano recommendation. I know what his book says, but I want some practical real world experience. I am going to route the joint into the block for precision, but how do i get the neck part to fit precisely. OR do some of you leave a tiny bit of play and then shim the neck in or glue it in addition to bolting it?
|
Author: | jsimpson [ Mon Jun 25, 2007 3:06 pm ] |
Post subject: | |
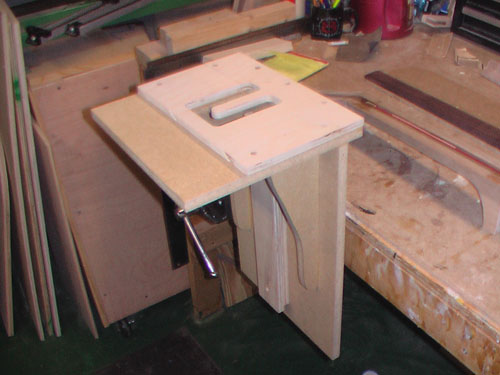
Hi John, I'm a relative newbie here, actually just finished my first build and am in the stringing up/tweaking stage. I don't claim to have a wealth of experience, but this worked well for me! Attached (hopefully) is a pic of the jig I made for routing my neck joint. The entire top of the jig is removeable, held in place with dowel pins. With the template off, I clamp the neck blank in vertically to the long piece of plywood in the center (fretboard area facing OUT), which is angled 91 degrees to the top of the jig to allow for a slight back-angle when mated to the mortise. I just flush-cut this with the router, then add the template and rout the U-shaped tenon. I have a similar jig for routing the mortise, the closed body clamps underneath the jig in the same way and the matching U-shape is the actual template on top. Hope this makes sense! if not, holler and I'll snap some pix of the body jig as well. Cheers!
Jon |
Author: | KenH [ Mon Jun 25, 2007 6:14 pm ] |
Post subject: | |
I would like to see your body jig if you can post a picture of it. I have been considering doing something new with the neck joints and you may have the solution.
|
Author: | crazymanmichael [ Mon Jun 25, 2007 9:13 pm ] |
Post subject: | |
in a straight mortice and tenon the parts do not have to be a super tight fit. a tiny bit of slack is useful as it allows a bit of flexibility to dress the cheeks fot neck alighment. the whole point of doing a bolt on is that the bolts give the stuctural integrity, not the tight fit of the joint. for 25 years or so taylor, who really popularized the bolt on neck against huge industry and market resistance, didn't use a tenon, just s bolted butt. if you are using two bolts, glue is unnecessary and really defeats the purpose of using bolts, which after all is to make neck alignment and resetting easier. I never have been able to get my head around martin's current hybrid system. as for cutting the mortice, i think most folks do it on the table saw before installation, but a suitable jig and template works well also. |
Author: | Marc [ Mon Jun 25, 2007 11:37 pm ] |
Post subject: | |
Paper wrap will help with the spots. I bent honduras rosewood without wrap once, purple spots everywhere, I scraped for a long time. Next bend I wrapped with paper, it absorbed 90% of the purple. |
Author: | erikbojerik [ Mon Jun 25, 2007 11:46 pm ] |
Post subject: | |
Neck joint: I pre-cut the mortise into the neck block before gluing it to the sides, with the sides covering the mortise. Then to open it up I just use a Dremel with a small sanding drum, and ever so slightly round off the edges by hand with sandpaper. |
Author: | Michael Dale Payne [ Mon Jun 25, 2007 11:52 pm ] |
Post subject: | |
1.It is common to get resin bleed when bending IRW 2.I like my tenon to fit my mortise just short of press fit tight. In other words where it goes in with out issue but does not slop around any. If you are bolting the neck then do not glue the tenon to the mortise. This will make a fine joint with only the bolts securing the neck. Plus it makes any future neck work far less risky of a task. |
Author: | old man [ Tue Jun 26, 2007 12:29 am ] |
Post subject: | |
My block is fully machined before glueing it to the sides. I cut the mortise on the router table. Ron |
Author: | jonhfry [ Tue Jun 26, 2007 5:45 am ] |
Post subject: | |
REALLY COOL. Could you show off some pics of the block jig too, and when you use it again, some pics of it in use. That looks simple enough
|
Author: | jsimpson [ Tue Jun 26, 2007 5:45 am ] |
Post subject: | |
[QUOTE=Hodges_Guitars] I would like to see your body jig if you can post a picture of it. I have been considering doing something new with the neck joints and you may have the solution.
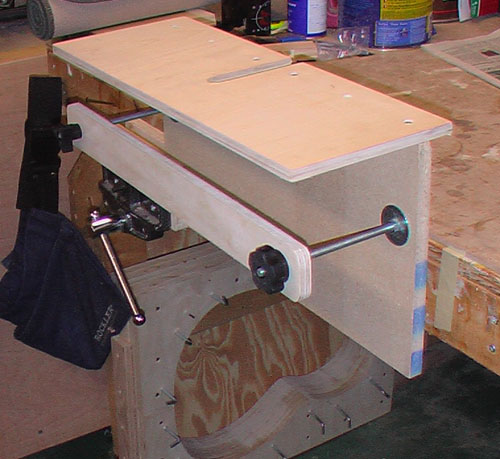
[/QUOTE] Hiya! This cuts an exact slot to match the jig in my previous post. I pre-drill the neck block for the two machine screws and truss rod adjustment, close up the body. Then I just match the body's centerline with the one on the jig's top, clamp it down, and cut the slot with a few passes of the router. In my case, I do this prior to binding. Then just test-fit the neck and sand accordingly, mark the screwhole/trussrod locations from inside the body with a tapered punch and drill the holes for the inserts. Hope this helps, sure works well for me! Jon |
Author: | jonhfry [ Tue Jun 26, 2007 5:47 am ] |
Post subject: | |
Thanks Todd, I think you warned me about the resin before and recommended craft paper. Honestly, I didn't care about resin, I just wantted to see how easy it was to bend sides, and now I am pleasantly surprised because I learned that what I feared most (side bending) was actually quite fun and easy. Pardon my ignorance, but what is kraft paper? Like construction paper that kids use or is it something else? Thanks |
Author: | jsimpson [ Tue Jun 26, 2007 5:48 am ] |
Post subject: | |
[QUOTE=jsimpson] Hi John, I'm a relative newbie here, actually just finished my first build and am in the stringing up/tweaking stage. I don't claim to have a wealth of experience, but this worked well for me! Attached (hopefully) is a pic of the jig I made for routing my neck joint. The entire top of the jig is removeable, held in place with dowel pins. With the template off, I clamp the neck blank in vertically to the long piece of plywood in the center (fretboard area facing OUT), which is angled 91 degrees to the top of the jig to allow for a slight back-angle when mated to the mortise. I just flush-cut this with the router, then add the template and rout the U-shaped tenon. I have a similar jig for routing the mortise, the closed body clamps underneath the jig in the same way and the matching U-shape is the actual template on top. Hope this makes sense! if not, holler and I'll snap some pix of the body jig as well. Cheers!
Jon [/QUOTE] OOPS!! The fretboard would actually be facing the BACK of the jig, not outward...my bad! JS |
Author: | jonhfry [ Tue Jun 26, 2007 5:51 am ] |
Post subject: | |
Thanks michael, that answered what I was looking for regarding the neck situation. The block and tenon i have fit snug but not tighly. I was going to use it anyway, and figured the play may be useful in adjusting, but wanted to be sure I did not overlook something without asking.
|
Author: | davidmor [ Tue Jun 26, 2007 7:55 am ] |
Post subject: | |
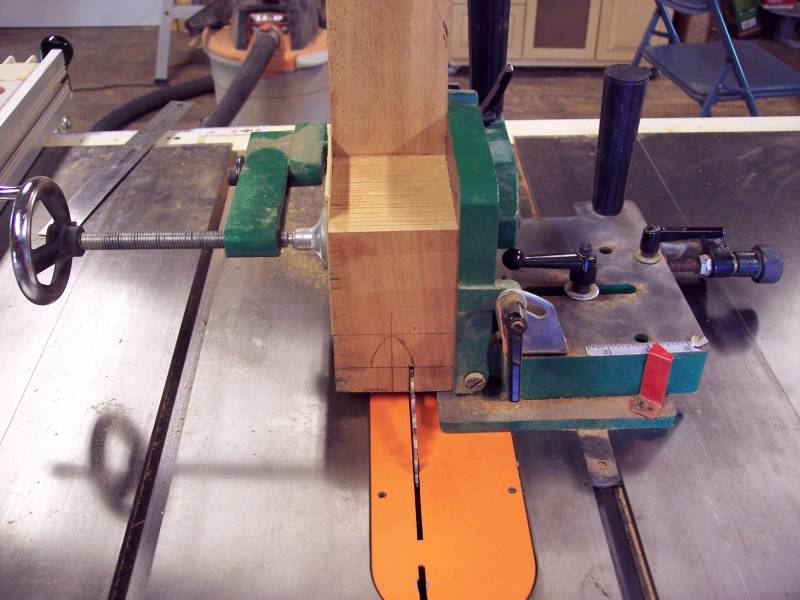
Like other have said, use kraft paper when you bend. It makes cleanup a lot easier. As for tenoning I use my table saw with a tenoning jig. It is the same kind of jig you use for making tenons on furniture. Here is a picture of mine. One piece of advice I learned the hard way, lay out your tenon, drill and install the brass inserts before cutting the tenon. The sides of the tenon are fairly weak and can (will) split very easily while installing the inserts. I got this at Woodcraft and it is pretty inexpensive. I also route the mortise in the block before installing it. I use a 3/4" mortising bit and my router table with a fence. I am much more comfortable cutting the mortise on an expendable block of wood than taking my router to a guitar with expensive sides already installed! |
Author: | Dave Rickard [ Tue Jun 26, 2007 12:37 pm ] |
Post subject: | |
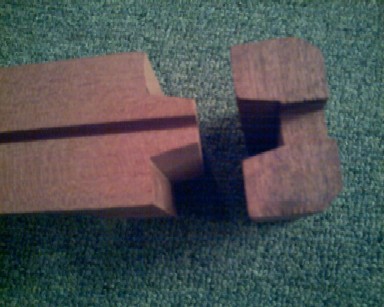
At ASIA there I bought a couple of Mossman necks and neck blocks more because they had an interesting joint. It's a M/T with beveled sides. Hope the picture shows. |
Author: | Dave Rickard [ Tue Jun 26, 2007 12:42 pm ] |
Post subject: | |
Well an EDIT button would be nice. I don't know if Stu Mossman used this joint on all of his guitars but I like the looks of it. I might try this on a future build. |
Author: | KenH [ Tue Jun 26, 2007 3:06 pm ] |
Post subject: | |
Thanks for posting the pics ! as they say, a picture says a thousand words... |
Page 1 of 1 | All times are UTC - 5 hours |
Powered by phpBB® Forum Software © phpBB Group http://www.phpbb.com/ |