Official Luthiers Forum! http://w-ww.luthiersforum.com/forum/ |
|
Tutorial - Seamless florentine joint http://w-ww.luthiersforum.com/forum/viewtopic.php?f=10102&t=12750 |
Page 1 of 1 |
Author: | Rod True [ Sat Jul 07, 2007 3:55 am ] |
Post subject: | |
I have posted this in the past without pictures so I was going through the pictures on my computer and thought I would add the pictures to the text for a tutorial on making a seamless florentine cutaway joint. 
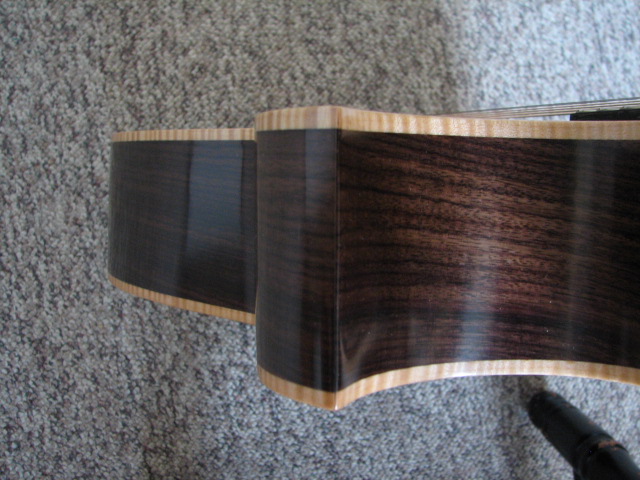
What we are trying to achieve ![]() Some terms I'll use before we start. "Cut away long side" the long side piece running from the tail to the tip of the cutaway. "Cut away short side" the other side. It's basically like doing any corner miter with binding, only your doing it with the side piece. You want to make this joint first, before you attach the head and tail blocks. 
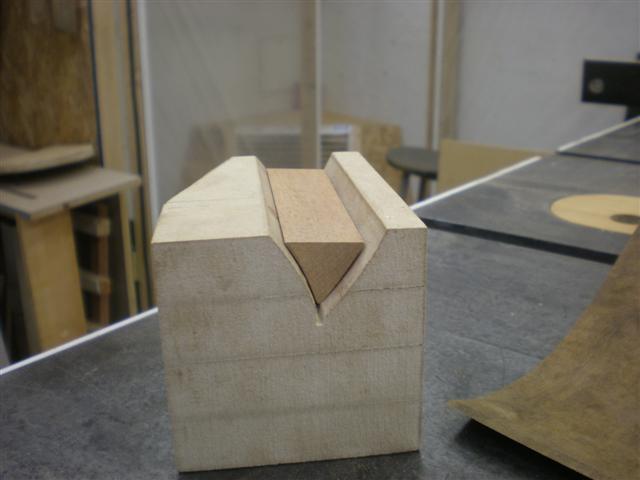
Start with the inside block, shaped to the profiles of the curves of both side pieces, you should lay this out on paper (cause we all know that the wood acts just like a paper layout right) ![]() 
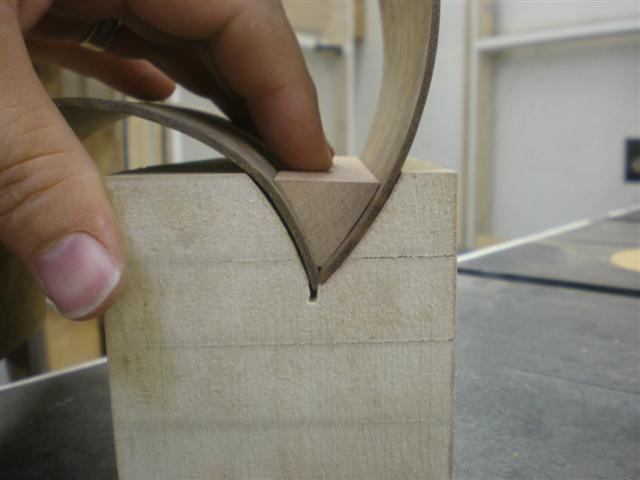
Now, take the cutaway long side place it in the mold with the waist located correctly and mark out where the tip of the cutaway is going to be on the inside of the side. Now I take the cutaway short side and sit it on top of the tip of the cutaway to help layout the miter angle, make a mark on the outside of the long side where the top of the cutaway will be. Use your square and draw a line down the side. Now you have two lines on the side, one inside and one outside. You can join these lines across the thickness to get an idea of the angle of the miter. You all with me so far? Sorry, no pictures of these steps. 
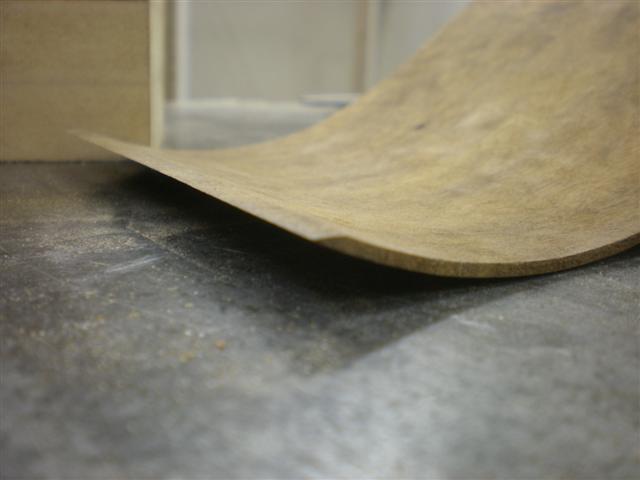
Next I take the long side to the sander (I use my thickness sander as I don't have an edge or belt sander) and sand in a rough angle, close to the miter angle for the cutaway. Check the inside and outside lines often as you don't want to sand through one, just close to them both. So once you have this rough angle sanded to the long side, do the same with the short side. Once the short side is roughed in, check the sides and inside block to your paper layout. Now you can start refining the angles getting them just right. Like any of the miters on the guitar, you want to go slow and take a little of at a time to make sure you don't have a Homer moment (Doh!) and trim to far. It's always easier to take off the material, it's much harder to put it back without anyone noticing. ![]() ![]() 
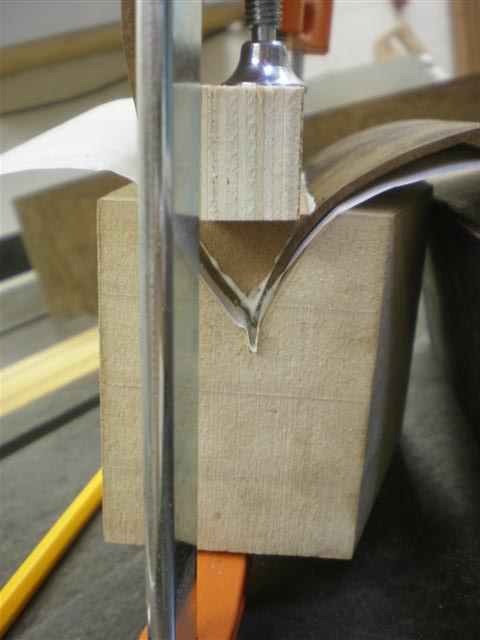
When you have the miter where you like it, you want to glue up both pieces to the inside block all at once. Here is a clamping caul I made based on a picture off Jim Olson's website, Bruce Dickey also has one in the jig's tools and technique's section. ![]() Check and refine before you glue of course. Use some wax paper between the clamping caul and the sides. ![]() 
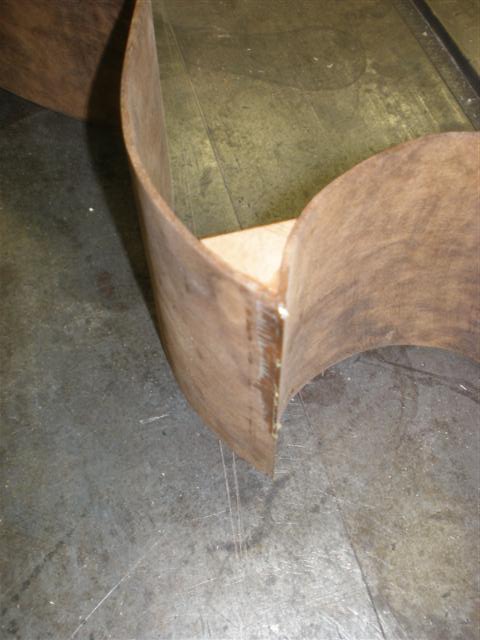
Than you should have a nice clean joint once the glue has set up. As I said, gaps in rosewood joints hide very well with sawdust and CA, so don't worry to much about gaps, of course you want as few as possible. ![]() Now you can touch up the short side on the pipe if you need to, but if you've bent the pieces to your paper layout, you should not need to. Now your ready to glue in the tail and head block as well as the other side. When the body is all assembled, take a piece of steel round bar and run it along the point of the florentine. This will close up any small little gaps and help give that seamless appearence. Few.... I hope I haven't scared any of you away trying this out. It sure is rewarding when it turns out. Remember, if it doesn't turn out, you can always bind the tip of the cutaway. |
Author: | Don A [ Sat Jul 07, 2007 4:32 am ] |
Post subject: | |
Thanks Rod, it has already made it into my personal archive. The pictures are a big help. I've never tried a florentine cutaway, but who knows, I just might in the future. |
Author: | Billy T [ Sat Jul 07, 2007 6:16 am ] |
Post subject: | |
Thanks Rod! I've seen a couple of tutorials on the florentine and each one shows different aspects and concepts! Never thought of round baring a joint to force the fibers into the miter! Cool! |
Author: | Rod True [ Sat Jul 07, 2007 6:21 am ] |
Post subject: | |
Ya Billy, I got that from some other wood working site. Cabinet makers do this with their mitered corners just to help close the joint. It's a great little trick. |
Author: | Shawn [ Sat Jul 07, 2007 7:09 am ] |
Post subject: | |
Rod, the steps look good...one possible refinement... It has been a long time since I did a cutaway as I dont build steel strings or archtops any more but what I used to do with a similar setup to get the miter tighter was to clamp each of the two pieces in place as close as can be and then run a flushcut saw between the two pieces where they join. I picked up this tip from a violin maker who was a stickler for a perfect miter joint at the C bout of his violin family instruments. It get it very close and then I would take a fine grit (220+) stickon sandpaper and attach it to the sides of the flush cut saw just as some people use sand paper to shoot an edge for joining backs or tops. the result is a joint that when dry has no gaps and when joined is close to invisible. On the archtops I did that were curly maple sides, when using white or yellow glue for the joint, it was hard to see the joint at all. |
Author: | Jim Watts [ Sat Jul 07, 2007 7:33 am ] |
Post subject: | |
Rod, thanks for posting that I'm sure I'll use it! |
Author: | Rod True [ Sat Jul 07, 2007 7:33 am ] |
Post subject: | |
Thanks Hesh ![]() ![]() Shawn, could you give me some more detail with the flush cut saw please. I'm not quite picturing it. That's what makes posting these tutorials a really great idea. People are always willing to help make things just a little bit better. |
Author: | Chansen [ Sat Jul 07, 2007 8:22 am ] |
Post subject: | |
Thanks so much Rod!!! I really love seeing a clean Florentine cut-away and hope to some day use this tutorial. Thanks!!! |
Author: | KenH [ Sat Jul 07, 2007 8:40 am ] |
Post subject: | |
Outstanding tutorial!! Thanks for sharing with us Rod!. I, too, would be interested in a jig. |
Author: | Cocephus [ Sat Jul 07, 2007 8:42 am ] |
Post subject: | |
Rod, Thanks for posting this tutorial. It helps to take some of the mystery out of making that joint come out perfect. I have a couple questions, though. 1. I like the way you match the grain of the sides. Do you cut off the "short side" before bending, or is it rebent on the hotpipe after bending the "long side"? 2. I see from the mock-up pic that you have the short side shooting a little long (the pic with the caul). Is this where you get the most room for adjustment and finishing out the seam? Coe |
Author: | Sam Price [ Sat Jul 07, 2007 8:46 am ] |
Post subject: | |
Thankyou! |
Author: | Bill Greene [ Sat Jul 07, 2007 9:18 am ] |
Post subject: | |
Agreed Rod, that's terrific, and what results! I'll be looking back at this one day - when my courage is slightly higher. |
Author: | Shawn [ Sat Jul 07, 2007 12:18 pm ] |
Post subject: | |
Rod, If you press the pieces down into the mold having cut the miters as close as possible and then instead of holding them in place with a caul as the wedge instead hold them with clamps from each side so that you can still get a flush cut saw into the V of the two pieces where they meet. By sawing in that V with the flush cut saw basically cutting a kerf between the two pieces so that any part that is protruding that is keeping the edges from mating is cut, the edges will then be very close. Any additional trimming can be done by turning the saw so the teeth of the flush cut saw stick up and with fine grit sandpaper stuck to the sides of the flush cut saw, it will allow you to get the mitered joint perfect. On Violin family instruments at the center curve (C bout) there is two miter joints that are a sharp angle similar to what you encounter on a florentine cutaway. On violin family instruments instead of bending the sides to fit inside an outer mold as you would with a steel string guitar, the mold is a block in the center of the instrument with cutouts for the corner blocks (that will reinforce the miter joints of the C bout), heel and tail blocks to which the bent side pieces are clamped. Once the sides and blocks are glued to form the frame of the instrument, the center mold block is taken out and the top and back are attached. Once the sides are bent, the center curved part of the C bout is clamped against a mold and needs to be mitered to get the sharp joint of the C bout cut and glued to the corner blocks. By using a flush cut saw to perfect the joint for the cutaway, the joint will be almost seamless without having to resort to "rolling the edge" to crush any gap closed as another post suggested. The problem of rolling the edge is that it is hiding a gap that at a future point could open. At least for violin family instruments the adage goes that if a joint can open up it will so you must make sure that the joint is tight from the start. |
Author: | Rod True [ Sat Jul 07, 2007 12:47 pm ] |
Post subject: | |
[QUOTE=Cocephus] Rod, Thanks for posting this tutorial. It helps to take some of the mystery out of making that joint come out perfect. I have a couple questions, though. 1. I like the way you match the grain of the sides. Do you cut off the "short side" before bending, or is it rebent on the hotpipe after bending the "long side"? 2. I see from the mock-up pic that you have the short side shooting a little long (the pic with the caul). Is this where you get the most room for adjustment and finishing out the seam? Coe [/QUOTE]Thanks Coe, 1. I cut the short side after bending. This way I've made sure the piece is the correct length at the tail block. I have a very fine saw (0.010") which I use to cut the side. This way I loose almost nothing to the kerf. 2. I try and make sure that both sides line up perfectly before gluing. That picture was taken in the minor refining stage so it's not perfect or ready for gluing yet. |
Author: | Rod True [ Sat Jul 07, 2007 12:53 pm ] |
Post subject: | |
Ok Shane, I can picture it better now thanks. I think that next florentine I have to make, I will make up some sort of inside/outside jig to hold the two pieces and give the flush cut saw a try. This won't be for a while I'm sure but when I do it, I'll make sure and take some pictures of the jig and the process and post an "addition" to the tutorial. Thanks Shane. Again that's what makes posting tutorials so great, someone will always have something great to add to it. |
Author: | Rod True [ Sat Jul 07, 2007 12:54 pm ] |
Post subject: | |
[QUOTE=Hesh1956] Rod if You didn't mind and a sponsor was willing this jig would sell and I would most certainly buy one rather than trying to reinvent the wheel. It should be named the "True Cut-Away" jig. Hint, hint..... ![]() ![]() You know Hesh, that's not a bad idea. along with the jig you could get a dozen inside blocks machined to match the shape of the cutaway. Hmmmmmmm, I'll certainly keep that in mind. |
Author: | Rod True [ Sun Jul 08, 2007 4:01 am ] |
Post subject: | |
Jim has always been generous with sharing his information. A good idea to give him a call. I love that solid lining, that would be a good one to get cut on CNC for sure, than you'd have his Profile too. |
Author: | Rod True [ Sun Jul 08, 2007 4:12 am ] |
Post subject: | |
[QUOTE=Rod True] Ok Shane, I can picture it better now thanks. I think that next florentine I have to make, I will make up some sort of inside/outside jig to hold the two pieces and give the flush cut saw a try. This won't be for a while I'm sure but when I do it, I'll make sure and take some pictures of the jig and the process and post an "addition" to the tutorial. Thanks Shane. Again that's what makes posting tutorials so great, someone will always have something great to add to it.[/QUOTE] This was directed at you Shawn ![]() |
Author: | Greg [ Sun Jul 08, 2007 5:48 am ] |
Post subject: | |
Outstanding. That's what this forum is about. ![]() |
Author: | Rod True [ Sun Jul 08, 2007 6:34 am ] |
Post subject: | |
Hey Greg, Are you located in BC by any chance??? Nice Avatar too by the way, what you fishing for??? |
Author: | WaddyThomson [ Sun Jul 08, 2007 7:47 am ] |
Post subject: | |
[QUOTE=Rod True] This was directed at you Shawn ![]() Shane! Shane! Come back Shane! ![]() ![]() ![]() ![]() |
Page 1 of 1 | All times are UTC - 5 hours |
Powered by phpBB® Forum Software © phpBB Group http://www.phpbb.com/ |