Official Luthiers Forum! http://w-ww.luthiersforum.com/forum/ |
|
Nut Height Gauges http://w-ww.luthiersforum.com/forum/viewtopic.php?f=10102&t=13085 |
Page 1 of 1 |
Author: | David Collins [ Sat Aug 04, 2007 4:25 pm ] |
Post subject: | |
In the spirit of the recent patents thread, I'd like to start posting photos of more of my tools here on the forum. Even if the threads die without being useful to most members, at least it will get them "published" and dated in effort to keep things in public domain. When adjusting any aspect of a setup I like to rely on as few other variables and inconsistent reference points as possible. When setting initial nut height for example, I find it best to leave out variables like the saddle, and as much as possible neck relief as well. Of course when you are really fine tuning a setup that last 5% for a very discerning player, I often find everything has to be tweaked as a package, delicately playing each minor adjustment off of the others. To get good enough for most however, excellent results can be gotten in the initial, relatively generic setups for various styles (and at about half the time and cost). Anyway, back to nut height. The method of setting the height by using the string from nut to 2nd fret as a straightedge has been fairly standard in the industry, probably for centuries. Although I know some people measure height at the 1st fret with the string open, slight differences in relief and saddle height put too many variable reference points in the mix for me. Fretting past the 2nd and checking clearance on the first relies only on the frets themselves being perfectly level, and perhaps very very very minimally may factor in relief. Setting height by eye is something I believe all technicians should be fluent in, but when teaching I've always looked for a tool that could actually quantify the height. Communicating through numbers and measurements can drastically reduce the learning curve for many, as opposed to saying "make it look like that". I made these gauges for this reason, though I personally use them very rarely. They may be a useful tool for those who do not have a mentor to directly study under, but I would emphasize the importance of checking by eye in tandem when using these to avoid needing them as a crutch. I'll have to post photos in a new reply, due to a disagreement Safari seems to have with the current forum software. |
Author: | David Collins [ Sat Aug 04, 2007 4:34 pm ] |
Post subject: | |
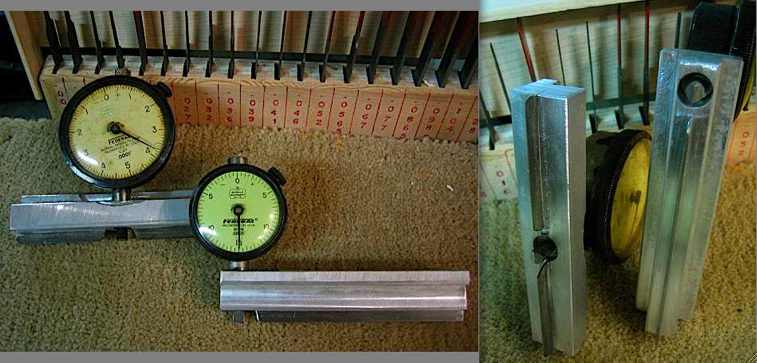
So here are the gauges. I made two styles. The one on the left will measure the same thing you would view by eye - clearance above the first fret in reference to the plane from the nut slot to the second fret. The one on the right will reference from the plane of the frets and read the height of the slot above or below that plane. Of course the tools have to be leveled and zeroed out on a surface plate. The first one (on left) will give a further negative reading for a high nut and positive for a low one. The second (on right) will read positive for high and negative for low, and is also twice as sensitive. I used the less sensitive of the indicators on this one. |
Author: | David Collins [ Sat Aug 04, 2007 4:42 pm ] |
Post subject: | |
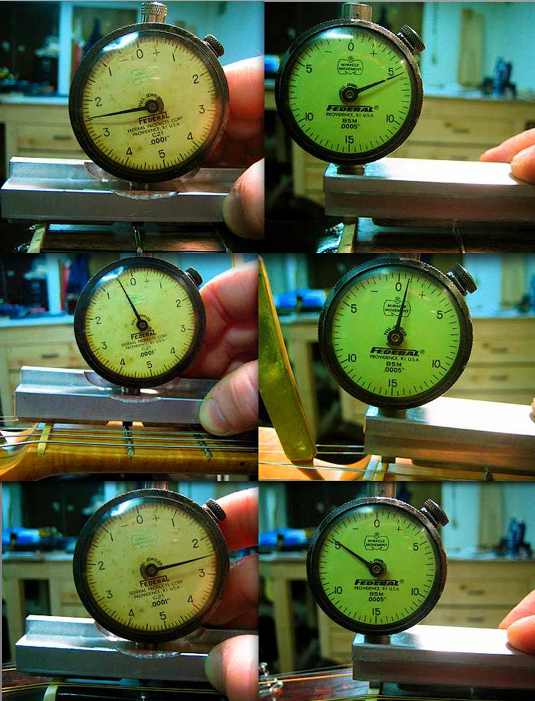
Here is a collage of each reading the same slot. High on the top row, good (for the particular instrument measured anyway) in the middle, and low at the bottom row. With twice the sensitivity and a more meaningful measurement it would seem that gauge #2 (right) would be more useful. Unfortunately it seems a little too unpredictable in it's current state. The tip needs to be thin enough to fit in a .010" slot, and the slightest twist of the tip can throw off the readings tremendously. I also would have to increase the spring pressure in the dial a bit to ensure it seats well in any given slot. The first one can be set much more consistently in place. |
Author: | David Collins [ Sat Aug 04, 2007 4:46 pm ] |
Post subject: | |
Like I said, I don't often use them myself, but they can be useful. For many people learning to work on instruments, nut height can be a big stumbling block in setups. I emailed the to Dan at StewMac a few months ago, and it sounded like Don Macrostie was already working on a very similar tool. Hopefully they will be offering something like this in the not too distant future. I'm sure many folks would find it useful. |
Author: | Dave-SKG [ Sun Aug 05, 2007 12:35 am ] |
Post subject: | |
David, nice tool. But as you said above most of us can eyeball the height needed. I use a pencil that has been sanded flat on one side. I put the nut blank in the slot level the pencil on the first two frets and run my mark. It's always a little too tall using this method so I don't have to worry about "blowing the nut". once strung up I lower the string height to the players preference...now that's where a tool like yours that was notched (and perhaps worked perpendicular to the strings) so you could do individual strings would come in handy. I have had players want the first string as low as .007 off the first fret. With action that low it's easy to ruin the nut by accidentaly filing one of the other strings too low referencing off of that first string. With the changing diameter and tension of the strings the points where a string will start to buzz is difficult to acess. I guess after a while you sort of sense it. I think your tool is great . I guess using your tool you could collect the data and use it on future nuts with the same results...very ingenious! |
Author: | Billy T [ Sun Aug 05, 2007 6:18 am ] |
Post subject: | |
[quote]Unfortunately it seems a little too unpredictable in it's current state. [/quote] Great approach! David, You could test over the top of the string, subtracting the diameter, that would give more area for contact wouldn't it? |
Author: | npalen [ Tue Aug 07, 2007 4:25 pm ] |
Post subject: | |
StewMac had a prototype tool on display at ASIA in Sprinfield consisting of a small aluminum "cube" with a dial indicator mounted. It had grooves to clear the fret as well as the strings if I understood and remember correctly. I didn't ask but assumed that it was for checking the string clearance above the fret. |
Author: | David Collins [ Wed Aug 08, 2007 2:01 am ] |
Post subject: | |
I'm not sure it that would have been it, or at least I hope it wasn't. In setting nut height, or any aspect of setup for that matter, the surface of the fret board means absolutely nothing. Making a tool that included the board as a variable would seem pretty backward to me. I wonder if it could have had some other use?? |
Author: | npalen [ Wed Aug 08, 2007 2:56 am ] |
Post subject: | |
David--I'm thinking the block resting on the fretboard was just to hold it steady while the tip of the indicator measured the string movement when it is pressed down against the fret. The indicator could be zeroed first before pressing the string. Someone else here surely saw the tool? Nelson |
Author: | npalen [ Fri Aug 10, 2007 4:25 pm ] |
Post subject: | |
David--I tend to get in a hurry when reading posts and didn't realize you had mentioned above about emailing Dan at StewMac. It would be interesting to find out from someone there "in the know" just how their tool is designed to work. It looked to me like the aluminum block, which appeared to have some "fret board radius" curvature on the bottom with slots to clear strings and frets would sit on the fretboard. I figured the tip of the indicator would be placed in contact with the string directly above the #1 fret and zeroed. Depressing the string would then read it's clearance above the fret. It does look like the indicator would need to be fairly sensitive, however, to avoid too much deflection of the string prior to zeroing. Do we have a "resident StewMac guru" here at the OLF to set me straight? Nice work on the gauges by the way, David! Nelson |
Page 1 of 1 | All times are UTC - 5 hours |
Powered by phpBB® Forum Software © phpBB Group http://www.phpbb.com/ |