This is my first tutorial, and I’m not sure if I really have
the qualifications to do one. That’s not
true. I am sure that I don’t have the
qualifications, but here it is anyway.
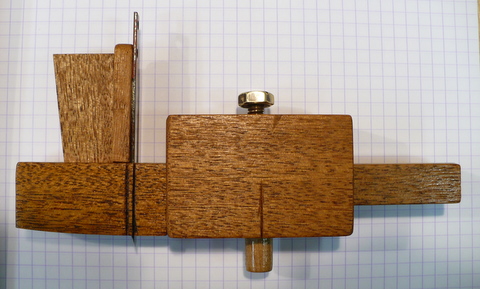
Joshua suggested a separate thread on my little homemade circle
cutter/purfling cutter combination tool.
I won’t take full credit. I saw a
picture of a similar circle cutter in Courtnall’s book, “Making Master Guitars”. I made up the details and the purfling cutter portion, all by myself. Here is a picture of the finished circle cutter only. I don’t really think the measurements are
particularly important. The main thing
is to keep things square and centered as much as possible, for consistency.
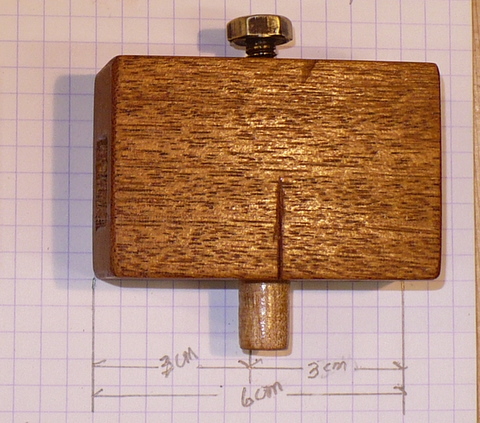
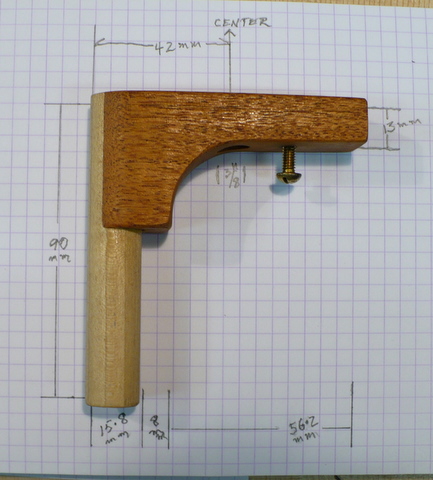
I started with a 60 mm L x 26 mm W x 39 mm H block of Mahogany. I marked a 15mm square hole 10 mm from the
bottom and 14 mm from the top. I used a
machinist square and a marking knife to mark the hole on each end, then
chiseled out the square about 5 or 6 mm deep on each end to get a clean square. I then drilled out with a ?” brad point bit,
and chiseled out the corners, being particularly careful to try and keep a flat
bottom since that is where the inserted piece would register. I then drilled a 3/8” hole centered in the
bottom, where I inserted a 3/8” x 20mm dowel(tight press fit). Using sandpaper I sanded to reduce the size a
tiny bit and slightly tapered the dowel toward the bottom so it would be a
snug, but not tight fit in a 3/8” hole. Next I drilled a #16 wire size (3/16 would
also work) drill, hole in the center of the top, and tapped it with a ? x 20
tap. The drill size is smaller than
recommended, but in wood, I like to undersize the hole a little to get a little
compression when the threads are cut. I
think it makes it hold up a little better.
I then used a ? x 20 x 3/4” brass bolt for the thumb screw.
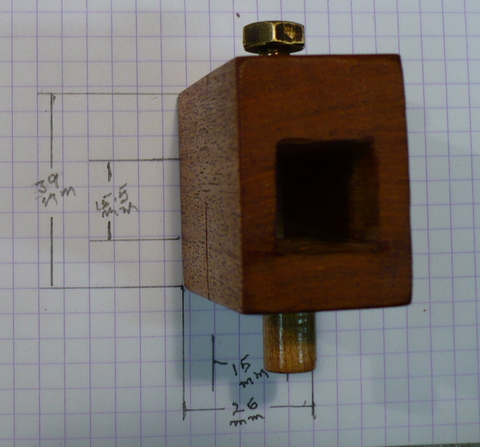
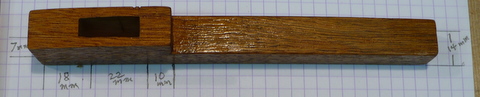
The next piece was a 150 mm L x 14 mm W x 24 mm H stick of
Mahogany. I cut a 10mm L x 10mm high section
out of the bottom, leaving this:
Then I marked and cut the rectangular hole from top to
bottom (size at top 25mm x 7mm, size at bottom 22mm x 7mm) keeping the face
nearest the 14mm x 14mm stick square and vertical. The back face was sloped the 3mm difference
to accommodate a wedge. I then chiseled
out a ?” groove and glued in a strip of ? x 1/16 x 9mm brass flat stock,
available at hobby stores in 12” lengths.
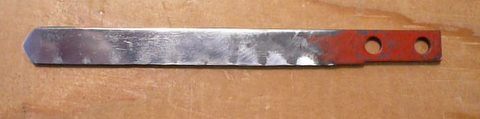
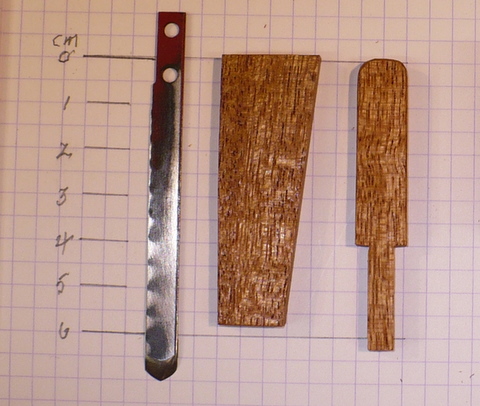
For the blade, I used an old worn out jigsaw, bi-metal
blade, ground off the teeth, ground to a point, then sharpened to an edge
leaving one side flat like a chisel. ( I think I need to additionally sharpen
the edges up the side more, and increase the tip angle, to allow deeper cuts.) It works fine, as is, for cuts 2 mm or so
deep.
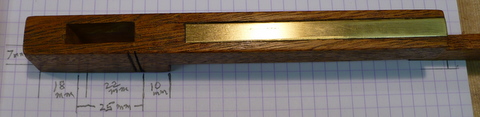
The other pieces are the wedge and the blade baffle to keep
the blade from moving when the wedge is tightened. These items were basically cut to fit, and
cut off so they would not go below the bottom surface. You want them to come close, though, to give
the blade solid backup, so it won’t bend or move much. Actually, the blade was what determined the
width of the slot in the sliding piece above.
When assembled, you can tap the wedge in to get a good tight fit. I left enough play to allow some side to side
wiggle room for loosening.
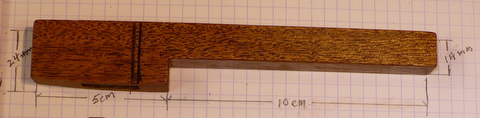
When it worked, I decided to try to adapt it for cutting, or
at least marking, binding channels, so I made this piece from another little
scrap of Mahogany, a 5/8” dowel and a 8 – 32 x 3/4” screw.
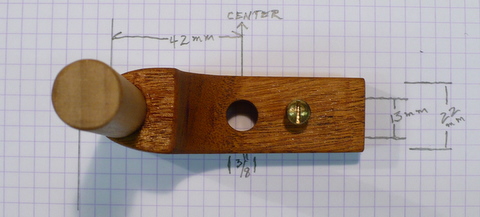
The measurements, again are not all that important. The 3/8” hole needs to be centered, and the
outside edge of the dowel should touch the cutter blade when fully closed, and
with the flat of the blade to the inside.
On mine, that distance is 42mm from the center of the hole to the edge
of the dowell. I used a Forstner bit to
drill the 5/8” hole in the right place.
I started with a 75mm L x 22 mm W x 38mm H block. I drilled the center hole and the dowel hole
while it was still square then shaped it and then drilled the screw hole. This bears some discussion. The way I did that was to mount this piece on
the circle cutter, making sure the center of the dowel was at the center of the
cutter. Then I drilled a #33 hole(7/64
would also work) all the way through both blocks making sure the block stayed
registered in the right place. I then
tapped the hole with an 8 – 32 tap through both pieces. I did this to make sure my alignment stayed
right. After that, I reamed the threads
out of the attachment piece, using a #20 drill (5/32 would work too) so the
screw would still be a tight fit, but not bite in that piece. That allows for tightening the piece snugly
to the block of the circle cutter.
If both are threaded, it tends to
hold it off an allows it to wobble. When
assembled, it looks like this.
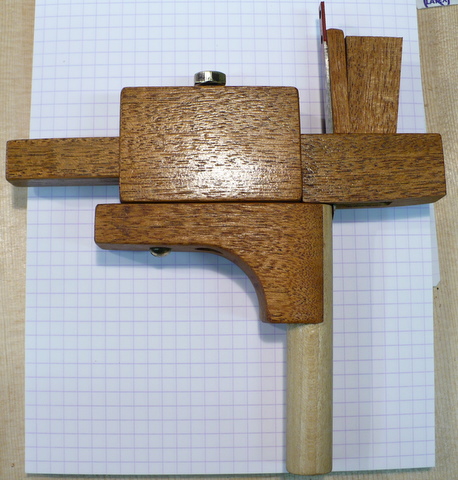
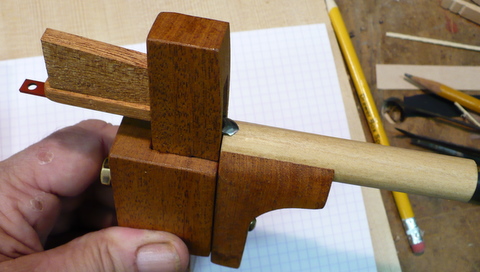
Hopefully the dowel, which is 90 mm long will allow good
side registration. Also note, that I
sanded a slope from the cutter to the end of the slide block, to allow for any
curvature in the top. It has no effect
on the circle cutting performance, which is pretty good. When the blade is flipped, as you would do
for a binding or purfling channel, the minimum cut will be about 1mm, which is
the thickness of the blade. A thinner
blade might be good, but you do not want it to be so thin that it will flex
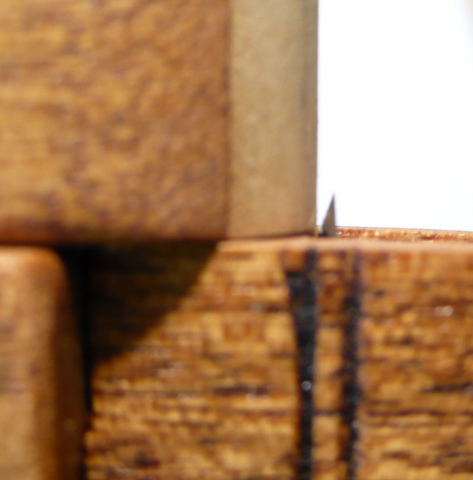
when cutting. Here is a close up of it
closed up.
Thanks for looking. I
will be glad to answer questions. I’m
sure I left out details.


 That would be simple to make. How thick does the cut have to be? Double lines @ .5mm = 1mm or smaller, double lines @ .25mm = .5mm? It would also eliminate the bevel side of the cut, which compresses one side, sometimes creating a problem, particularly with very narrow cuts.

