Official Luthiers Forum!
http://w-ww.luthiersforum.com/forum/

Nut / Slot Prep Discussion
http://w-ww.luthiersforum.com/forum/viewtopic.php?f=10102&t=13796
Page 1 of 1

Author:  Bruce Dickey [ Wed Sep 26, 2007 11:42 pm ]
Post subject: 

Okay, this is an achilles heel to me and I'd like to solve the problem of perfectly installed nuts.

1. Getting them to fit nicely on three sides is difficult. I want it to be visually pleasing, in other words, perfect.

2. I have no problem topside with string action, or shape, polish.

3. Just yesterday, unhappy with the fit I removed a nut. The raw mahogany peeled out fibers and they were glued to the bone nut. Ouch. So, apparently nut slots should be sealed with finish to seperate it from the nut material easier?

4. I've thought of setting up a router to slice a perfect slot which I've done on an electric bass before, but not on an acoustic. Then there is the problem with blowout on the exit of the slot.

Well, as you can see this is a thorny issue for me and by golly I need to draw on some experience you guys already have. Pics are nice if you have any. Thanks, back this evening to check the thread.

Author:  Kim [ Thu Sep 27, 2007 12:31 am ]
Post subject: 

Bruce,

I have just made a neck sort of Cumpiano style ( all done bare shaping in the shaft) with the nut slot on the flat of the shaft and the headstock overlay veneer cut at an angle and acting as support for the back of the nut.

To get the angle at the rear of the overlay just right, I cut it with the tablesaw fitted with a fret slotting blade. This is why the shaft is left unshaped until last, you need the squared edge. To do the cut I put the neck fretboard side down on to the table of the saw and clamped the squared edge of the shaft to the mitre guide so that it would cut 3/16" past the end of the fretboard mark. I then wound the blade up so it would cut into the overlay a thou or so shy of the headstock face and pushed that sucker through. Clean, crisp, square and perpendicular.

Cheers

Kim

Author:  burbank [ Thu Sep 27, 2007 12:40 am ]
Post subject: 

Here's what I do.

I start with a rough nut, sized on its fitting surfaces, bevelled on the bottom, not shaped on top nor cut to length. The bottom of the nut is bevelled on the disk part of the disk/belt sander, with the table at the desired bevel. A plywood guide is bevelled on the edge using the same table setup as for the nut. The nut and guide now have identical bevels to match the headstock angle. The nut is placed against the end of the fretboard as a spacer, then the guide is clamped very snug up against the nut, like this.
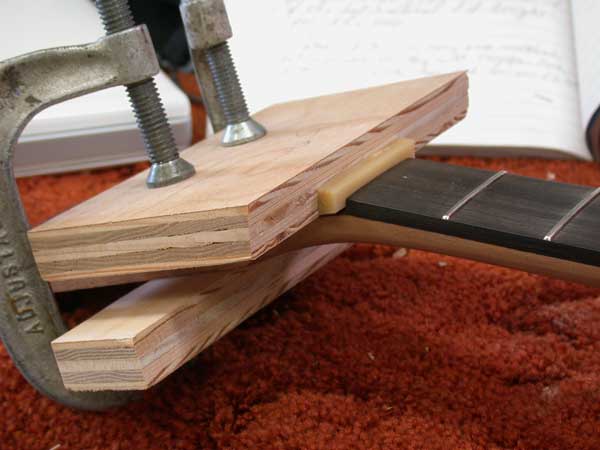


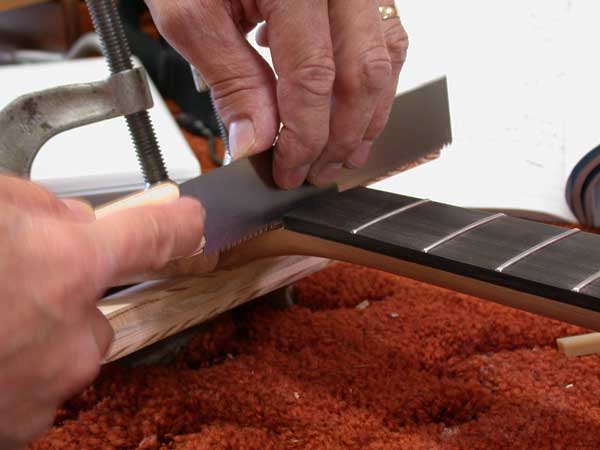
Remove the nut. I now have the guide's bevelled face coplanar with the tuner side of the nut. Using a small Japanese saw, or X-Acto saw, cut the end of the headstock overlay while pushing the saw up flat against the guide. Stop just shy of the neck wood.


Break out the cutoff of the headstock and clean out the slot with a narrow chisel. Sometimes

I use an old nut with a piece of sandpaper glued to it.
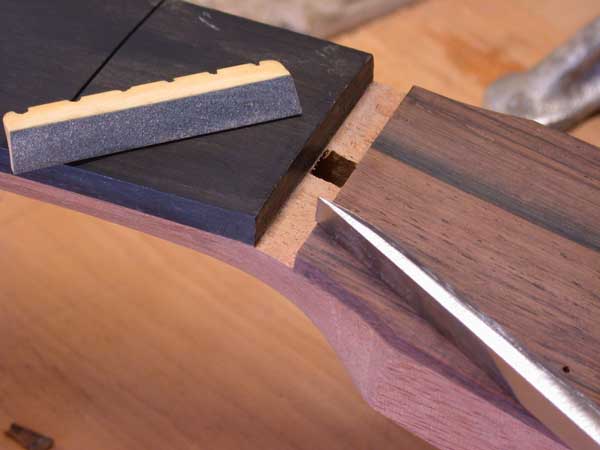


We now have a slot sized to the rough nut.
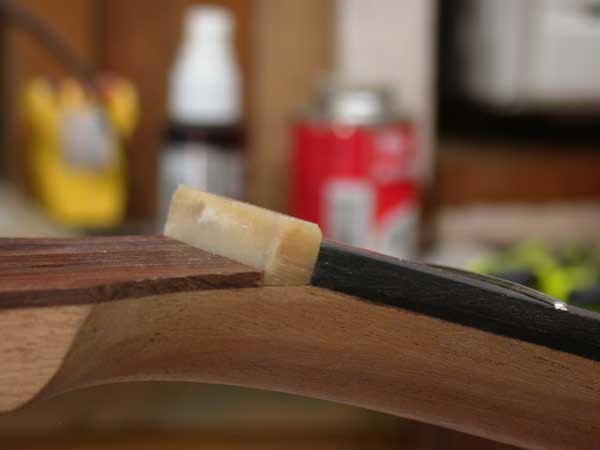


Shape and finish the top portion of the nut. This one still needs some material taken off the height.

Author:  David Collins [ Thu Sep 27, 2007 12:41 am ]
Post subject: 

I've always just relied on the chisel and file method to square up slots by
hand. Sealing slots would be a good idea I suppose. I've never given it much
thought because it's always been just an accepted fact for me that slots will
usually need a bit of cleanup when replacing a nut.

When building instruments I still really prefer the nut to be finished in. It's
obviously much easier to get a perfect fit when the nut is glued in before
peghead overlay is on or the neck is final shaped. I know it's not the service-
friendly priority that I usually stand by, but I just really like the look of an
original nut finished in.

Author:  JJ Donohue [ Thu Sep 27, 2007 12:43 am ]
Post subject: 

Bruce...Here's the sequence I use.

Glue the FB to the neck.

I usually seat my nut on the angled headstock. That requires that I have the north and south sides of the nut parallel to each other.

The bottom is angled at 15* by sanding on the disk sander with the fence angled to 15*. It then seats perfectly to the angled surface on the headstock. Keep tweaking until the south side of the nut butts up perfectly to the FB.

The headplate edge is angled at 15* such that it fits perfectly to the north side of the seated nut. I use a tablesaw to make the cut. Once all those angles are established, I glue the headstock such that all 3 sides are perfectly seated.

On the bottom side of the nut I only put 2 very small dots of the weakest glue I have. No need to adhere the nut to the neck so tenaciously. It should release with a smart tap from a wooden block. In some cases, I have forgotten the glue and it seats well enough without any problems.


Author:  Kim [ Thu Sep 27, 2007 12:47 am ]
Post subject: 

Sorry Bruce,

My point was that you could adapt that same method for a nut slot on the angle face as well. Just do your initial cut nice and steady and then use the saw blade a dado removing the waste with a nice sharp 1/8" chisel. Clean up the bottom of the slot with a 3/16" stewmac nut slot file, which is actually 1/64" shy of a full 3/16" to give a snug fit to the nut, and your done.

Cheers

Kim

Author:  grumpy [ Thu Sep 27, 2007 2:59 am ]
Post subject: 

Nice pictorial, Pat!

 I'll add that for glue, two drops of super glue, drops, tiny drops, on the fretboard side of the nut, is all it takes. None on the mahogany part, please ad thank you <g>. The nut doesn't need to be glued solidly, only held in place when the strings are off.

A string nut is something that WILL need replacing in the guitar's life. Make it easy and safe to remove.


Author:  grumpy [ Thu Sep 27, 2007 3:04 am ]
Post subject: 

Oh, I'll add that I often(when i remember to...) make the nut while I am carving the neck. I'll make the nut, and carve the sides of it as I carve the neck. When done, I pop the nut off, finish the neck, and then replace the nut before final sanding and buffing. The finish will have built up a bit around the nut, but it can be blended-in with the fine papers and buffing. Looks almost finished-in, yet pops out easily and without damage later in its life.


But damned if I remember to do so half the time...<sigh> I'm still stuck in the habit of "carve the neck, finish the neck, make the nut...." that I was doing forever.

Author:  Bob Long [ Thu Sep 27, 2007 3:45 am ]
Post subject: 

[QUOTE=grumpy] Oh, I'll add that I often(when i remember to...) make the nut while I am carving the neck. I'll make the nut, and carve the sides of it as I carve the neck. When done, I pop the nut off, finish the neck, and then replace the nut before final sanding and buffing. The finish will have built up a bit around the nut, but it can be blended-in with the fine papers and buffing. Looks almost finished-in, yet pops out easily and without damage later in its life.But damned if I remember to do so half the time...<sigh> I'm still stuck in the habit of "carve the neck, finish the neck, make the nut...." that I was doing forever.[/QUOTE]

This is brilliant! Great idea...This has to go into the "Why didn't I think of that list. Thanks Grump!!!

For what it's worth, I never use any glue on my nuts.

long

Author:  Arnt Rian [ Thu Sep 27, 2007 4:45 am ]
Post subject: 

I carved a couple of necks with the nut in place after I saw a picture from the Martin factory where they did this. Didn't care too much for it myself, I thought the nut was a bit "in the way" of the shaping, so I'm back to my old ways...

Author:  grumpy [ Thu Sep 27, 2007 5:51 am ]
Post subject: 

How does it get in the way? Do you have a photo of the area on one of yours? I'm curious to see your neck.

Author:  Arnt Rian [ Thu Sep 27, 2007 6:38 am ]
Post subject: 

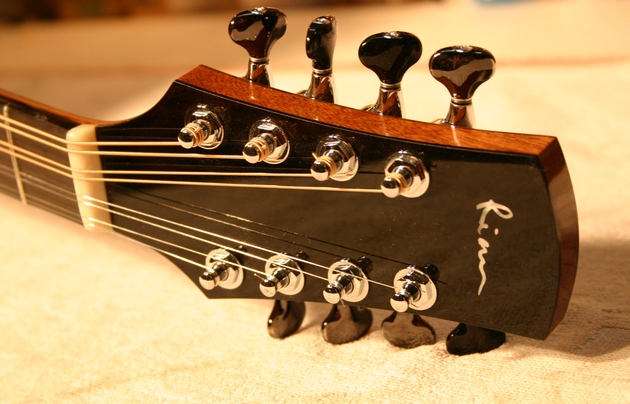
Nothing special about this area of my necks as far as I know. I thought it was easier to shape the concave shape from the headstok towards the neck shaft without the nut in there, that's all. Here's a recent headstock, unfortunately the nut is not to clear in the picture but you get the idea.


Author:  Kent Chasson [ Thu Sep 27, 2007 9:17 am ]
Post subject: 

Hmmm, am I the only one who uses a friction fit and no glue on my nuts?  If it's good enough for the saddle....


I've just seen too many over-glued nuts that are a major pain to remove. I can't see why it needs it.


I put a slight angle on the end of the finger board, taking about .007" off the bass side.  That keeps the 5th and 6th strings from playing sharp on the first fret and allows me to make a slightly wedge shaped nut that squeezes nicely into place.


Author:  grumpy [ Thu Sep 27, 2007 9:27 am ]
Post subject: 

Loose nuts are a pain. The owner goes to change strings, clean the guitar up, whatever, takes all the strings off, and plink, the nut falls off, and down the nearest floor register or something.... Never to be seen again.

or, he/she re-strings, and calls you, all freaked out because the strings are way off to one side....

or, the nut was a bit loose, and on multiple string changes, some dirt worked its way behind it, and now the action is weird, and why is the intonation suddenly "off?"

If it's for yourself, fine, leave it, but if you sell your guitars, glue the nut.  Your customer does not expect things to fall off the guitar.

Author:  Kent Chasson [ Thu Sep 27, 2007 9:36 am ]
Post subject: 

Does your saddle fall off?  Do you glue it?

Author:  James W B [ Thu Sep 27, 2007 9:47 am ]
Post subject: 

You got that right Grumps.
                James
My Life`s In The Drink
Pour Me A Whiskey

Author:  grumpy [ Thu Sep 27, 2007 10:52 am ]
Post subject: 

The saddle is captured on 3 sides, so it's a tight fit and doesn't fall out, and the player expects it to be loose, anyhow.

I've experienced all the above scenarios <g> trust me, sell enough guitars, you'll run across many different people.

2 drops of super glue on the fretboard holds it securely in place, yet it will come off with simple thumb-pressure from behind.


Author:  Bruce Dickey [ Thu Sep 27, 2007 1:22 pm ]
Post subject: 

Nice Tutorial Pat. Thanks everyone for your input. This isn't rocket science, but I can see you guys put a lot of thought into your methodology.

Pat the sandpaper on an old nut was really cool. I was trying to drag some sandpaper under my nut, but it didn't work too well. Good tip.

I'd like to save this thread on my computer. Some really good ideas here. My biggest problem is I had no set pattern. When I sawed the headplate, invariably I'd saw a kerf into the neck on at least one side or the other.

Then there was the tearout of mahogany when I had to remove a nut, as in this case. So just a wee super glue to the fb will take care of that. mmmm hmmmm.

I may have to give the angled nut a try. So far, I've only done the flat nut deal. With a jig or two I can see you can make that angle no problem. Those jigs were nice Terry. Can't look back at the thread to be sure they were yours.

Rian, that's a beautiful bouzouki nut and finish job. I just enjoyed it again this evening. My nephew was over and I showed him Andreas Aase playing it on You Tube.

One more thank you to Pat for some nice pictures. Thanks all.

Author:  Sam Price [ Thu Sep 27, 2007 6:09 pm ]
Post subject: 

[QUOTE=Kent Chasson]

Hmmm, am I the only one who uses a friction fit and no glue on my nuts?  If it's good enough for the saddle....


[/QUOTE]

My cittern's nut is friction fitted without glue. mainly because I was still getting the optimal action at the time.

Author:  KenH [ Fri Sep 28, 2007 4:53 pm ]
Post subject: 

I personally use the saw method to shape the end of the headstock veneer as mentioned above. I also sand the nut on my disk sander to get the proper angle. The only reason I have for doing it this way is because I was taught to do it that way and I am sure there are easier methods, like the ones mentioned above. I especially like the jig that Ken uses (The other Ken).


One thing I do differently is to use a drop of thick CA to set it all in place. As Mario mentions, it only take a drop to make sure that it stays where you put it and doesnt fall out when the customer restrings.


I also like to shape my nuts while I am shaping the neck to make sure the radius matches the neck profile. As a player, I have a hangup about anyting grabbing my hand or fingers on the fretboard. I dont want the sharp edge of a nut to cut me or pick at me. I usually remove the nut before finishing and then reglue it afterwards, before I do my final polishing. In another thread, I mentioned that I would like to have a smaller chisel than the 1/4" one I use. This is exactly the place that a narrower chisel comes into play and the exact reason I want one.... final cleaning of the nut slot!


I'm getting better with each build on making my nut heights right, but this is still something that I am in a learning curve over.


Thanks for posting the pictures!


Ken


Page 1 of 1 All times are UTC - 5 hours
Powered by phpBB® Forum Software © phpBB Group
http://www.phpbb.com/