Official Luthiers Forum!

Owned and operated by Lance Kragenbrink
It is currently Wed Apr 23, 2025 6:01 pm


All times are UTC - 5 hours


Post new topic Reply to topic  [ 22 posts ] 
Author Message
 Post subject:
PostPosted: Sat Aug 27, 2005 9:05 am 
Offline
Koa
Koa

Joined: Sun Jan 02, 2005 1:38 pm
Posts: 1106
Location: Amherst, NH USA
Focus: Build
Status: Amateur
I based this jig of of something I saw in Julius Borges' shop. It took only about 20 minutes to build and made the job of lacating the bridge so easy that I'll take the time to make one of these for every scale length I use.

First, here's a drawing:


I used a drawing be cause the jig is polycarbonate and hard to photograph.

First I cut a piece of 3/32" polycarbonate to 3" x 26".
Next I clamp a straight edge to the center of the strip and score a line down the middle with an X acto knife.

Next I mark out my scale length (In my case 24.9") and with a square score a line 90 degrees to my center score.

Next I layout a line for my compensated saddle. I compensate the saddle by 1/8" at the center line.
I compensate the saddle by 1/16" at the treble edge of the strip of plastic. I chose to make my strip 3" wide bcause my saddle is 3" wide. I take a straight edge and score a line from the treble edge to the bass edge using my two compensation marks as guides. This new line is the CENTER of my saddle slot.

So far this is just like I layed it all out on paper as described in Cumpiano.

Next, I cut off a 3/16" by 2-1/2 inch piece of the 3/32" inch plastic. I sand one edge of the small piece of plastic and lightly sand a line on the other side of the platic under the score line I made for the compensation position.

I carefully clamp this small piece of plastic to the larger strip so that the score line is centered. I then wick in some solvent to glue this piece on. After 2 minutes or so I can remove the clamps. The jig is done.

Here is how you use it. Mark a center dot at on the fretboard at the nut position and at the sound hole position. Lay the jig on top of the fretboard so that the center line of the jig lines up with the center of the fretboard and the end of the jig is flush against the end of the fretboard. Clamp it down. At this point the small piece of plastic is in the exact spot that your saddle is supposed to be. Take you pre-slotted bridge and slide it up under jig so that the blastic slide into the saddle slot. The bridge will not be able to slide toward or away from the nut. It will have some play side to side. I put a center dot on the top of the bridge to line up with the center line of the jig. The jig hold the bridge pretty securely. Now you can mark around the bridge with your exacto knife.

I cut my jig so that it doesn't extend much beyoud the plastic saddle piece. This allows me to drill the 1 and 6 bridge pin holes. I use the Fox bridge clamp to mount my bridge so the pin holes are and excellent way to set the bridge position.

What I like most about this jig is that almost nothing slides around while your setting the bridge. You can accurately position a bridge in 15 seconds.
Mike Mahar38591.7561342593


Top
 Profile  
 
 Post subject:
PostPosted: Sat Aug 27, 2005 9:15 am 
Offline
Site Admin
User avatar

Joined: Mon Dec 27, 2004 5:02 am
Posts: 8553
Location: United States
First name: Lance
Last Name: Kragenbrink
City: Vandercook Lake
State: Michigan
Zip/Postal Code: 49203
Country: USA
Focus: Build
Status: Semi-pro
Mike, its funny you should post this, I have a simular Jig that John Hall Blues Creek Guitars donated for the OLF Auction, Ill be putting it up next week.

_________________
Support the OLF! Bookmark our STEWMAC link Today!
Lance@LuthiersForum.com


Top
 Profile  
 
 Post subject:
PostPosted: Sat Aug 27, 2005 9:20 am 
Offline
Brazilian Rosewood
Brazilian Rosewood

Joined: Thu Jun 16, 2005 10:31 am
Posts: 2103
Location: United Kingdom
I,ve got one of the jigs from Blues creek and it is a very similiar principle, but it is adjustable.

Once I recieved some instruction from John and stopped trying to use it the wrong way round 
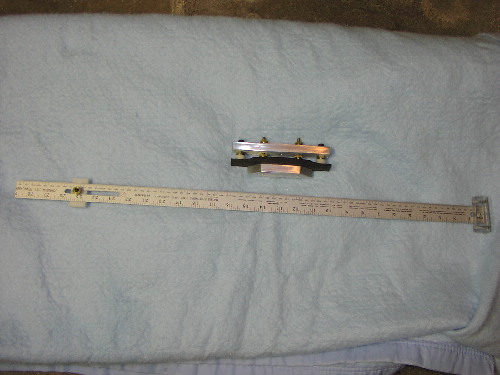
, I have only had it a few weeks, and have done 3 bridge sets with it, but you couldn't part me from it, at excellant and engenius tool. Beautifully engineered

RussellR38591.7651851852


Top
 Profile  
 
 Post subject:
PostPosted: Sat Aug 27, 2005 12:18 pm 
Offline
Koa
Koa

Joined: Thu Feb 17, 2005 3:38 pm
Posts: 1542
Location: United States
Hi Guys
here is the poop on my jig. the unit is laid out by the rule. You set the length. I add about .125 to the length. This helps when intonating. I tried so often to set them at dead length and never had a good result . Once I started to find the secret I kept going long till T stopped being sharp.
   With the scale set you drill 2 3/16 inch holes in the 1st and 6 th location. Wax the posts so glue doesn't form on the threads. Use the knurled nuts and lexan to glue the saddle area of the bridge . The wings are done last after you clean up the glue. Once the upper plate is on just lightly snug them on the wings. It doens't take much.
Any questions feel free to ask and I will do what I can to answer any question. I will have a OLF special right after the auction
johntippie5338591.8915740741


Top
 Profile  
 
 Post subject:
PostPosted: Sat Aug 27, 2005 12:38 pm 
Offline
Koa
Koa

Joined: Wed Dec 29, 2004 3:25 am
Posts: 886
Location: United States
John.....

Questions questions questions...

I take it that it does multiple scales??

Can it adapt to different width's on the 1st and 6th?

and how much...

I LOVE it..

-Paul-

_________________
-Paul-
Image
Patriot Guitars


Top
 Profile  
 
 Post subject:
PostPosted: Sat Aug 27, 2005 12:42 pm 
Offline
Contributing Member
Contributing Member

Joined: Wed Feb 02, 2005 3:14 am
Posts: 2590
Location: United States
The "T" string John? Man you must use some interesting tunings!!

_________________
http://www.presnallguitars.com


Top
 Profile  
 
 Post subject:
PostPosted: Sat Aug 27, 2005 9:48 pm 
Offline
Brazilian Rosewood
Brazilian Rosewood

Joined: Thu Jun 16, 2005 10:31 am
Posts: 2103
Location: United Kingdom
Hi Paul

Yes it does different Scales.

One of the posts on the clamp slides to cope with different String Spacings at the Bridge.


Top
 Profile  
 
 Post subject:
PostPosted: Sat Aug 27, 2005 10:05 pm 
Offline
Koa
Koa

Joined: Thu Feb 17, 2005 3:38 pm
Posts: 1542
Location: United States
T is TYPO. LOL
Never type after spraying lacquer
john hall
cheaper than beer and ya ain't gotta pee


Top
 Profile  
 
 Post subject:
PostPosted: Sun Aug 28, 2005 1:28 am 
Offline
Brazilian Rosewood
Brazilian Rosewood

Joined: Tue Feb 15, 2005 10:31 am
Posts: 3134
Location: United States
So John,

I seems every once in a while I read about a jig or tool that someone has purchased from you, but I can't seem to find it on your web site! Please, let us know about all the stuff you offer!


Top
 Profile  
 
 Post subject:
PostPosted: Sun Aug 28, 2005 2:36 am 
Offline
Koa
Koa

Joined: Sun Jan 02, 2005 1:38 pm
Posts: 1106
Location: Amherst, NH USA
Focus: Build
Status: Amateur
[QUOTE=tippie53] Hi Guys
here is the poop on my jig. the unit is laid out by the rule. You set the length. I add about .125 to the length. This helps when intonating. I tried so often to set them at dead length and never had a good result . Once I started to find the secret I kept going long till T stopped being sharp.
   With the scale set you drill 2 3/16 inch holes in the 1st and 6 th location. Wax the posts so glue doesn't form on the threads. Use the knurled nuts and lexan to glue the saddle area of the bridge . The wings are done last after you clean up the glue. Once the upper plate is on just lightly snug them on the wings. It doens't take much.
Any questions feel free to ask and I will do what I can to answer any question. I will have a OLF special right after the auction
john[/QUOTE]

John, I don't understand yet how you use your jig. What do you mean by "glue the saddle area under the bridge" and then you glue the wings next? Once you've glued down the saddle area, how do you get the glue under the wings?
Do you mean that you tighten the clamp in the saddle area fist and then tighten the clamp on the wings with glue spread on the whole bottom of the bridge?

Does your jig line up the saddle slot or the bridge pin holes? It is hard to tell from the picture. How do you center the jig on the fretboard? You have a slot cut at the nut end but nothing further up the neck to align things.


Top
 Profile  
 
 Post subject:
PostPosted: Sun Aug 28, 2005 2:59 am 
Offline
Koa
Koa

Joined: Sun Jan 02, 2005 1:38 pm
Posts: 1106
Location: Amherst, NH USA
Focus: Build
Status: Amateur
If I were making a jig to sell I would probably make it adjustable. However, anything that can be adjusted has to be adjusted and can be adjusted wrong. One of the strengths of my simple jig is that it is correct for 24.9" scale length and unless someone sneaks into my shop and trims off the end of the jig, it should be good.

Making a new one for other scale lengths is a simple enough job that I'm inclined to do it that way rather than make it adjustable.


Top
 Profile  
 
 Post subject:
PostPosted: Sun Aug 28, 2005 4:52 am 
Offline
Brazilian Rosewood
Brazilian Rosewood

Joined: Thu Jun 16, 2005 10:31 am
Posts: 2103
Location: United Kingdom
Hi Mike

What I think John means is you glue the whole thing clamp the centre then tighten the bridge wing clamps.

The jig has a piece that sits into the saddle slot.

Russell


Top
 Profile  
 
 Post subject:
PostPosted: Sun Aug 28, 2005 6:02 am 
Offline
Mahogany
Mahogany

Joined: Wed Feb 02, 2005 5:20 pm
Posts: 56
Location: United States
I like the stewmac version - fairly low tech, but it worked for me.


Top
 Profile  
 
 Post subject:
PostPosted: Sun Aug 28, 2005 8:04 am 
Offline
Koa
Koa
User avatar

Joined: Wed Dec 29, 2004 3:48 pm
Posts: 1478
First name: Don
Last Name: Atwood
City: Arlington
State: Virginia
Country: USA
Focus: Build
Status: Amateur
I have the StewMac Saddlematic and like it for determining bridge location. However, I then use John's clamp for bridge glue up.

_________________
Don Atwood
Arlington, VA


Top
 Profile  
 
 Post subject:
PostPosted: Sun Aug 28, 2005 11:57 am 
Offline
Koa
Koa

Joined: Thu Feb 17, 2005 3:38 pm
Posts: 1542
Location: United States
   If you look at the scale the unit is adjustable. The lower end will drop into the saddle slot for assured alighment and postioning. 2 3/16 holes are drilled so the clamp can pin the bridge and keep it from moving .
    The bridge is then glued on.
   This comes up through the and then the leaxan is placed over the bridge 
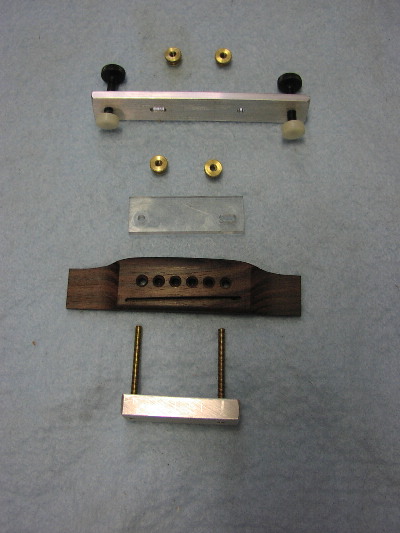
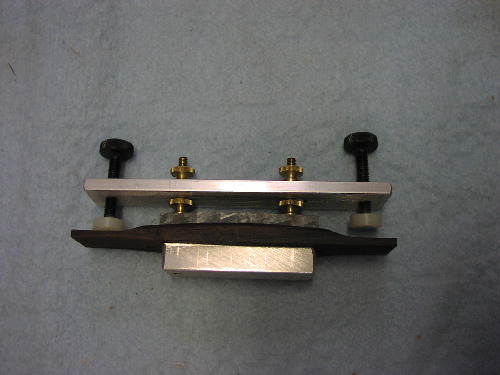
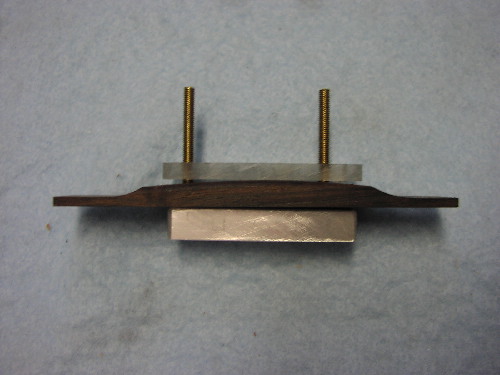
then the knurled nuts are tighten till the lexan takes the shape of the bridge at the saddle area 
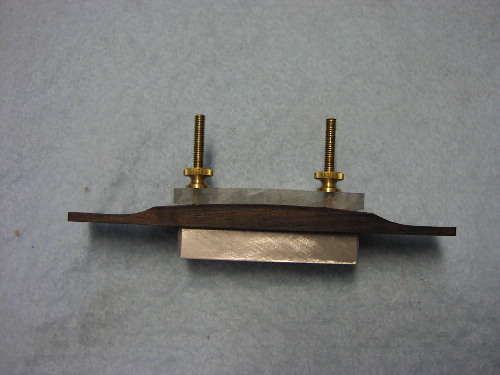
Now you place the upper unit on and with the nuts on the post the toggle clamps secure the wings. I hope this makes the use of this clear. If you have any questions please let me know I want you all to be able to see how this works.


Top
 Profile  
 
 Post subject:
PostPosted: Sun Aug 28, 2005 2:51 pm 
Offline
Brazilian Rosewood
Brazilian Rosewood
User avatar

Joined: Fri Jun 10, 2005 9:51 am
Posts: 2148
Location: San Diego, CA
First name: Andy
Last Name: Zimmerman
City: San Diego
State: CA
Zip/Postal Code: 92103
Country: United States
Focus: Build
John
How much is this jig for OLFers
Andy

_________________
Andy Z.
http://www.lazydogguitars.com


Top
 Profile  
 
 Post subject:
PostPosted: Sun Aug 28, 2005 11:22 pm 
Offline
Koa
Koa

Joined: Thu Feb 17, 2005 3:38 pm
Posts: 1542
Location: United States
   Regular price is $75 for the pair. I will do $65 for the OLFers.
    Free Shipping also.
John


Top
 Profile  
 
 Post subject:
PostPosted: Mon Aug 29, 2005 12:46 am 
Offline
Brazilian Rosewood
Brazilian Rosewood
User avatar

Joined: Thu Jan 06, 2005 7:29 am
Posts: 3840
Location: England
John can't find it on your site. Have you got a link to it?

Colin

_________________
I don't believe in anything, I simply make use of a set of reasonable working hypotheses.


Top
 Profile  
 
 Post subject:
PostPosted: Mon Aug 29, 2005 5:25 am 
Offline
Brazilian Rosewood
Brazilian Rosewood

Joined: Tue Feb 15, 2005 10:31 am
Posts: 3134
Location: United States
I'll second what Colin said. Please see my message above.


Top
 Profile  
 
 Post subject:
PostPosted: Mon Aug 29, 2005 6:17 am 
Offline
Koa
Koa

Joined: Sun Jan 02, 2005 1:38 pm
Posts: 1106
Location: Amherst, NH USA
Focus: Build
Status: Amateur
John,
I have a suggestion on a small but important change to your clamp. Make one of the holes through which the screws go slotted 90 degrees to the direction of the other slot.

I just glued up a pyramid bridge where the pin holes were parallel to the saddle. This caused the wing clamp to be severely off center on the treble side and I couldn't make the camp pressure even. If my jig had been slotted in the other direction I could have lined it up with the bridge and not the pin holes.


Top
 Profile  
 
 Post subject:
PostPosted: Mon Aug 29, 2005 6:28 am 
Offline
Brazilian Rosewood
Brazilian Rosewood
User avatar

Joined: Sat Feb 12, 2005 1:07 am
Posts: 2281
Location: Jones, OK
John, are the brass screws in the baseplate adjustable side to side? Or do you have to use the same pin spacing all the time so the screws will fit correctly?

_________________
Dave Rector
Rector Guitars


Top
 Profile  
 
 Post subject:
PostPosted: Mon Aug 29, 2005 2:29 pm 
Offline
Koa
Koa

Joined: Thu Feb 17, 2005 3:38 pm
Posts: 1542
Location: United States
The bridge clamp is adjustable to fit a 2 to 2 3/8 spacing. there is a cylinder the will open up.
I don't have this in the site as of yet. I am in the process of making a new face lift and I hope to have a full on line catlog on the site.
thanks for all the input. I do listen
john


Top
 Profile  
 
Display posts from previous:  Sort by  
Post new topic Reply to topic  [ 22 posts ] 

All times are UTC - 5 hours


Who is online

Users browsing this forum: No registered users and 15 guests


You cannot post new topics in this forum
You cannot reply to topics in this forum
You cannot edit your posts in this forum
You cannot delete your posts in this forum
You cannot post attachments in this forum

Jump to:  
Powered by phpBB® Forum Software © phpBB Group
phpBB customization services by 2by2host.com