Official Luthiers Forum! http://w-ww.luthiersforum.com/forum/ |
|
Binding jigs http://w-ww.luthiersforum.com/forum/viewtopic.php?f=10102&t=3113 |
Page 1 of 1 |
Author: | Dave Anderson [ Mon Sep 05, 2005 3:24 am ] |
Post subject: | |
Does anyone recomend the jig from GuitarJigs.com or some other design for cutting your binding channels? |
Author: | crazymanmichael [ Mon Sep 05, 2005 3:29 am ] |
Post subject: | |
i use the willims jig descibed in the tools and jigs section along with the binding bit from luthier suppliers, lik above. it's inexpensive to build and works very well. |
Author: | Pwoolson [ Mon Sep 05, 2005 3:41 am ] |
Post subject: | |
I've done it both ways so I feel I can make an objective review. The jig I build based on Don Williams' ideas works very well for me. I did only minor modifications like put a supporting caster under the body of the unit. The thing is solid as a rock and is completely effortless to operate. The only minor flaw is that my extensions are about 1/2" too short. I can cut in one pass but it is maxed out in both directions on my largest body. I think longer slides will cure that problem. Ah, yes, the review: If you are anything like me, you'll be much happier with Don's design. It's much easier to move the router around the guitar (which is fixed on the bench) than it is to move the guitar through the router (which is fixed on the bench on the LMI design). If I were you I'd look into this design and I'd be happy to help out if you need any. |
Author: | Josh H [ Mon Sep 05, 2005 3:49 am ] |
Post subject: | |
Dave I use the guitarjigs.com jig and it works great! I cannot make a good comparison as it is the only jig I have used. I can cut all my binding and purfling channels in 10-20 min depending on the binding scheme. I would defiantly recommend it. Josh |
Author: | LanceK [ Mon Sep 05, 2005 3:51 am ] |
Post subject: | |
Josh - I just got on of Guitar Jigs units, and have never used it yet. Would you mind giving a little details as to how you use it, rotation of the body, Purfs first/last? where do you start? etc? Thanks Lance |
Author: | Dave Anderson [ Mon Sep 05, 2005 4:17 am ] |
Post subject: | |
Thanks guys, I don't really have a lot of room in my shop so I think I might go with the guitarjigs unit.The Don Williams jig looks great though so I'll have to think about it .It would be definately cheaper to build the Williams jig!! |
Author: | Josh H [ Mon Sep 05, 2005 4:29 am ] |
Post subject: | |
Lance Sure I could, but Mark has already put together a fine set of instructions on his site (with pictures). I would recommend anyone who is interested look through that first. Just look at the binding jig and you will see a link for mounting and routing instructions. I will add a few thought of my own. I like to work at eye level with the cutter/roller. That way I can make sure that the sides are always in contact with the roller. I mount the jig in my vise and kneel down in front of it. You could also mount it higher so that you could use it at eye level while standing. This is just my preference. The body is rotated so that it is always moving into the cutter. You would think you might have issues with tear out but I have not had any problems when routing binding channels. My suggestion is that you flush up the top and back with a hand held laminate trimmer before you use the 31mm roller supplied for flush cutting. If I remember right I did have tear out issues on one top when I tried to flush cut a lot of top overhang with the 31 mm roller. Flush cut with the trimmer and then go to the 31 roller. I then sand the sides and make sure they are flat all around. Make sure that you do your test cuts on a scrap. Once my test cut looks like it is where it should be I route a small section of the top at the neck block. This is a section that will be covered by the heel and fingerboard so if it is incorrect it will be covered. Check your test cut on the body to make sure it is correct. If it is correct then go ahead and route the top and back binding channels. I usually do 2 passes, after which I will inspect the channel and go over any spots which look like they may need another pass. Next I cut the purfling channels. Again test cut on a scrap. And this should be done on the same one you used for your binding cut. Once it looks good route the section under the neck. If that looks good go ahead and rout your purfling channels. I do 2 passes. Inspect the channels and clean up any fuzz around the top or back with a little sandpaper. There are a few things which are required for the jig to work properly. One your trimmer/router must be mounted properly. Do yourself a favour and dedicate one trimmer to this jig. If you are continually mounting and removing the trimmer you will have problems. I know this from experience. I use the little Makita trimmer pictures on guitarjigs. Follow the directions on guitarjigs.com for mounting the trimmer. Also the sides of the instrument must be in contact with both rollers the whole time. Don't tip the guitar off the rollers into the bit or you will have some problems. Also your sides must be smooth and square as they are the reference for the cutter. If you have bumps or divots in your sides they will show in the channel. The only times I have had issues with this jig is when one of these factors has been ignored. Once I fix whatever was out of place it works great. I like this jig because it only has one cutter size. No changing bearings and the rollers can be changed in about 10 seconds. It can be used with any binding and purfling combination with ease. Once properly setup and after one or two guitars you will find that you can get pretty fast at cutting the channels. Please ask if you have any more specific question. Hope this is helpful. Josh |
Author: | Kelby [ Mon Sep 05, 2005 6:56 am ] |
Post subject: | |
I use the LMI jig because that was the only one I knew about at the time I needed one. I can't compare it to the other units, but I have been very happy with it. It doesn't bother me to move the body rather than the router, although as Paul says, if that's a concern for you, don't get the LMI one. |
Author: | Don Williams [ Mon Sep 05, 2005 7:15 am ] |
Post subject: | |
I'm hoping Lance will send me his GuitarJigs unit to test out and see what I think about it. I suspect that I would like using it. It looks like a great unit. |
Author: | RussellR [ Mon Sep 05, 2005 9:17 am ] |
Post subject: | |
I was looking at Dons Jig in the Jig section, and I am puzzled. What is a Lazy Susan ? |
Author: | Terry Stowell [ Mon Sep 05, 2005 10:18 am ] |
Post subject: | |
[QUOTE=RussellR] I was looking at Dons Jig in the Jig section, and I am puzzled. What is a Lazy Susan ? [/QUOTE] Somethin you DON'T want to accuse my wife of being ![]() It's a pieec of hardware that you attach to the bottom of a (usually) round piece of wood that is placed on your kitchen table,(for condiments etc.) that enables it to rotate for easy access for everyone at the table. It's a spinny dealy thingy. |
Author: | RussellR [ Mon Sep 05, 2005 10:32 am ] |
Post subject: | |
Thanks Terry |
Author: | tippie53 [ Mon Sep 05, 2005 1:13 pm ] |
Post subject: | |
The basis of both these jigs is to get an even cut. I to prefer the staiontary router and move the body but in reality it matters what you think and want to try, I am a beliver in simplicity and while the unit is not a bad one there are alot of moving parts. It is complicated but it does work. Make a decision on what info you have. The Rebekke design has be aroung a long time as was infact originally a move the router design. It just seemed to work better the other way. I also am concerned with runaway. john |
Author: | Michael Dale Payne [ Tue Sep 06, 2005 1:27 am ] |
Post subject: | |
I can see one real advantage to the Guitar Jig's model, that being that the guid bearing bars are stationary i.e. not rotating. Eazy to add tape for custom depth settings, plus how many of use have put to mch side pressure oan were left with a slight indention from the rotating guide bearing. I supose this issue could still be an issue with this jig, but I don't think quite as likly. I use one of Bues Creeks binding jig, so I can't really compair. Lance give it a try and let us know ![]() |
Author: | rlabbe [ Tue Sep 06, 2005 2:03 am ] |
Post subject: | |
I use the binding cutting base from luthiertool. http://www.luthiertool.com/binding_cutter_base.html It takes a bit of practice to not wobble the trimmer while moving it around the guitar, but I'm very happy with the results now that I have a feel for it. The downside, if you want to call it that, is that there are no bearings - you need to adjust the base to control how much of the bit is available to control the depth and height of the cut. Adjustability means a lot of finiky adjustments and tests. On the other hand, the storage space required is minimal, which is an important attribute in my tiny space. I'm strongly considering buying a second one so I can leave one set up for cutting the binding channel, and the second for the purfling channel. I'd definitely do that if I was in production. |
Author: | LanceK [ Tue Sep 06, 2005 2:13 am ] |
Post subject: | |
Michael - the Acacia Dread is on the queue for binding next. ![]() |
Author: | Mike Mahar [ Tue Sep 06, 2005 7:46 am ] |
Post subject: | |
[QUOTE=Pwoolson] The only minor flaw is that my extensions are about 1/2" too short. I can cut in one pass but it is maxed out in both directions on my largest body. I think longer slides will cure that problem. [/QUOTE] Paul, I thought I had this problem until I realized that I could turn the guitar sideways. ![]() |
Author: | Pwoolson [ Tue Sep 06, 2005 8:10 am ] |
Post subject: | |
Mike, I'm feeling pretty stupid right now. Leave it to a Luthier to completely over engineer something and then realize that the fix can be as simple as turning the guitar sideways. I'll have to see it it will still fit on my bench that way. Great tip. Thanks Paul |
Author: | old man [ Tue Sep 06, 2005 2:51 pm ] |
Post subject: | |
Dave, have you looked at the jigs section of this forum? There are some great tools there. I built Don Williams binding jig, Bob C.'s brace shaping jig, John How's bridge shaping jig, and Sylvan Wells FB taper jig. All outstanding ideas or adaptations. I can't wait to use the binding jig. I put the highest quality drawer slide and turn table bearing in it that I could find and that thing is smooth as glass. Ron |
Author: | Dave Anderson [ Tue Sep 06, 2005 3:28 pm ] |
Post subject: | |
Ron, Yes I've checked out the jigs section and you're right there are some nice tools in there. I am considering making the Williams binding jig.Thanks |
Author: | Arnt Rian [ Tue Sep 06, 2005 6:31 pm ] |
Post subject: | |
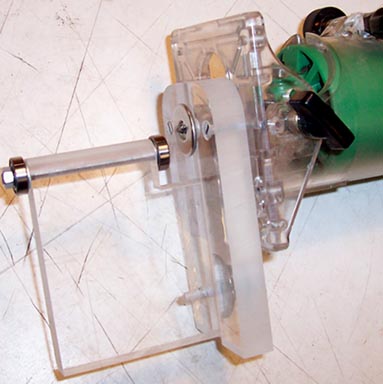
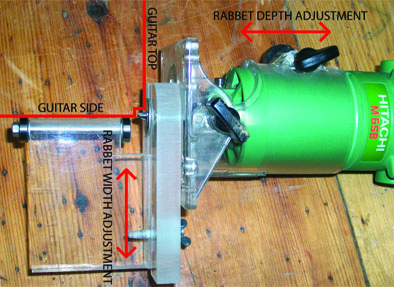
I'm not exactly sure how the binding jig from “Guitar Jigs” works, but as I understand it's a double bearing foot or base that registers off the guitar's sides and on its top or back edge. I used this principle when I made one out of 15 mm Plexiglas scraps that works very well for me. The binding rabbet width is adjusted by moving the bottom part in or out in groove in the top part. A wing nut and a screw that is tapped into the moving bottom part secure it to the fixed upper part. The binding rabbet height is adjusted on the trimmer base adjustment screw. I like the fact that I can use 1/4" carbide down cut bits (from LMI) with this jig, so the cut is very clean. The bit protrudes through a washer glued to the base which makes sure you only register on the edge of the top or back plate, meaning the plate’s radius will not interfere with the cut. I clamp this jig in a vise and rotate the guitar. From the descriptions by Josh and others above you need to be aware of many of the same things that you do with the “Guitar Jigs” trimmer with this one, but this one is a lot cheaper! Hopefully the picture explains better than my words... ![]() |
Author: | Josh H [ Tue Sep 06, 2005 11:13 pm ] |
Post subject: | |
Arnt Great looking Jig!! Yes you are right, the guitarjigs jig and your jig work by the same principle. I think it would be great if you could submit a few more pictures and a description and get Lance to put it on the Jigs page of the forum. Josh |
Author: | Arnt Rian [ Wed Sep 07, 2005 6:21 am ] |
Post subject: | |
Thanks Josh! This is just a humble jig, based on about a dozen different designs I have seen in the MIMF archives and elsewhere around the internet. I'm sure the Don Williams or LMI ones are more fool proof, but like I said this one works so well for me that won't bother with one of the more elaborate ones (yet!). I made this quick illustration of how the thing works, I don't have any pictures of it in action. I usually cut first from the widest part of the bouts towards the end block, neck block and waist, then one or two passes around the entire instrument. There's usually little to no fuzz to clean up afterwards, and the rabbet is remarkably even! ![]() <edit> something wrong with picture, it seems... It's a .jpeg of 79kb...can't seem to fix it...hmmm |
Author: | CarltonM [ Thu Sep 08, 2005 2:35 am ] |
Post subject: | |
Thanks, Arnt. I've been thinking about just such a jig, but I haven't been able to visualize how to accomplish some of the details, and it turns out you've solved that problem for me! Excellent! ![]() |
Page 1 of 1 | All times are UTC - 5 hours |
Powered by phpBB® Forum Software © phpBB Group http://www.phpbb.com/ |