The repair is a tough on that takes you into several areas that only experienced repair people should travel. I'm assumiong that you've explained to your cutomer that the damage has created a situation that impossible to reverse completely and that some visible evidence of the damage and subsequent repair work will always be resent, no matter who does the repair. There are certain things that even those guys who claim to be the best in the world can;t make disappear, unfortunately
The fact that you have the pieces from the back and top make those parts a snap to get very close to their original condition. I'd leave their replacement for a time later in the repair, though. Repair the kerfed lining and the side before gluing them back in place just because their absence will allow for a little more clearance and visibility for the time being.
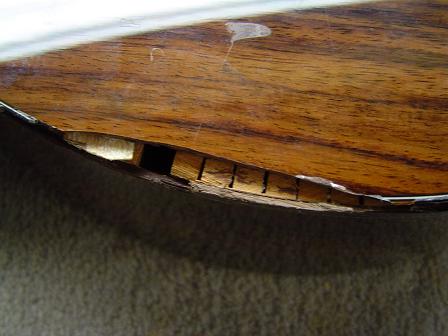
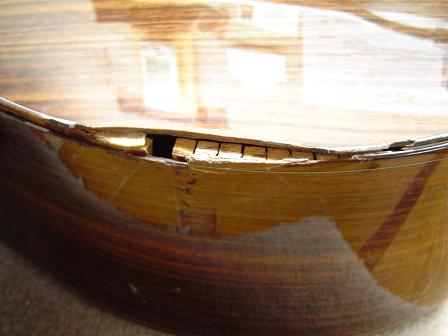
I would advise lifting the top and back from more of the kerfing using some heat and a warm spatula to coax them away as you do. Lift both plates away from the kerfing at least three to four inches in either direction beyond the actual impact area. This is quite simply to give you the flexibility needed to provide clearance for the linings to be seen, reached and repaired more easily and efficiently.
Check all segments of the lining for a few inches beyond the damaged area to be sure that anything that is loose in lifted off and all glue residue is removed to be able to achieve a clean reglue surface for any loose sections. One of the worst feelings is to do a repair of that sort in an area only to spot a few loose pieces through the soundhole later after all is said and done.
Be sure to check the top and back bracing for any indication of their being knocked loose during the accident that cause the damage. and repair thenm before the plates are glued down to allow you to work through the openings with clamps.
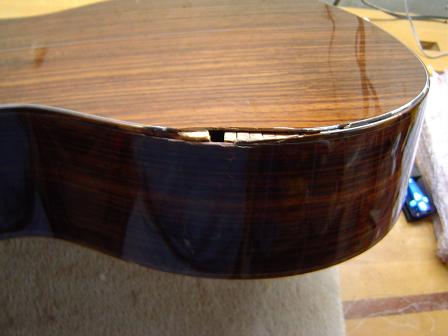
You can repair any cracks or damage to the side while the top and back are nice and loose over the area and have plenty of room for cauls and clamps with their ability to be lifted well above the edges. Than the linings can be easily replaced or repaired with what should prove to be sufficient clearance to reclaim the crown of the exisitng linings closely to provide a consistent glue surface while maintaining the radius of the back and top.
The binding can be closely matched with materials from any of several vendors and neatly replaced with scarf joints a few inches outside of the damaged area after the top and back are repaired and glued back in place.
As far as reapiring the finish. Anyone who has never used the polyester finish that Taylor uses will tell you that it doesn't repair well, but any of us who use it on our guitars regularly have had better results than we get with lacquer. Lacquer repairs always have clearly visible witness lines since the shrinkage that occurs is unavoidable with it. Even on repairs that I've seen done by the best repair people in the country, the lacquer blendng and repair is always evident.
The hardness of the polyester as compared to lacquer make repairing it with other finishes pretty touchy since it will come up to gloss with much more difficulty than the other finishes when sprayed over it.The trouble areas will prove to be the edges of any repair wher the sanded prep area in the polyester is running our from under the feathered spray edges of the new finish. As you buff it, the new finish will come to a full gloss before the polyester and the dull line tha results around the repair is that un buffed fine line where the two meet. As you continue to buff in an effort to blend them, the softer new finish just gets worked off and a new line of the unglossed polyester shows up under it. That's precisely the reason why most people have trouble repairing it. You'll get the best results when you repair using the same material.
With the UV cured finish that Taylor uses, you can get very good results with the polyester two part finish from Lawrence McFadden. You don't need a UV light or special masks or protection other than what you would use for your lacquer spraying. Rick Turner uses it on his guitars and it is very similar to the UV cured material with the exception of the UV sensitive activator or curing agent.
Once your repairs are complete and the area has been sanded in preparation for spray, be sure to take the entire area to 1000 grit. Your sanding should run well beyond the repair area by a few inches in all directions. The polyester finish needs the sanding texture, even though very fine, to take advantage of the mechanical bond that it will create between the existing finish and the new coats.
Spray with your touch up gun over the area allowing you pattern to catch the sanded areas of the old finish. Build it as you would any finish with several coats, sanding in between every pair or three. Once the finish is cured which is only a day or two, you will be able to nicely level and sand it to blend cleanly into the old finish with very little eveidence of repair.
Bring it up to about 1500 grit using 3M Trizact papers and then go to you buffing wheel to pull it to gloss. It is a very durable and workable finish that will surprize you with the results you get.
These are just things that I know from my experience so there may be another set of ideas you chose to employ. I hope these help a little , though.
Regards,
Kevin Gallagher/Omega GuitarsKevin Gallagher38635.4532986111
|