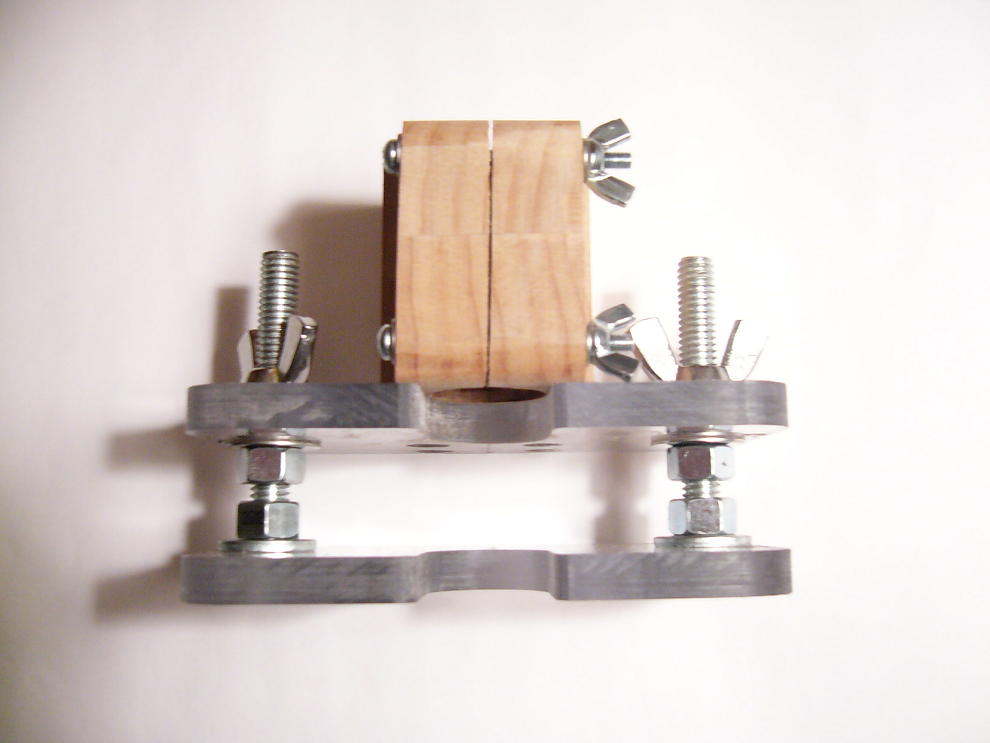
Here's my contribution to the world of jigs from my new store "Jigs'R'Us". Seriously the first two pictures are of a router base designed for a Foredom handpiece.
Here's another angle shot....

| Official Luthiers Forum! http://w-ww.luthiersforum.com/forum/ |
|
| Foredom Router Base + Rosette Cutter http://w-ww.luthiersforum.com/forum/viewtopic.php?f=10102&t=4625 |
Page 1 of 1 |
| Author: | Anthony Z [ Thu Jan 19, 2006 3:07 pm ] |
| Post subject: | |
Here's my contribution to the world of jigs from my new store "Jigs'R'Us". Seriously the first two pictures are of a router base designed for a Foredom handpiece.
Here's another angle shot....
|
|
| Author: | Anthony Z [ Thu Jan 19, 2006 3:09 pm ] |
| Post subject: | |
To convert it to a Rosette cutter, undo the wing nuts and place it on this base. I got the idea for the Rosette base from a Big Red Book VII article on Jeff Elliott (the idea for using nylon lock nuts to hold the threaded rod in the middle piece is thanks to Tony Karol). 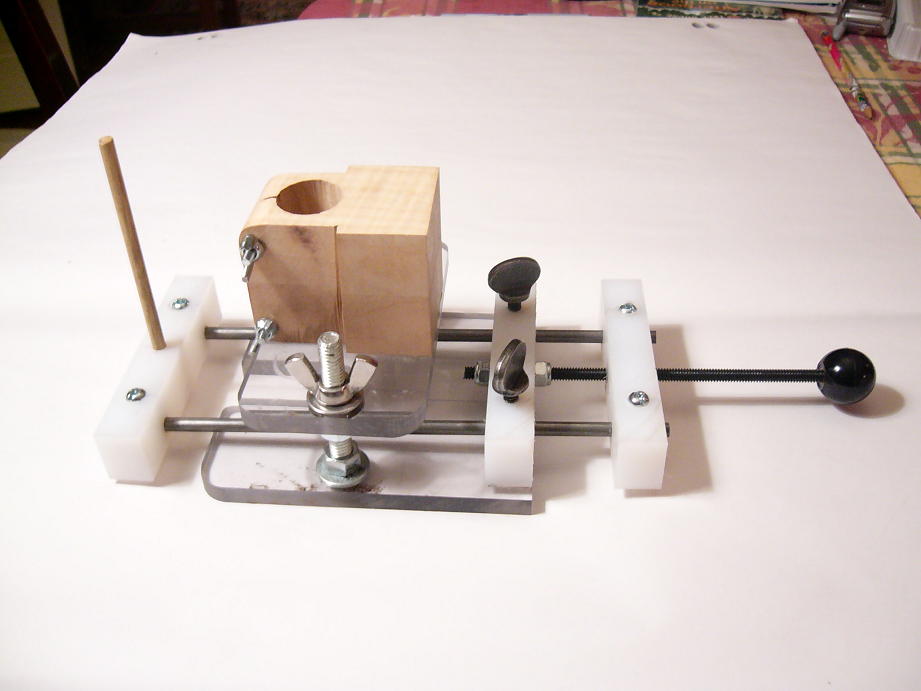 |
|
| Author: | Rod True [ Thu Jan 19, 2006 3:24 pm ] |
| Post subject: | |
Tony, very nice, That looks like something I need. |
|
| Author: | Dickey [ Thu Jan 19, 2006 11:52 pm ] |
| Post subject: | |
Nice work Anthony. |
|
| Author: | TonyKarol [ Fri Jan 20, 2006 1:17 am ] |
| Post subject: | |
Hey bud .. live by the jig, die by the jig  ..cool. ..cool.
|
|
| Author: | Alain Desforges [ Fri Jan 20, 2006 1:57 am ] |
| Post subject: | |
Very nice! |
|
| Author: | Serge Poirier [ Fri Jan 20, 2006 5:24 am ] |
| Post subject: | |
Beautiful tool! Serge |
|
| Author: | Michael Dale Payne [ Fri Jan 20, 2006 6:34 am ] |
| Post subject: | |
Nice tool  Being a mechanical engineer I do have a comment for you on the rosette attachment i.e. the micro adjustment screw and the same would hold true for height adjustment. Being a mechanical engineer I do have a comment for you on the rosette attachment i.e. the micro adjustment screw and the same would hold true for height adjustment.
When you put 2 nuts on opposing sides of a buttress plate and run a bolt or screw through them, it is impossible to keep the nuts both aginst the plate and in sync and therefore one or the other wants to bind on the screw and buttress plate and become a locking nut. This may have been your intention, to have one of the nuts as a locking nut. However unless you have the other nut attached i.e. permantly secured in some manner to the buttress plate when you back off the locking nut and adjust the micro adjustment screw the other nut will want to turn with the screw or bind on the buttress plate depending on direction you turn the screw. This affect will cause loss of micro adjustment control due to the slop imposed until you thread the nut up against the buttress plate again. I mention this not to criticize you tool at all!!, because I figure you have glued or permanently attached one of the nuts to the buttress plate in one way or another. Rather I mention it to help other that may want to build a similar jig avoid this issue. If I was building a similar jig I would use a splined or knurled insert nut installed in the buttress plate and one locking nut on the outside of the buttress plate. This would give the best micro adjustment control and avoid any chance of having slop in the adjustment. Two nuts of a width of 1/8” each will not provide the in sync engagement that one nut 1/4” long nut does because they would never be in true thread sync with each other. You may have or may also tap the buttress plate to achieve the same result but I would think threading polycarbonate buttress plate would not hold up long. Sorry just an engineer’s critique 
|
|
| Author: | TonyKarol [ Fri Jan 20, 2006 7:20 am ] |
| Post subject: | |
Hi Michael, Not being a mechy, but a very mechy oriented electrical engineer, i will add my two cents in. I sort of under stand what you are saying about the micro adjust on the rosette radius control - but here is how this is set up. The two nuts on either side of the plate are in fact nylon lock nuts. They are just snugged up to the UHMW plate from either side, and the thru hole is not threaded, it allows the rod to turn freely. Both nuts turn with the rod when the adjuster is rotated. Seeing as the rod turns much freer and moves the plate with less friction than is required to move either of the lock nuts, I fail to see how this jig wont be extremely accurate - after all, I have had mine for 5 years and have never touched the lock nuts - they dont move. The up down of the router is a different story because there are two bolts to deal with on their own rods. But even there although it may be tricky to adjust, once the bit depth is set, all it needs to be is tight. Just my observations based upon my experiences. |
|
| Author: | Michael Dale Payne [ Fri Jan 20, 2006 7:58 am ] |
| Post subject: | |
My point is less apparent on a small fine thread screw but none the less is still true just that the force is less apparent. The one thing that can happen in your favor is if the thickness of the plate is exactly equal to multiples of the thread pitch, then what I said is not a factor. But it does not happen often. Still none the less a single long nut as the guide nut will be more accurate than two narrow nuts. The more synchronized threads engaged in a single nut the less the slack in the adjustment. Please keep in mind here that with this small of a thread pitch we are talking in micro inches. For explanation purpose, if the adjusting screw was 1”- 8thd and the plate did not equal exactly an even multiple of the thread pitch you would notice the effect I am referring to instantly. The friction of the nylon against the polycarbonate plate is over coming the tendency of the nut following the direction of the screw and helps prevent the screw walking in the nuts so this set up works pretty good. I design and build large dia. lead screw and slide rail systems on pumping units and this issue is very apparent. The smaller the screw and lighter the load it is less apparent or smaller the forces are. If you look at a lathe’s worm screw and guide nut you will notice that the guide nut continuously engages a lot of threads, the more it engages the less slack allowed in the adjustment. Please understand I was not trying to criticize you tooling. Just me rambling about and issue I deal with every day. And I must admit I did not think about using nylon insert nuts..Daaa  Their friction overcome most of the issues I was referring to. Their friction overcome most of the issues I was referring to.
|
|
| Author: | TonyKarol [ Fri Jan 20, 2006 8:33 am ] |
| Post subject: | |
Hi Michael, point well taken - I understand fully the implications in larger and more forceful applications. Any accuracy much beyond a couple thou here doesnt matter either - I mean the shell strips we all use varies that much anyway, and the glue has to go somewhere too (as I always tell the guy whose cracked headstock has a hairline ridge after I fix it) !!! |
|
| Author: | Michael Dale Payne [ Fri Jan 20, 2006 8:47 am ] |
| Post subject: | |
I was not thinking nylon nuts when I wrote my first post. Nylon nuts are fractionaly over cut in threads per inch. this gives them their grip. The fact that the nylon has high surface friction aginst both the plate and screw really makes this work. That said I think, I reason, that if the nuts were standatrd metal machine nut that very soon the nuts would loose friction with the plate and one would turn with the screw in the direction of the turn. Forgive me if I got too critical, Some times after dealing with 2-3 ton loads daily you forget the forgiving nature of small loades 
|
|
| Author: | TonyKarol [ Fri Jan 20, 2006 10:12 am ] |
| Post subject: | |
Michael - I agree fully, std metal nuts wouldnt work here for very long, if at all - the lock nuts are critical. The nut has some friction on the plate, but you dont tighten here very much - the nylon in the nut though on the threads is very tight. Thats what makes it work smooth. No matter how hard you push the nut against the plate with the adjuster, there will never be enough friction there to overcome the friction on the threads from the nylon part of the nut. Simplicity in action - its a beautiful thing. |
|
| Author: | Anthony Z [ Fri Jan 20, 2006 11:47 am ] |
| Post subject: | |
Michael/Tony -- interesting exchange! Being a hydrocarbon infrastructure project development/financial guy who deals with engineers on a daily basis -- I actually grasp most of what you are both saying. Michael, no worries as I didn’t take any offense to your comments on my tooling. My motivation for building the Router Base was the Maple piece used to be attached to a polycarbonate base (essentially the router base Larry Robinson shows in his book “The Art of Inlay”). The height adjustment was done by loosening the small wing nuts on the side of the Maple block and sliding the Foredom handpiece up or down and then retightening the wing nuts. I found it really difficult to accurately set the end mill to the desired depth of the inlay cavity as the handpiece would occasionally move when I tightened the two small wing nuts. This proved to be a real pain doing my last headstock and fretboard inlay which used different thicknesses of shell and change-outs of different diameter end mills. The small wing nuts on the side of the Maple block are now used to hold the handpiece firmly in place. This new set-up isn't perfect, but it is infinitely more accurate and easy to set the depth than its predecessor. The height is adjusted by raising or lowering the middle bolts and then locked by the wing nuts on top. I used 3/8” – 16 tpi threaded rod and an improvement would be finer threaded rod (Home Depot didn’t have any in 3/8”). As to the Rosette cutter, the router base and the centre UHMW cross bar comprise a carriage that travels along the two outside ?” rods that can be locked into place using the two thumb screws. The radius of the circle is set by rotating the ?” 20 tpi rod that is threaded through the rear cross bar (on the right) and is held captive at the centre cross bar by the two nylon lock nuts. The front and rear cross bars are held in place with machine screws. The “slop” concerns Michael raises are largely fixed by tightening the thumb screws once the desired radius is set. I find it easier to accurately set the radius with the turn of the threaded rod than rely on a sliding carriage adjusted by hand and then locked (same issue I had with my old inlay pocket router base). One change I am going to make is to replace the tapped UHMW cross bar on the right with one with a ?” threaded insert as there is a fair bit of friction turning the threaded rod through the tapped cross bar and longer term I am concerned it may strip. |
|
| Author: | TonyKarol [ Sat Jan 21, 2006 7:50 am ] |
| Post subject: | |
Mine hasnt stripped yet Anthony (and its used a lot), and it likely wont either. It will loosen up a bit from use, then it will just turn nicely. |
|
| Author: | tippie53 [ Sun Jan 22, 2006 6:40 am ] |
| Post subject: | |
cool |
|
| Page 1 of 1 | All times are UTC - 5 hours |
| Powered by phpBB® Forum Software © phpBB Group http://www.phpbb.com/ |
|