Official Luthiers Forum! http://w-ww.luthiersforum.com/forum/ |
|
Tail Block Wedge Question http://w-ww.luthiersforum.com/forum/viewtopic.php?f=10102&t=4640 |
Page 1 of 1 |
Author: | LarryH [ Fri Jan 20, 2006 2:10 pm ] |
Post subject: | |
I'm going to call the triangular piece of trim that overlays the joint at the tail block an (edit) end graft and I wanted to know when you all put that wedge on. On my first guitar it was in position BEFORE I cut the binding channel which ran right through it. The single piece of binding then simply continued through the wedge. This time I'd like to add a small detail below the binding and have that detail stop at the wedge, run along the sides of the wedge and meet up with the other detail on the other piece of binding, framing the wedge with that detail piece. I see it all the time and my description is pretty lame, but hang in there. My question is that if I have the wedge in first, the binding channel will be too deep across the wedge where the detail will change directions. Is it simply a matter of putting the wedge in after the bindings detail and channels are cut? Or is there a trick I'm missing? 
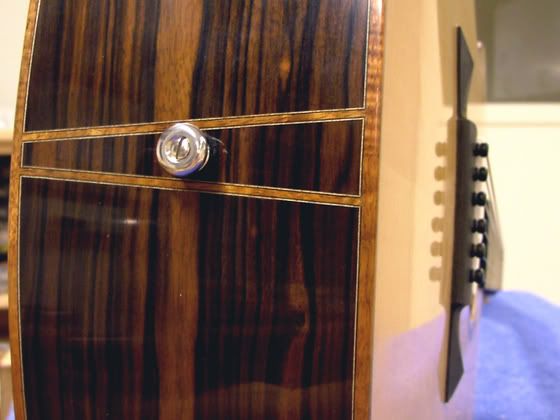
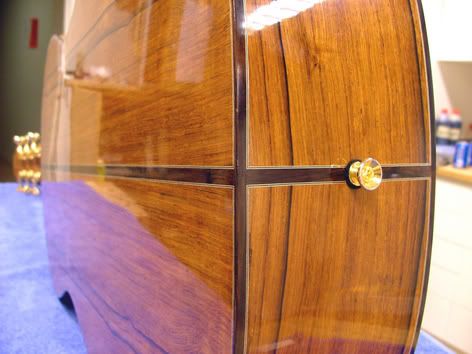
The below pic shows what I'd like to do pretty clearly. Is that wedge put in before or after the binding channels are cut? thanks Larry |
Author: | Brock Poling [ Fri Jan 20, 2006 2:18 pm ] |
Post subject: | |
Here is how I do it. (BTW, I call it an end graft) Install it first as you did before (but remember to install the purflings on the sides of the end graft). Route for BINDING ONLY and route around the entire body. Then lower the cutter the depth of the purfling and route again, this time stopping as close as you can to the end graft without touching it. Finish cutting the ledge by hand (chisels and razor blade) until it meets the edge of the purfling in the end graft. When you are done the end graft will stick up above the channel the height of the purfling only. Then you can miter around your corners. To get good miters you want to use the mirror trick. Once you have good miters I tack the purflings in place with CA and then tape everything up nice and tight and glue the binding / purflings on with CA. (be carful with this method -- it can stain the top... you need to seal your top woods first before using CA) I can go into more detail if you like... but these are the high points. |
Author: | tl507362 [ Fri Jan 20, 2006 2:41 pm ] |
Post subject: | |
What Brock said EXACTLY! Tracy |
Author: | peterm [ Fri Jan 20, 2006 2:45 pm ] |
Post subject: | |
another vote for Brock! ![]() |
Author: | LarryH [ Fri Jan 20, 2006 3:36 pm ] |
Post subject: | |
Thanks you guys - Mirror trick? |
Author: | Dickey [ Fri Jan 20, 2006 3:42 pm ] |
Post subject: | |
Have the end of your chisel polished to a mirror finish, then you can see the purfling reflection in the tool. Align the cut by looking in the mirror. Hoffman shows this on his site. www.hoffmanguitars.com |
Author: | Lars Rasmussen [ Fri Jan 20, 2006 11:03 pm ] |
Post subject: | |
I use the schneider gramil that lmi sells. its just the perfect tool for this! ![]() First i route the slot for the binding and purfling, leaving the whole endgraft area to be cut by hand. Then i use a peice of purfling in the bottom of the slot and set the gramil on top of that, so it cuts at the depth of the binding (- the purfling). Then its just to miter and glue it all up! Its a little more time consuming than using the router, but I like the control it gives me and it shure is fun. ![]() ![]() |
Author: | Dickey [ Sat Jan 21, 2006 1:01 am ] |
Post subject: | |
Beautiful Lars, beautiful. I'm ready to step up. |
Author: | Serge Poirier [ Sat Jan 21, 2006 1:06 am ] |
Post subject: | |
looks awesome Lars, thanks for the tip! Serge |
Author: | LarryH [ Sat Jan 21, 2006 1:39 am ] |
Post subject: | |
Lars, Thanks so much for the tip and pics. That first design is very close to what I was considering. It's great to have a visual. Thanks again Larry |
Author: | Shawn [ Sat Jan 21, 2006 3:13 am ] |
Post subject: | |
I do the same as Lars does as that was how I learned...I only build classicals so a gramil is the traditional tool to use. The control is the biggest advantage of a gramil...until a couple years ago I used the gramil for all of the binding/purfling cuts but have since switched to a router for the initial cuts for speed sake. |
Author: | TonyKarol [ Sat Jan 21, 2006 7:47 am ] |
Post subject: | |
I do it slightly different. Before installing the end graft, route for the binding and purf depth. Now route and install the tail wedge (as I call it !!) Now you only have to reset the depth of the router bcak to binding only depth and trim off the end of the graft with its adjacent side purf. Now all thats left then is to mitre that purf, and the bottom purf on the binding and install. Either way works well, but this way there is no trimming of the side wood with a chisel to make the binding fit close to the tail wedge, which might be difficult in harder figured woods. |
Author: | LarryH [ Sat Jan 21, 2006 1:26 pm ] |
Post subject: | |
Tony I really like that idea. I already installed the tail wedge/end graft butwe keep it mind for next time - seems much simpler. Larry |
Page 1 of 1 | All times are UTC - 5 hours |
Powered by phpBB® Forum Software © phpBB Group http://www.phpbb.com/ |