Official Luthiers Forum! http://w-ww.luthiersforum.com/forum/ |
|
Gluing top and back to sides http://w-ww.luthiersforum.com/forum/viewtopic.php?f=10102&t=5925 |
Page 1 of 3 |
Author: | Rossy [ Sun Apr 02, 2006 8:07 am ] |
Post subject: | |
Hey guys, I was just looking for some input and options on gluing my top and back to my sides. I don't have a jig made or rubber bands. All I really have right now is binding tape. Would that work or would you guys recommend something else. I'm willing to get what I need to. I'm a true rookie and this is my first guitar. Any input would be greatly appreciated. Thanks. blessings, Ross |
Author: | Bruce Dickey [ Sun Apr 02, 2006 8:39 am ] |
Post subject: | |
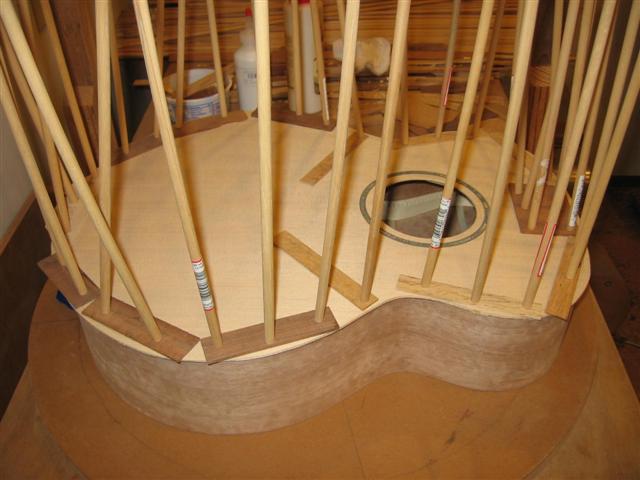
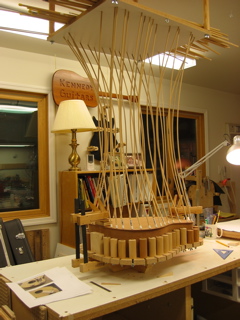
I recommend a gobar deck for quality work and low expense. I made mine from a couple scrap two by fours and some bolts, and an old cabinet and a piece of ply material. The sticks are 48 cents each, 5/16 hardwood dowels from Walmart, three feet long. 
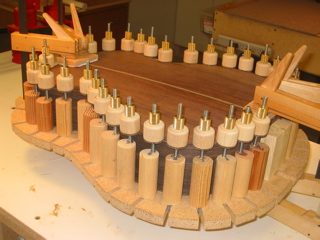
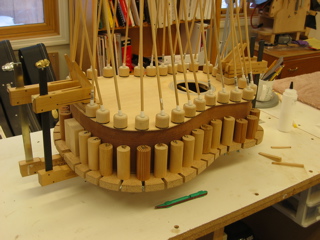
You can even take about any hardwood material that is knot free and make your own, 1/4 by 3/4 by 36 inch slats work just fine for gobars. Good luck. I recommend protecting the top and back with small pieces of hardwood or make a protector the shape of the guitar from inexpensive materials. http://www.dickeyguitars.com/dickeyguitars/JigsTools.html |
Author: | Serge Poirier [ Sun Apr 02, 2006 9:41 am ] |
Post subject: | |
What Bruce said Ross, your dowels will also have to be one inch taller than the length between your hardwood protectors and the go bar deck's top to be able to deflect them for added strength! Good luck building that fantastic jig! |
Author: | peterm [ Sun Apr 02, 2006 9:48 am ] |
Post subject: | |
Go bars are ideal, but for a low expense you can buy a tire tube from a local tire shop and cut it along and around its whole length into ONE long rubber strip, then place the guitar top (or back) in place, clamp at the ends (neck block and tail block). place the guitar on a stand, bench or anything else that will allow you to go under with the rubber strip and here how you do it: PROCESS IS CALLED "ROPING" Wrap the rubber around the waist of the guitar and tuck one end of the band under the turn you just made. Now, keeping pressure on the top with one hand, slightly stretch the rubber and start wrapping the guitar all around alternating side to side front to back and etc untill the whole top or back is all wrapped up. make sure you don't allow the back to move and look for squeeze out to ensure good contact. I will look for a picture of this process and post later. Good luck |
Author: | Serge Poirier [ Sun Apr 02, 2006 10:05 am ] |
Post subject: | |
Great tip there Peter, thanks! |
Author: | Rossy [ Sun Apr 02, 2006 11:28 am ] |
Post subject: | |
Can I just say, I love this forum. You luthiers are the coolest, most helpful guys in the world. Thanks for all of your input. blessings, Ross |
Author: | letseatpaste [ Sun Apr 02, 2006 12:07 pm ] |
Post subject: | |
Tape works great... ![]() If you've got an extra deep neck block you may want to find a way to add some pressure in that area since the tape only really applies pressure around the edge. I do this by laying down a folded towel over that area and then stacking some weight on it. Pretty primitive but it does the trick. |
Author: | Joe Beaver [ Sun Apr 02, 2006 12:13 pm ] |
Post subject: | |
The go-bars are probably the way to go but, I use the old tire tube trick. It works well once you get the roping technique down. If you invest in a go-bar setup you will be able to use it for gluing the braces also. Just remember, a go-bar setup works better with a radius dish, especially if you are using it for brace gluing. In fact you should consider it essential for braces from what I can tell but the experts are the ones that know. With the tire tube you will still need a work board built up around the perimeter with cork or such to accommade the radius of the plates. (sure wish they had spell check here! foregive my ignorance...) |
Author: | Rossy [ Sun Apr 02, 2006 12:19 pm ] |
Post subject: | |
Once again. Thanks Terken. Great pics. blessings, Ross |
Author: | Rossy [ Sun Apr 02, 2006 12:24 pm ] |
Post subject: | |
Thanks again guys. I actually have 15' and 25' radius dishes and also have go bars so I think I will give the go bar way a shot. I'm in the process of buliding the deck so should be able to try it soon. Thanks again everyone for all of your help. It's greatly appreciated. blessings, Ross |
Author: | arvey [ Sun Apr 02, 2006 1:22 pm ] |
Post subject: | |
If you are set up with gobars it is the only way to go IMHO. Tried the others, love the go bar method. |
Author: | Bruce Dickey [ Sun Apr 02, 2006 1:26 pm ] |
Post subject: | |
Ross, here are a few more pics of top gluing to sides on the recent OLF SJ 2 Team Built guitar. |
Author: | Andy Zimmerman [ Sun Apr 02, 2006 1:51 pm ] |
Post subject: | |
I use my radius dishes as clamping cauls. Fits like a glove. ![]() |
Author: | Mattia Valente [ Sun Apr 02, 2006 4:39 pm ] |
Post subject: | |
Go-bars here as well. |
Author: | Cocephus [ Sun Apr 02, 2006 5:20 pm ] |
Post subject: | |
Go-bars on two so far... |
Author: | Bruce Dickey [ Sun Apr 02, 2006 9:17 pm ] |
Post subject: | |
Andy, you are cheating, that just makes too much sense. ![]() I must just like to see what I'm working on.... but your results speak for themselves! ![]() |
Author: | nickton [ Sun Apr 02, 2006 10:02 pm ] |
Post subject: | |
has anyone ever built their own radius dishes? |
Author: | Colin S [ Sun Apr 02, 2006 10:15 pm ] |
Post subject: | |
I think probably a majority of us here make our own dishes, it's very simple with a router. Lance sells plans for a simple jig that you can use, look in the plan library. Alternatively do some searches in the archives I know we have had pictures and discussions there before. Colin |
Author: | L. Presnall [ Mon Apr 03, 2006 2:32 am ] |
Post subject: | |
[QUOTE=nickton] has anyone ever built their own radius dishes?[/QUOTE] Oh, the DUST, the DUUUUUSSSSSTTTTTTT! ![]() |
Author: | L. Presnall [ Mon Apr 03, 2006 2:34 am ] |
Post subject: | |
Seriously, you'll be sweeping/vacuuming for a month after making a pair of these babies...the only thing keeping me from ordering my next pair from Tracy is the shipping...they are large and heavy! |
Author: | Serge Poirier [ Mon Apr 03, 2006 3:13 am ] |
Post subject: | |
[QUOTE=terken] I used to use speed nuts with half of a spool clamp but the back and sides had to be very close to actual size for proper clearance. On the last couple I have used go bars also. I like this the best. I use part of the spool clamp to protect the top. ![]() ![]() ![]() This is very cool Terry, i've seen this example a couple of times on the net and it makes perfect sense if you build more than one size guitars,. Is it possible to buy the spool clamps at any hardware store or i should look at a more specialized woodworking store like Lee Valley for instance? |
Author: | Serge Poirier [ Mon Apr 03, 2006 3:15 am ] |
Post subject: | |
[QUOTE=azimmer1] I use my radius dishes as clamping cauls. Fits like a glove. ![]() Vey cool idea too Andy! ![]() |
Author: | Michael Dale Payne [ Mon Apr 03, 2006 3:56 am ] |
Post subject: | |
Go-bars and a ID OD template out of hardboard. OD to match the the shape ans ID about an inch to inch and a quarter insude the body shape. This is a clamping caul for the go-bars to use and prevent divots caused by the bars. By far go-bars are the most user friendly way. Much easer to varrify alignment. Spools are ok but time comsuming to get clamped down. Go-bars are a flash |
Author: | Serge Poirier [ Mon Apr 03, 2006 4:11 am ] |
Post subject: | |
I like the spool clamps for many shapes but as you mentionned Michael, for the go bar, a ID OD template out of hadrwood sounds safer. Many ways to skin a kitty, i guess one with more experience with spool clamps doesn't feel uncomfortable or unsafe vis a vis divots? |
Page 1 of 3 | All times are UTC - 5 hours |
Powered by phpBB® Forum Software © phpBB Group http://www.phpbb.com/ |