Official Luthiers Forum!

Owned and operated by Lance Kragenbrink
It is currently Thu May 01, 2025 5:37 pm


All times are UTC - 5 hours


Post new topic Reply to topic  [ 15 posts ] 
Author Message
 Post subject:
PostPosted: Sun Jul 16, 2006 5:28 am 
Offline
Koa
Koa

Joined: Fri Sep 30, 2005 10:33 pm
Posts: 954
Location: United States
As I was working on positioning my bridge for its final drilling/glueing spot, I thought there has got to be a better way than the one I'm using which is....measure, move, measure, move a little more, yeah that's it, then try to clamp it down and it moves...evey time!! I thought about using 2 sided tape on the bottom of the bridge, then thought, that is going to pull spruce fibers out like nobody's business. I can get it done this way but I know you geniuses out there have figured out something, if you are willing to share your techniques I'd be ever grateful to see/hear about them.

Thanks,
Greg

_________________
Gwaltney Guitars


Top
 Profile  
 
 Post subject:
PostPosted: Sun Jul 16, 2006 6:37 am 
Offline
Koa
Koa

Joined: Fri Sep 30, 2005 10:33 pm
Posts: 954
Location: United States
Thanks Hesh, that is helpful for sure.

Greg

_________________
Gwaltney Guitars


Top
 Profile  
 
 Post subject:
PostPosted: Sun Jul 16, 2006 8:30 am 
Offline
Brazilian Rosewood
Brazilian Rosewood
User avatar

Joined: Mon Jul 04, 2005 7:13 am
Posts: 3270
Location: United States
I draw a light pencil line down the center of the top, then draw a perpendicular line to that where the front of the bridge needs to be. Mark the center of the front of the bridge, like Hesh, then put tape down, like Hesh said. I line the bridge up with the perpendicular line and center mark and place one cam clamp in the center of the bridge.
Drill the two outer holes, trace the bridge onto the tape, remove the bridge, cut out the bridge shape (inside the drawn outline) and remove the outer portion of the tape. It's ready to finish. This allignment method would only work, I suppose, if the front edge of your bridge is straight.

Ron

_________________
OLD MAN formerly (and formally) known as:

Ron Wisdom

Somewhere in the middle of Arkansas......


Top
 Profile  
 
 Post subject:
PostPosted: Sun Jul 16, 2006 9:55 am 
Offline
Koa
Koa
User avatar

Joined: Wed Dec 29, 2004 5:34 am
Posts: 1906
Location: United States
Wow Hesh that's alot of measuring! ,
I just slop mine on and glue er up! 
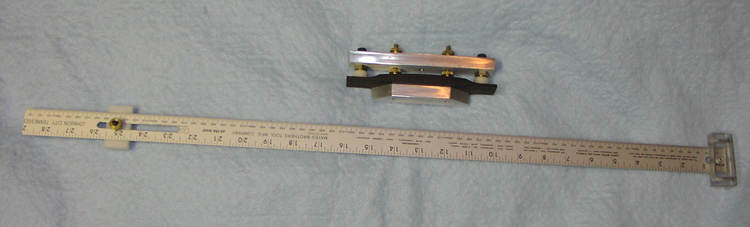
Well maybe a little bit of both you and Ron said...the most important part is were the saddle goes...I never slot my saddle until my bridge is attached. Mark my intonation spots then slot for the saddle.

_________________
Dave Bland

remember...

"If it doesn't play in tune...it's just pretty wood"


Top
 Profile  
 
 Post subject:
PostPosted: Sun Jul 16, 2006 9:56 am 
Offline
Brazilian Rosewood
Brazilian Rosewood
User avatar

Joined: Fri Jun 10, 2005 9:51 am
Posts: 2148
Location: San Diego, CA
First name: Andy
Last Name: Zimmerman
City: San Diego
State: CA
Zip/Postal Code: 92103
Country: United States
Focus: Build
I do all my fitting when the guitar is done just before finishing.
I find it easier to tape and move with an unfinished guitar.

I put a large piece of making tape over the bridge postion and then draw
a center line across the top and tape. I do all the measuring and fitting.   
Once I have my exact postion, I tape the bridge down so it CANNOT
move.

Once taped, I drill holes 1 and 6 and then bolt the bridge down to the
top.
Recheck the measurements with it bolted down.    If OK, I remove the top
tape and score the edges of the bridge with a brand new XACTO blade
through the first piece of masking tape.
Remove the excess tape around the bridge. Now my bridge is masked off
for the finishing. Unbolt the bridge and tape over the holes.

I know some like to do this all on a finished guitar, but I don't like getting
laquer thinner near the guitar. When the finish is done, all I have to do is
clean a bit under the masked bridge spot. Holes 1 and 6 are already
drilled and I use these with John Hall's bridge clamp. I LOVE HIS BRIDGE
CLAMP BY THE WAY. Simple
azimmer138914.7909953704

_________________
Andy Z.
http://www.lazydogguitars.com


Top
 Profile  
 
 Post subject:
PostPosted: Sun Jul 16, 2006 11:25 am 
Offline
Brazilian Rosewood
Brazilian Rosewood

Joined: Thu Jun 16, 2005 10:31 am
Posts: 2103
Location: United Kingdom
I do mind a slightly different way :

I have a ruler which John Hall Made that has an adjustable piece of perspex on one end and a piece of aluminium set to my saddle slot angle at the other, I set to my desired scale length plus compensation then I put the end with the aluminium in the saddle slot of my bridge hook the perspex over the nut end of the fingerboardand align the center of the ruler to the ceter of the fingerboard, tape the back and sides of the bridge then I check my center line with a straight edge and use a piece of string to check the alignment of the two outer pin holes. Finaly I measure from the pin holes to the outside of the fret slot at the 12th.

Then I drill the two outer holes, until recently I used John Halls Bridge Clamp, but I have just changed to Vacuum as I find it easier with hide glue.
RussellR38914.8517939815


Top
 Profile  
 
 Post subject:
PostPosted: Sun Jul 16, 2006 11:51 am 
Offline
Brazilian Rosewood
Brazilian Rosewood

Joined: Thu Jun 16, 2005 10:31 am
Posts: 2103
Location: United Kingdom
Here you go Hesh, the Pic is actually a proto type, the final version is just slightly different. I have scribed a center line on mine too, The measure is great, a simple little tool, but one of my favourites.


Top
 Profile  
 
 Post subject:
PostPosted: Sun Jul 16, 2006 11:56 am 
Offline
Brazilian Rosewood
Brazilian Rosewood
User avatar

Joined: Fri Jun 10, 2005 9:51 am
Posts: 2148
Location: San Diego, CA
First name: Andy
Last Name: Zimmerman
City: San Diego
State: CA
Zip/Postal Code: 92103
Country: United States
Focus: Build
Hesh
Here is the pict of the bridge clamp.
Awesome device.
1. Place silver piece with posst up through holes 1 and 6
2. Clamp down lexan piece with brass knobs (This will bend to conform to
the shape of your bridge.
3.Add large silver bar and clamp down with 2nd set of brass knobs
4. Tighten outer black knob to put pressure on wings.
I usually add a top caul under the wing clamp.

azimmer138914.9111458333

_________________
Andy Z.
http://www.lazydogguitars.com


Top
 Profile  
 
 Post subject:
PostPosted: Sun Jul 16, 2006 2:17 pm 
Offline
Brazilian Rosewood
Brazilian Rosewood

Joined: Tue Feb 15, 2005 10:31 am
Posts: 3134
Location: United States
Hesh, it's time to remind John that he needs to get these tools listed on his web site; or we're gonna sick your avatar on him!!!


Top
 Profile  
 
 Post subject:
PostPosted: Sun Jul 16, 2006 3:08 pm 
Offline
Brazilian Rosewood
Brazilian Rosewood
User avatar

Joined: Fri Jun 10, 2005 9:51 am
Posts: 2148
Location: San Diego, CA
First name: Andy
Last Name: Zimmerman
City: San Diego
State: CA
Zip/Postal Code: 92103
Country: United States
Focus: Build

TID=2523&KW=Bridge+Clamp#forumTop">Johns Clampazimmer138915.0089583333

_________________
Andy Z.
http://www.lazydogguitars.com


Top
 Profile  
 
Display posts from previous:  Sort by  
Post new topic Reply to topic  [ 15 posts ] 

All times are UTC - 5 hours


Who is online

Users browsing this forum: No registered users and 19 guests


You cannot post new topics in this forum
You cannot reply to topics in this forum
You cannot edit your posts in this forum
You cannot delete your posts in this forum
You cannot post attachments in this forum

Jump to:  
Powered by phpBB® Forum Software © phpBB Group
phpBB customization services by 2by2host.com