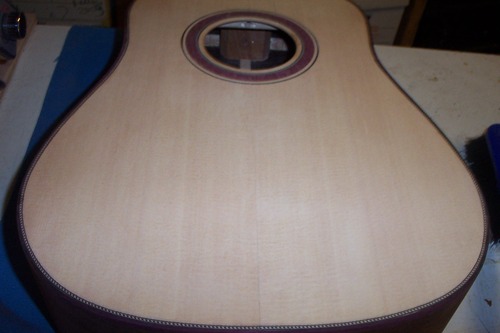
Scooter, the purfling is the inner strip that is thinner than the outside binding, think of the Herringbone purfling on a d-28 or a rope purf like on mine!
On the top
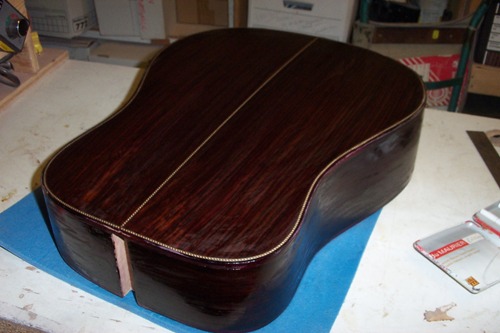
And on the back
Serge
| Official Luthiers Forum! http://w-ww.luthiersforum.com/forum/ |
|
| How do you glue purfling to binding? http://w-ww.luthiersforum.com/forum/viewtopic.php?f=10102&t=7685 |
Page 1 of 1 |
| Author: | John Elshaw [ Tue Jul 25, 2006 7:19 am ] |
| Post subject: | |
I have some really great binding I bought from one of the sponsors here, and was wondering what the best way is to go about adding the purfling strip before I bend it? Do I just need to cut the purfling and then glue it up with a bunch of clothepin type clamps? Any suggestions would be greatly appreciated. Cheers! John |
|
| Author: | TonyKarol [ Tue Jul 25, 2006 7:31 am ] |
| Post subject: | |
Check the thread that 355 had on jigs - I think I posted one in there. You could also do it this way - take a piece of MDF, long slot it on the table saw to about 3/16 inch deep (assuming your binding/purf is about that high or higher) then line it with wax/parchment paper, and glue up your bind/purf, push it into the paper and slot, then spring clamp it every 3 inches. Before the metal clamp, thats what I used to do. Some guys just tape them together loose and bend, then glue up as they install. |
|
| Author: | Kelby [ Tue Jul 25, 2006 10:17 am ] |
| Post subject: | |
Here's my method, which is to create the binding & purfling all at the same time, glued up. (Note: this method is useless if you buy pre-cut binding.) Let's suppose I am using curly Maple binding with cocobolo and maple purfling lines. I mill a piece of Maple that is as thick as the binding is tall --- say, 36" x 4" x 1/4" (actually 1/4" minus whatever thickness of purfling I will use). Then I mill a purfling "sheet" of maple (and another of cocobolo) that is 36" long and 4" wide, and however thick I want the purfling to be. Then I glue up a binding/purfling sandwich using Titebond II (which is soft enough to bend nicely in the Fox bender). I clamp it with my vacuum press, but any clamp/caul system should work fine. When the glue is dry, I now have is a sandwich block 36" x 4" x 1/4". I use the bandsaw to rip binding slices a little wider than the final width I am shooting for --- typically, I rip them to 1/8". Between each slice, I run a handplane along the freshly cut edge of the sandwich so I have a flat surface. Rinse and repeat. Thickness sander the rough-sawn side of each piece of binding, and it's all done. I do two batches at a time. With a couple hour's work (including milling time), it's pretty easy to churn out 40-50 pieces of binding with purfling already glued on. If you are working with pre-milled pieces of binding, I suppose this method doesn't work. But if you want to make your own from scratch, you can churn out a lot of binding very efficiently, with purfling pre-attached. |
|
| Author: | John Mayes [ Tue Jul 25, 2006 10:25 am ] |
| Post subject: | |
I don't. They get glued together when it gets on the guitar. I bend them, and glue them on together, but in separate pieces. |
|
| Author: | Bill Greene [ Tue Jul 25, 2006 11:34 am ] |
| Post subject: | |
[QUOTE=Kelby] Here's my method, which is to create the binding & purfling all at the same time, glued up. (Note: this method is useless if you buy pre-cut binding.) Let's suppose I am using curly Maple binding with cocobolo and maple purfling lines. I mill a piece of Maple that is as thick as the binding is tall --- say, 36" x 4" x 1/4" (actually 1/4" minus whatever thickness of purfling I will use). Then I mill a purfling "sheet" of maple (and another of cocobolo) that is 36" long and 4" wide, and however thick I want the purfling to be. Then I glue up a binding/purfling sandwich using Titebond II (which is soft enough to bend nicely in the Fox bender). I clamp it with my vacuum press, but any clamp/caul system should work fine. When the glue is dry, I now have is a sandwich block 36" x 4" x 1/4". I use the bandsaw to rip binding slices a little wider than the final width I am shooting for --- typically, I rip them to 1/8". Between each slice, I run a handplane along the freshly cut edge of the sandwich so I have a flat surface. Rinse and repeat. Thickness sander the rough-sawn side of each piece of binding, and it's all done. I do two batches at a time. With a couple hour's work (including milling time), it's pretty easy to churn out 40-50 pieces of binding with purfling already glued on. If you are working with pre-milled pieces of binding, I suppose this method doesn't work. But if you want to make your own from scratch, you can churn out a lot of binding very efficiently, with purfling pre-attached. [/QUOTE] Doggone that's slick. It's always the simple things that I completely miss. Great tip, great tip. I have GOT to get to work on a vacuum jig...care to share yours Kelby? |
|
| Author: | John Elshaw [ Tue Jul 25, 2006 11:39 am ] |
| Post subject: | |
John, how do you bend the purfling line without it being attached to the binding? That's the part I'm hung up on. With the purfling line needing to be bent sideways, I wasn't sure it could be done separate from the binding. Thanks! John |
|
| Author: | Bill Greene [ Tue Jul 25, 2006 1:05 pm ] |
| Post subject: | |
The stuff i recently used i bent on a pipe, but John probably has a much quicker/better way. |
|
| Author: | Michael McBroom [ Tue Jul 25, 2006 1:08 pm ] |
| Post subject: | |
John, I've tried it a variety of ways and I've pretty much settled on one method. I would use Kelly's method if I was cutting my bindings from a plank, but typically I get my bindings from side offcuts. I have about a hundred of those little black plastic clamps with the orange jaws -- the ones that are about 2" long or so. I use lots of them -- side by side as close as I can fit them -- to glue the SIDE purfling to the binding. I use Titebond II for this because it doesn't let go when I spritz the binding before it gets put on my side bender. Works great. For the back and top purfling, I cut stairstep channels. I use LMI bwbw purfling for the top, and 1mm curly maple binding for the back, which matches the side purfling. I measure my purfling, then cut the top ledge with my laminate trimmer on the back and sides (different dimensions for each, of course) to a width that is equal to the width of the binding and purfling, plus about 0.010". I install the binding with side purfling, then I clean the squeeze-out from the channels left for the purfling. The back purfling is usually a very snug fit, and I push it into place with the back of a chisel's handle, then use watered down Titebond, liberally brushed over the purfling to glue it into place. The top purfling usually isn't as snug of a fit. I bend it separately on the side bender, then install it, once again using watered down Titebond, brushed liberally over the purfling, and I use tape to secure it in place. Sounds like a lot of work, but it's the least frustrating method I've come up with so far. Best, Michael |
|
| Author: | Scooter B [ Tue Jul 25, 2006 11:24 pm ] |
| Post subject: | |
Ignorant question here but I had always assumed you bent the sides first and then added the kerf and binding. Obviously there are several ways to do this step.... I was anticipating needing to keep the inside and outside of the sides clean and uniformaly flat for the bending process and that the slotted kerf would be flexible enough to bend by hand around the sides. Time to read a tutorial on kerf and bindings... |
|
| Author: | JBreault [ Tue Jul 25, 2006 11:33 pm ] |
| Post subject: | |
[QUOTE=Scooter B] Ignorant question here but I had always assumed you bent the sides first and then added the kerf and binding. Obviously there are several ways to do this step.... I was anticipating needing to keep the inside and outside of the sides clean and uniformaly flat for the bending process and that the slotted kerf would be flexible enough to bend by hand around the sides. Time to read a tutorial on kerf and bindings... [/QUOTE] Scooter, no questions are ignorant! You are correct on your first assumption. The processes being discussed here aer after the box is closed up. some folks pre-laminate their bindings and purflings prior to glueing them to the box and some don't. The advantage to pre-laminating is that you don't need six hands to keep the binding and a couple of purfling lines from getting in the way as you glue them to the body. |
|
| Author: | old man [ Wed Jul 26, 2006 1:42 am ] |
| Post subject: | |
[QUOTE=John Elshaw] John, how do you bend the purfling line without it being attached to the binding? That's the part I'm hung up on. With the purfling line needing to be bent sideways, I wasn't sure it could be done separate from the binding. Thanks! John [/QUOTE] John, I just bent four pieces of herringbone by taping them together (on edge), spritzing them, and bent in the Fox style bender just like my sides. Worked great. Ron |
|
| Author: | CarltonM [ Wed Jul 26, 2006 5:05 am ] |
| Post subject: | |
Okay, for you guys that tape and bend: What type of tape do you use, and doesn't the heat transfer gooey adhesive onto the bindings? |
|
| Author: | old man [ Wed Jul 26, 2006 8:36 am ] |
| Post subject: | |
Carlton, I just used the blue masking tape and didn't have any sticky problem. I use light bulbs in my bender so it wasn't as hot as the blanket would get, I figure. Ron |
|
| Author: | Michael Dale Payne [ Wed Jul 26, 2006 8:47 am ] |
| Post subject: | |
Low tack painters tape I think 3m refers to it a delicate surface painters tape |
|
| Author: | Scooter B [ Wed Jul 26, 2006 11:06 am ] |
| Post subject: | |
I think where I was getting confused is the difference between purfling and binding laminates. What is the purfling then? |
|
| Author: | CarltonM [ Wed Jul 26, 2006 2:40 pm ] |
| Post subject: | |
Scooter, The purfling is the fine line or lines that go between the bindings and the top/sides/bottom. The laminate term just refers to the practice of gluing the bindings and purflings together before they're installed on the instrument. Thanks to the other folks for info concerning taping and bending bindings/purflings. |
|
| Author: | Serge Poirier [ Wed Jul 26, 2006 2:41 pm ] |
| Post subject: | |
Scooter, the purfling is the inner strip that is thinner than the outside binding, think of the Herringbone purfling on a d-28 or a rope purf like on mine! On the top
And on the back
Serge |
|
| Author: | PaulB [ Wed Jul 26, 2006 2:55 pm ] |
| Post subject: | |
I thought he was talking about side purfling, that goes between the binding and the sides. 
|
|
| Author: | John Elshaw [ Wed Jul 26, 2006 3:02 pm ] |
| Post subject: | |
Actually, I was talking about the side purfling, although I don't think I was very clear in my original post. It looks like I have several options here--I think I'll start with the least complicated and go from there. Thanks for the ideas fellas! John |
|
| Author: | Serge Poirier [ Wed Jul 26, 2006 3:05 pm ] |
| Post subject: | |
Sorry fellas, must be bedtime for me  
|
|
| Author: | PaulB [ Wed Jul 26, 2006 4:21 pm ] |
| Post subject: | |
In that case, I glue them together and wrap them with painters masking tape (green or blue) then bend them after the glue dries and the tape is off. It's easier if you temporarily tape the ends of purfling to the binding before you glue. If you flex the binding a little while taping each end, the resulting tension will pull the purfling against the binding. Makes glueing much easier. |
|
| Author: | MSpencer [ Thu Jul 27, 2006 2:35 pm ] |
| Post subject: | |
I can see where laminating the side purflings on the bottom of the binding and a top purfling on the top of the binding, however, I don't see that it would work on the top and back purflings, especially if you are using either Herringbone or Rope. This process, or at least how I do it is a double ledge, first the purf ledge into the top and or back and then followed by the binding ledge running down the side that could also include a laminated BWB or something if desired. So not to confuse things here, but there are a variety of types of purfling, thickness, heights, etc. that when installed the relation between the binding and the purfling say on the top creates a 90 degree or right angle connection. I do all my purflings and binding separately, but might give the Kelby method a try. Mike White Oak, Texas |
|
| Author: | Martin Turner [ Mon Jul 31, 2006 4:56 pm ] |
| Post subject: | |
[QUOTE=John Mayes] I don't. They get glued together when it gets on the guitar. I bend them, and glue them on together, but in separate pieces.[/ QUOTE] This is the way I do it too. |
|
| Page 1 of 1 | All times are UTC - 5 hours |
| Powered by phpBB® Forum Software © phpBB Group http://www.phpbb.com/ |
|