Official Luthiers Forum!
http://w-ww.luthiersforum.com/forum/

Spalted rosette and philosophy
http://w-ww.luthiersforum.com/forum/viewtopic.php?f=10102&t=8318
Page 1 of 1

Author:  Kelby [ Mon Sep 04, 2006 5:03 pm ]
Post subject: 

Well, you get two for the price of one here.

First, Part II of my "segmented rosettes based on recent inspiration" thread. (The first was Cocobolo, documented in another thread.) Here it goes:


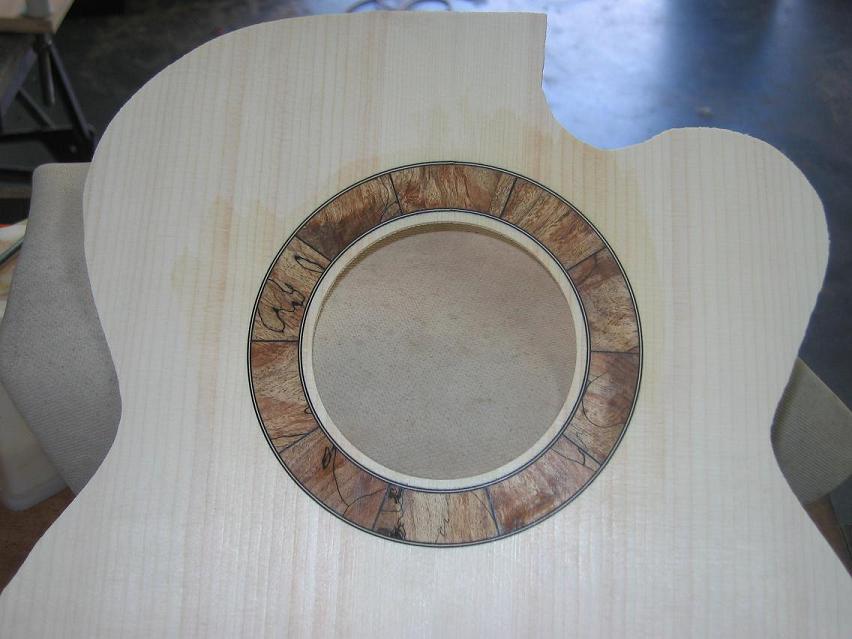
The soundboard is Adirondack. The materials --- spalted maple with black and maple fiber for the lines --- were selected to complement the theme of this guitar, which is Ebony with sapwood.   The box is coming nicely; pics to come soon.

And now for the philosphy. I think the most exciting part of building is finding ways to improve. In the first few builds, glaring mistakes made that easy --- "this time, why dont I build a guitar that doesn't have huge freaking binding gaps!" But once you can build instruments without obvioius blunders, developing craftsmanship becomes a matter of focusing on details. So, over the past couple years, I start each build only after looking over my past builds and trying to identify the most plain-looking feature. My primary focus for that build is turning a few so-so aspects of my prior guitars into a positive focal point on this one.

For the two instruments I'm building now, the rosettes were certainly on the short list of features I wanted to improve. And although I have seen many segmented rosettes here that humble my work, this is a huge improvement over my traditional black/white lines surrounding shell. Thanks to everyone here who provided the ideas and the know-how. On to the next so-so feature!Kelby38965.0888425926

Author:  Bobc [ Mon Sep 04, 2006 6:50 pm ]
Post subject: 

Kelby that looks great. Very nicely done. Look forward to seeing more pic's of this guitar.

Author:  JBreault [ Mon Sep 04, 2006 11:29 pm ]
Post subject: 

Kelby, I agree with Bob...it does look great. It looks very simple and elegant, but I know it is much more complicated. Nice work!

Author:  Serge Poirier [ Tue Sep 05, 2006 7:03 am ]
Post subject: 

What Bob and Joe said Kelby and i love your approach to improve the craftmanship, elegant work!

Serge

Author:  Dave Anderson [ Tue Sep 05, 2006 7:37 am ]
Post subject: 

This is the kind of rosette I like a lot. You did an excellant job on it Kelby! It looks really sharp!

Author:  TonyKarol [ Tue Sep 05, 2006 7:48 am ]
Post subject: 

Great work .. so, I notice there are no gaps at the fretboard end !!!! About one in three of mine fit together perfectly, but i usually dont bother to fit the piece under the fretboard exactly, no point really. So did you fit the last one in, or is your jig so darn perfect on the cuts they fit tight (which would be amazing).

Author:  Kelby [ Tue Sep 05, 2006 8:09 am ]
Post subject: 

Thanks, everyone!

Tony, as far as fitting perfectly, I cheated.    But I did figure out a fix, and more importantly, I devised a method for ensuring that I won't have gaps in the future.

First, here's how I fixed this one. There was a huge gap of about 1/8" when I tried to fit in the last piece. So I cut a 1/8" wide strip of spalted maple and squished it in there. If you measure carefully, you will find that the segment at the very top is a little bit longer than the others. If you look carefully, you will even be able to see where I inlaid the gap-filling piece.

Second, here's a trick I came up with to avoiding gaps going forward. (I made another rosette with this trick after the one in the picture, and it came out perfect.) When I initially assemble the segments, I do not glue them; I just tape them together. When I get to the last piece and have a little gap, I squish the whole taped-up rosette together enough to eliminate the gap. Being taped up, the joints all around will give just enough to close the rosette tightly. At this point, the taped-up rosette is twisting in all directions like a mobia strip. So I tape it down to the underlying veneer in a couple critical spots and, when it is reasonably flat, I flood everything with CA, throw wax paper over the top, and hold it down so it dries reasonably flat.

No gaps!

Author:  TonyKarol [ Tue Sep 05, 2006 8:28 am ]
Post subject: 

I actually saw what I thought was a strip the first time I looked (its tough to get anything by me - just ask Zlahtic), but being spalt its so hard to tell (but knowing that gapless is hard to achieve, its knowing where to look )

Another trick - I know that Josh House puts his 6 piecers together in halves (sorry bud for giving you up), then holds them together at the disk sander to make them mate - sneaky guy - they always look tight.

I will try the tape idea .. sounds like ti might be the ticket.

The 1/8 gap means you are so close - 1/8 inch gap on a 2.5 inch radius is about two degrees - remember the 20 cuts to make these - thats only 1/10 degree per cut. Most mitre gauges are nowhere near that accurate - I was going ot buy a new one, probaly still will someday, it has these aliging pin holes that can move the jig 1/2 degree - big deal I thought, thats not even close to what I am after. Thats why I have the micro adjust bolt setup to move the fence on my jig - always just a little more ...

Author:  Anthony Z [ Tue Sep 05, 2006 11:56 am ]
Post subject: 

[QUOTE=TonyKarol] (its tough to get anything by me - just ask Zlahtic)
[/QUOTE]

Tell me about it ... Karol can pick out amoeba poop in a salt shaker at 50 paces

Kelby that looks great!

Tony I am not following what you are saying about how Josh does it....maybe if I read it 50 more times the obvious will hit me. Anthony Z38965.8743981481

Author:  Joe Beaver [ Tue Sep 05, 2006 1:35 pm ]
Post subject: 

Kelby,

Excellent stuff

Author:  Cocephus [ Tue Sep 05, 2006 1:51 pm ]
Post subject: 

Cool!

Author:  crich [ Tue Sep 05, 2006 2:18 pm ]
Post subject: 

Kelby-nicely done. Clinton

Author:  MSpencer [ Tue Sep 05, 2006 3:20 pm ]
Post subject: 

Nice work and some good thoughts as well.

Mike
White Oak, Texas

Author:  TonyKarol [ Wed Sep 06, 2006 12:33 am ]
Post subject: 

OK Anthony.. picture this - you are making a ten piece segment rosette - glue it up in two sections of five, then place one on top of the other with the mating surfaces of each half towards the disc sander, lightly touch these four edges - now when you flip it back out like a bookmatch, the edges should mate up nicely. Oh, and watch out for the gnat poop, way worse than amoeba IMO.

Author:  dmills [ Wed Sep 06, 2006 12:58 am ]
Post subject: 

To what thickness do you guys typically level and sand your wood rosette rings prior to inlaying them into the guitar top?

thanks

Author:  TonyKarol [ Wed Sep 06, 2006 7:37 am ]
Post subject: 

Mine are thick (its just easier to make them), like an 1/8 inch .. inlay it about 70-75 thou, then run the top thru the thickness sander some more. Oh, and I usually sand the backer veneer off the ring before inlaying it as well (on a 12 inch disc sander, very carefully !!!)

Author:  Anthony Z [ Wed Sep 06, 2006 8:17 am ]
Post subject: 

Got it and thanks Tony!

Author:  Alain Desforges [ Wed Sep 06, 2006 3:16 pm ]
Post subject: 

Yep, that is a great trick and a good explanation. Thanks!

Page 1 of 1 All times are UTC - 5 hours
Powered by phpBB® Forum Software © phpBB Group
http://www.phpbb.com/