Official Luthiers Forum!

Owned and operated by Lance Kragenbrink
It is currently Mon May 12, 2025 5:05 pm


All times are UTC - 5 hours


Post new topic Reply to topic  [ 30 posts ]  Go to page 1, 2  Next
Author Message
 Post subject:
PostPosted: Sat Sep 23, 2006 1:22 am 
Offline
Cocobolo
Cocobolo

Joined: Tue Sep 12, 2006 12:43 pm
Posts: 147
Location: United States
I love building jigs. Creativity. I'd love to see what some of you guys use for your jigs for different operations.

Mark


Top
 Profile  
 
 Post subject:
PostPosted: Sat Sep 23, 2006 1:48 am 
Offline
Site Admin
User avatar

Joined: Mon Dec 27, 2004 5:02 am
Posts: 8553
Location: United States
First name: Lance
Last Name: Kragenbrink
City: Vandercook Lake
State: Michigan
Zip/Postal Code: 49203
Country: USA
Focus: Build
Status: Semi-pro
Check out this jig from Guitar Jigs, I did this little demo a while back

End Graft cutter

_________________
Support the OLF! Bookmark our STEWMAC link Today!
Lance@LuthiersForum.com


Top
 Profile  
 
 Post subject:
PostPosted: Sat Sep 23, 2006 2:26 am 
Offline
Cocobolo
Cocobolo

Joined: Tue Sep 12, 2006 12:43 pm
Posts: 147
Location: United States
I've used this home made end graph jig. Got this idea from Dennis Scannell from True North Guitars. Great Site by the way.

First cut the end graph, notice plywood base. will come off when this same jig goes on the guitar.

Now notice base is removed and the jig clamped to guitar for negative cutout

Works every time


Top
 Profile  
 
 Post subject:
PostPosted: Sat Sep 23, 2006 2:48 am 
Offline
Koa
Koa

Joined: Sun Jan 16, 2005 1:48 am
Posts: 571
Location: United States
[QUOTE=Mark Hanna] I've used this home made end graph jig. Got this idea from Dennis Scannell from True North Guitars. Great Site by the way.

First cut the end graph, notice plywood base. will come off when this same jig goes on the guitar.
[/QUOTE]

Ok, dumb question time... How do you cut the end graph? Do you just mark it in the jig and then cut it with a band saw or do you cut it somehow in the jig itself?

Cool jig BTW.


Top
 Profile  
 
 Post subject:
PostPosted: Sat Sep 23, 2006 3:00 am 
Offline
Cocobolo
Cocobolo

Joined: Tue Sep 12, 2006 12:43 pm
Posts: 147
Location: United States
I cut it right in the jig using an 1/8" router bit and a guide bushing. You have to make a slight adjustment to compensate the bushing and bit by loosing the wing nuts. The Graph you cut is longer then the guitar body, so you have room for error. It's a wedge. as in the last picture, I was even able to fit purfling in.


Top
 Profile  
 
 Post subject:
PostPosted: Sat Sep 23, 2006 3:57 am 
Offline
Koa
Koa

Joined: Sun Jan 16, 2005 1:48 am
Posts: 571
Location: United States
[QUOTE=Mark Hanna] I cut it right in the jig using an 1/8" router bit and a guide bushing. You have to make a slight adjustment to compensate the bushing and bit by loosing the wing nuts. The Graph you cut is longer then the guitar body, so you have room for error. It's a wedge. as in the last picture, I was even able to fit purfling in.[/QUOTE]

Got it. Thanks Mark.


Top
 Profile  
 
 Post subject:
PostPosted: Sat Sep 23, 2006 4:08 am 
Offline
Koa
Koa
User avatar

Joined: Thu Feb 24, 2005 4:53 am
Posts: 1584
Location: PA, United States
Mark,

Nice jig. I too saw it on Dennis' website. He didn't repsond to my 2 requests for more info, so this is helpful.

Question. Do you double stick tape the end graft to the lower base to hold it in place

Question #2. After you cut the graft, how does one keep the top two halves perfectly indexed after removing the lower plywood? How do you line it up on the guitar? Using the cut end graft snugged in between the top halves to get the spacing correct? Indexing is my main concern. How, how, how?

BTW, I LOVE fluted end grafts. So as soon as I figure it out, get me a guide bushing, I'm gonna make one!Terry Stowell38983.5592592593


Top
 Profile  
 
 Post subject:
PostPosted: Sat Sep 23, 2006 4:35 am 
Offline
Cocobolo
Cocobolo

Joined: Tue Sep 12, 2006 12:43 pm
Posts: 147
Location: United States
Hi Terry,
I don't tape the end graph piece. I have sandpaper under the jig wings, and a scrap piece equal to the e/g/piece. It locks down very tightly. If you look at the 2 pics of the jig, the 1st one only has the plywood attached under the wings. the holes drilled in the plywood base are a certain distance apart. (depends on e/g/width you want)The second pic shows the guitar clamps on the wings, and the holes in those clamps need to correspond with holes in the plywood, minus the compensation for the router bit. Again, there is small amount of room for error, due to the fact this is a wedge. I hope that explains it, if not I'll try again. I don't know if Dennis does this the exact way, I too had to figure this out from his pics.
Mark


Top
 Profile  
 
 Post subject:
PostPosted: Sat Sep 23, 2006 8:58 am 
Offline
Koa
Koa
User avatar

Joined: Wed Dec 07, 2005 9:08 am
Posts: 535
First name: Pete
Last Name: Liccardello
City: Eden Prairie
State: Minnesota
Mark,

It is obvious that the distance between the two jig profiles is different between cutting the EG piece and then routing the EG channel in the tailpiece but do you have a specific measurement that you offset between the two?

Pete

_________________
Peter


Top
 Profile  
 
 Post subject:
PostPosted: Sat Sep 23, 2006 9:33 am 
Offline
Cocobolo
Cocobolo

Joined: Tue Sep 12, 2006 12:43 pm
Posts: 147
Location: United States
Pete, it depends on your router setup. You would need to take into account the router bushing your using. Look at pic 2. I have mine on the pc lam. trim. When I cut the actual EG,(1st Pic), The wings are set to the outer line of the final eg width. (2nd pic), the wings are set for the inside line of the eg.

a is where the the wings should be when cutting out the eg.
b. is where it should be located on the guitar clamp brackets. The difference is the router being on one side of the final dimension line or the other. You need to figure out with your router and bushing. I did some practicing before I got it right. It's very consistent now that I have it. I hope that explained it. If not let me know.
One other improvement on this jig, I have longated all the holes so I can make the eg different widths. I simply have a set of templates for each width to quickly set up for that width.


Top
 Profile  
 
 Post subject:
PostPosted: Sat Sep 23, 2006 10:31 am 
Offline
Contributing Member
Contributing Member
User avatar

Joined: Wed Feb 15, 2006 7:37 am
Posts: 4815
It might be good to add a rule to it somehow. Take one off a dial-caliper
or something and glue it on. Make the 5 the center line.


Top
 Profile  
 
 Post subject:
PostPosted: Sun Sep 24, 2006 3:37 am 
Offline
Contributing Member
Contributing Member
User avatar

Joined: Fri Sep 09, 2005 7:51 am
Posts: 3786
Location: Canada
I would do it another way - same jig, but get the inlay set of router bit and bushings that Lee Valley sells - you route the inlay piece with the bushing sleeve off, then route the pocket with it on - the bushing sleeve takes into account the offset, and the piece is a tight fit - no fooling around with trying to move the template two hairs. my $.02. Its about 25 bucks.

_________________
Tony Karol
www.karol-guitars.com
"let my passion .. fulfill yours"


Top
 Profile  
 
 Post subject:
PostPosted: Sun Sep 24, 2006 4:47 am 
Offline
Brazilian Rosewood
Brazilian Rosewood

Joined: Sun Dec 25, 2005 6:32 am
Posts: 7774
Location: Canada
Jigs you want?

Ok, here's my rosette cutter jig, just a round piece of plexiglass with the router centered and fixed from underneat, you can repeat the same patterns over and over by deciding what diameters you'll need and pierce 1/8" holes for a 1/8" pivoting pin at half the distance of each diameter chosen!


My binding and purfling cutter jig, assembled with scrounged metal and plexiglass parts, it would be difficult to describe the parts, i just built it as i went with bearings bolts and wing nuts, the only thing i was looking for was to have this jig indexing from the sides and rolling well, i can adjust the height or depth of cut manually...


And my fretboard radiussing jig, you can make compound radiuses or same radius on the whole fretboard with it, thanks to my bud Al Peebles for that ingenious jig and plan! It's got a swing underneath the main table and the router slides over that huge slot. The fret board sits on the swing underneath, it can swing to different arches, you decide where you want your pivoting points, 12, 14, 16,...20" radius! You just clamp the jig to your workbench.


Ok, i could go on and on but i'll let the geniusses here give ya some more! Serge Poirier38984.7240856482


Top
 Profile  
 
 Post subject:
PostPosted: Sun Sep 24, 2006 5:41 am 
Offline
Koa
Koa

Joined: Fri Jun 30, 2006 4:23 pm
Posts: 1694
Location: United States
First name: Lillian
Last Name: Fuller-Watson
State: WA
Country: USA
Focus: Build
Status: Amateur
[QUOTE=Serge Poirier]
Ok, i could go on and on but i'll let the geniusses here give ya some more! [/QUOTE]
Please do. I'd love to see what you've come up with as well as what everyone else has hiding in their shop.

_________________
Aoibeann


Top
 Profile  
 
 Post subject:
PostPosted: Sun Sep 24, 2006 6:41 am 
Offline
Brazilian Rosewood
Brazilian Rosewood

Joined: Sun Dec 25, 2005 6:32 am
Posts: 7774
Location: Canada
[QUOTE=Aoibeann] [QUOTE=Serge Poirier]
Ok, i could go on and on but i'll let the geniusses here give ya some more! [/QUOTE]
Please do. I'd love to see what you've come up with as well as what everyone else has hiding in their shop.[/QUOTE]

Ok Lillian, 
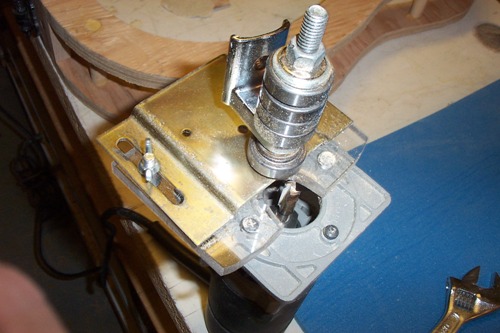
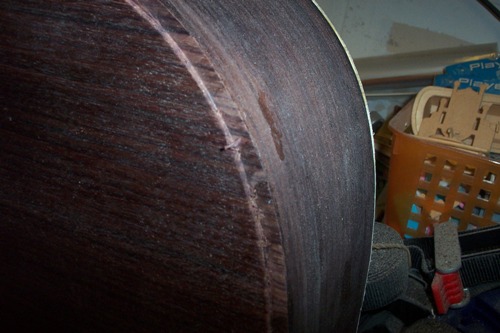
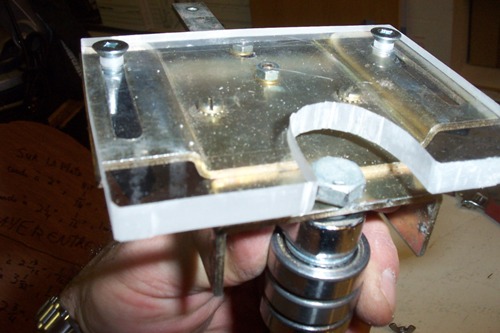
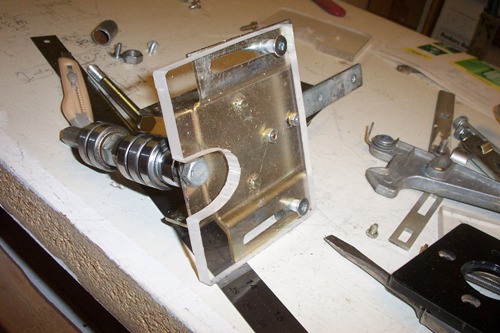
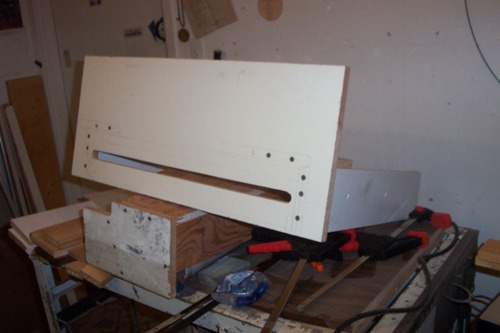
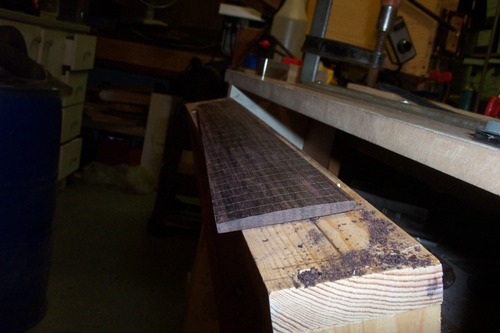
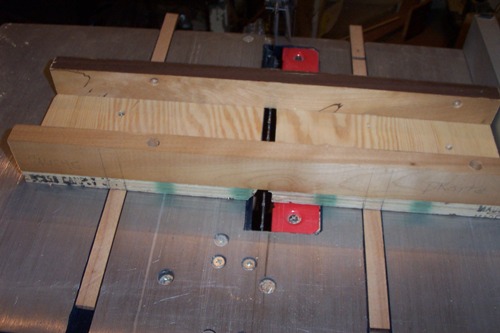
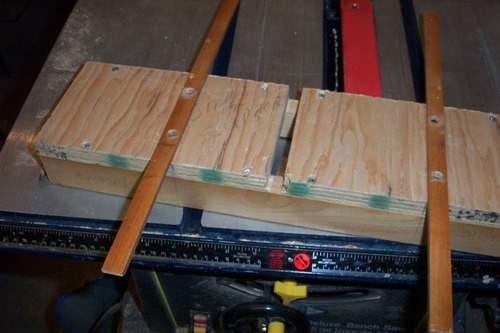
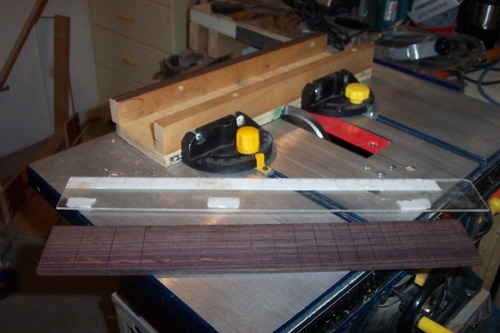
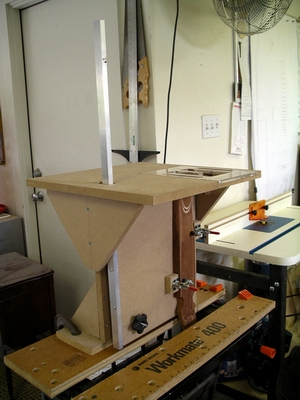
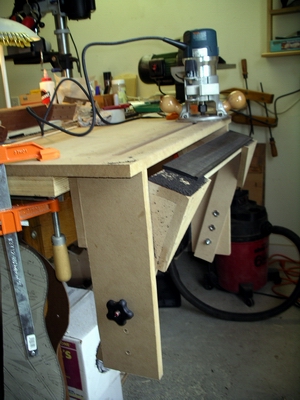
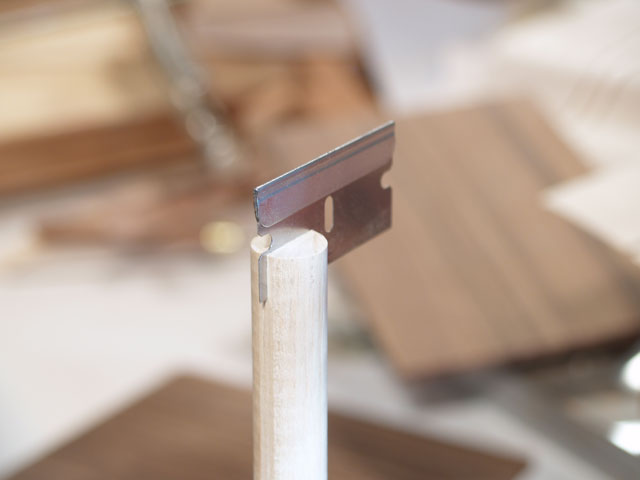
here's another one, my sled for cutting the fretboard slots, i use it on the table saw with a fretsaw blade that i purchased from Shane. With the WFRET program, i made a 25.4" scale plexiglass template that i put in the sled to make the cuts at their precise locations. i put the fretboard upside down first and the template on top of it and with a center line scribed into the wood, right over the blade's center, i slot the fretboard easily!

You can find more details on this on Sylvan Wells website :

http://wellsguitars.com/Articles/Fret_Cutting_Article.htm

Here's mine


Made some changes since then for the sled here


Edit: you just stick or tape the WFRET read out on the plexiglass and you are ready to go cut the slots! Serge Poirier38984.6559375


Top
 Profile  
 
 Post subject:
PostPosted: Sun Sep 24, 2006 8:27 am 
Offline
Koa
Koa

Joined: Fri Sep 30, 2005 10:33 pm
Posts: 954
Location: United States
I'm with you Lance on this one, I hate cutting the end grafts, takes me forever to get it perfect....I like this jig!!

Greg

_________________
Gwaltney Guitars


Top
 Profile  
 
 Post subject:
PostPosted: Sun Sep 24, 2006 8:47 am 
Offline
Koa
Koa

Joined: Fri Jun 30, 2006 4:23 pm
Posts: 1694
Location: United States
First name: Lillian
Last Name: Fuller-Watson
State: WA
Country: USA
Focus: Build
Status: Amateur
20" instead of 16" and ply instead of MDF. My thoughts exactly.

_________________
Aoibeann


Top
 Profile  
 
 Post subject:
PostPosted: Mon Sep 25, 2006 1:52 am 
Offline
Koa
Koa

Joined: Tue Mar 07, 2006 12:10 am
Posts: 606
Location: United States


Kerfing jig, cuts four sets at once, brass spine on the saw is used for the stop, tray slides and is indexed.


Top
 Profile  
 
 Post subject:
PostPosted: Mon Sep 25, 2006 1:59 am 
Offline
Cocobolo
Cocobolo

Joined: Thu Jun 23, 2005 9:36 am
Posts: 381
Location: United States
First name: Wayne
Last Name: Clark
City: Driftwood
State: TX
Focus: Build
Status: Amateur
I spent most weekends this summer building jigs.

Here is my Woolson neck jig:


And just yesterday I radiused a couple of fret boards on my Peebles jig:


And finally, here is a thickness calipre I made out of a dial indicator from Harbor Freight and some scrap wood:


_________________
53% of all statistics are made up on the spot
http://driftwoodguitars.blogspot.com/


Top
 Profile  
 
 Post subject:
PostPosted: Mon Sep 25, 2006 2:33 am 
Offline
Cocobolo
Cocobolo

Joined: Tue Sep 12, 2006 12:43 pm
Posts: 147
Location: United States
Todd, how can I get the plans for the 20" thickness sander? I've been meaning to build one.


Top
 Profile  
 
 Post subject:
PostPosted: Mon Sep 25, 2006 3:31 am 
Offline
Koa
Koa

Joined: Fri Sep 30, 2005 10:33 pm
Posts: 954
Location: United States
On that radius jig do you just lock the fretboard in one position run the router the length of the board adjust the board a tad and do it again & again..

Greg

_________________
Gwaltney Guitars


Top
 Profile  
 
 Post subject:
PostPosted: Mon Sep 25, 2006 3:40 am 
Offline
Cocobolo
Cocobolo

Joined: Thu Jun 23, 2005 9:36 am
Posts: 381
Location: United States
First name: Wayne
Last Name: Clark
City: Driftwood
State: TX
Focus: Build
Status: Amateur
[QUOTE=GregG] On that radius jig do you just lock the fretboard in one position run the router the length of the board adjust the board a tad and do it again & again..

Greg[/QUOTE]

Thats right. The fb is stuck to the jig with a few pieces of double-sided tape.

_________________
53% of all statistics are made up on the spot
http://driftwoodguitars.blogspot.com/


Top
 Profile  
 
 Post subject:
PostPosted: Mon Sep 25, 2006 4:47 am 
Offline
Koa
Koa

Joined: Fri Sep 30, 2005 10:33 pm
Posts: 954
Location: United States
Wayne,

What is the length of the arm on that jig to arrive at the appropriate radius?

Thanks,
Greg

_________________
Gwaltney Guitars


Top
 Profile  
 
 Post subject:
PostPosted: Mon Sep 25, 2006 5:01 am 
Offline
Cocobolo
Cocobolo

Joined: Thu Jun 23, 2005 9:36 am
Posts: 381
Location: United States
First name: Wayne
Last Name: Clark
City: Driftwood
State: TX
Focus: Build
Status: Amateur
Greg,

Here is the original thread where the jig was described. Al Peebles posted some plans in the thread with all the relevant dimensions.

_________________
53% of all statistics are made up on the spot
http://driftwoodguitars.blogspot.com/


Top
 Profile  
 
 Post subject:
PostPosted: Mon Sep 25, 2006 8:57 am 
Offline
Koa
Koa
User avatar

Joined: Thu Jun 23, 2005 7:46 am
Posts: 580
Location: United States
First name: John
Last Name: Watkins
City: Lake Zurich
State: IL
Focus: Build
Status: Professional
Here's my deluxe binding color scraping apparatus with micro-fine depth adjustment. I don't mind telling you, this thing was in R&D for years, but the results speak for themselves....    


_________________
John Watkins
CNC Guitar Parts


Top
 Profile  
 
Display posts from previous:  Sort by  
Post new topic Reply to topic  [ 30 posts ]  Go to page 1, 2  Next

All times are UTC - 5 hours


Who is online

Users browsing this forum: No registered users and 17 guests


You cannot post new topics in this forum
You cannot reply to topics in this forum
You cannot edit your posts in this forum
You cannot delete your posts in this forum
You cannot post attachments in this forum

Jump to:  
Powered by phpBB® Forum Software © phpBB Group
phpBB customization services by 2by2host.com