Official Luthiers Forum!
http://w-ww.luthiersforum.com/forum/

Is this too much? (pics)
http://w-ww.luthiersforum.com/forum/viewtopic.php?f=10102&t=8605
Page 1 of 2

Author:  Alain Desforges [ Mon Sep 25, 2006 1:46 pm ]
Post subject: 

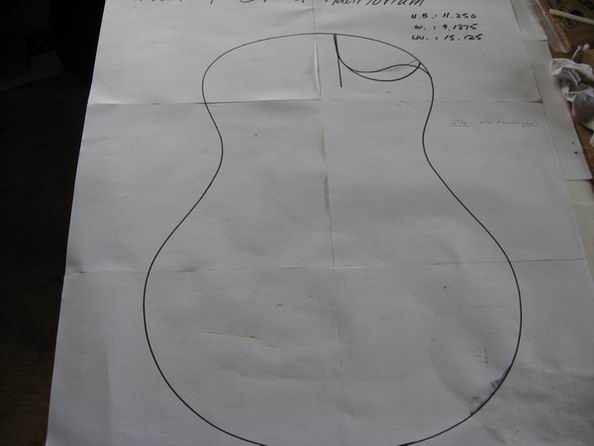
I'm slowly starting the planification of no.3. The top and back are joined. They are not down to thickness, but the sides are.

This will be a first for me. I've never worked with shell. I also want to try inlaying my headstock with a custom logo. (wish me luck!) Another first in the project is a florentine cutaway. I know, as Hesh once told me, I'm a glutton for punishment!

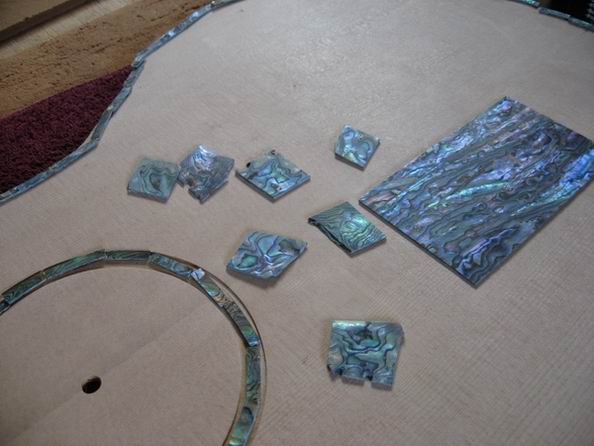
Now these quasi-blanks are a bit wide for my taste. I don't mind a wider rosette, but the side purfling has to be narrow...

I took a jewelers saw and cut one piece in half. I'm slowly 'jigging' up to sand and shape shell to profile.
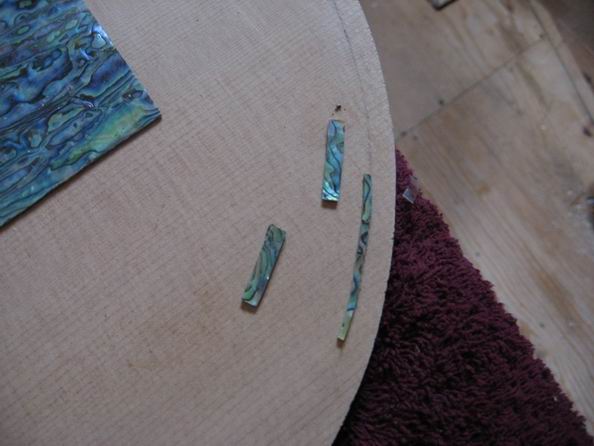
Anyways, I can see why they say that inlaying shell can double the time for building a guitar!!! I won't say how long it took me just to shape that 2" length! (last pic)

So here's the shape. Smaller than a dread. Grand auditoriumish???


Author:  peterm [ Mon Sep 25, 2006 1:54 pm ]
Post subject: 

Alain, I think there's a better way to do shell purfling rather than shaping every piece of inlay... there was a post here before that explained the whole technique... I'll try to find it or maybe someone else will.
Good luck!


Author:  Shane Neifer [ Mon Sep 25, 2006 2:00 pm ]
Post subject: 

Man, Alain, you are a glutten for punishment! Using laminated abalone for your purfling you should be able to just cut it into thin strips and then snap it into your purfling channel. For the rose, e-mail Andy Depaule, for about $25 you get some of his best abalone already radiused. But then that is taking away from the experience isn't it? Anyway, when you get it done she will be WONDERFUL. Hopefully I will get some progress when I am out there in November.

Lookin' sweet!

Shane

Author:  Rod True [ Mon Sep 25, 2006 2:22 pm ]
Post subject: 

Alain, that is going to be one sweet guitar. I really love the shape of it too.

Keep us posted, I'm sure you will. You can do it. I would take Shanes advise with Andy Depaule, he has great inlay products at great prices, lots of pre-cut stuff and he can do custom stuff as well.

Here is Andy's Link

Author:  Serge Poirier [ Mon Sep 25, 2006 2:45 pm ]
Post subject: 

Alain, another beauty that one will be, wish i had the money, i'd commision it right away! I really dig that shape bud! Must be these curves that inspire sweet sound already!

Looks like shell is hard to work with, i too would like to inlay my own logo with the stuff on the next instruments!

Looking good my friend, keep it up!

Author:  James Orr [ Mon Sep 25, 2006 2:48 pm ]
Post subject: 

You and your awesome body shapes.

Author:  MSpencer [ Mon Sep 25, 2006 3:13 pm ]
Post subject: 

Looking good!

Mike
White Oak, Texas

Author:  Billy T [ Mon Sep 25, 2006 7:43 pm ]
Post subject: 

    I never liked abalone purfling on a guitar until I saw a jumbo, up close, all done up just like yours!

Brings back some nice memories! Can't wait to see this one done.

Looks like serious work!!

Billy Dean

Author:  Michael Dale Payne [ Mon Sep 25, 2006 11:19 pm ]
Post subject: 

Wohw!! Alain, even using real shell I never radius large pieces of shell for purfling. I use nippers and a file and cut or break as it were short lengths and file edges to fit to make up purfling. In my opinion long pieces with few joints actually make the eye notice the joints more than short pieces many many joints. Not to mention the fact that if you use Ablam or real shell you can buy the stuff pre radiused to 4.93 ID. I applaud the effort but like others have said I am not sure the expense and work yields a benefit worth the time and money in the long run.

I agree with you by the way on the width of purfling. If you use a black/white/black bourder purfling on both sides of 1/16" wide abalone, the black aginst the abalone make it apear wider to the eye and also hides the fack that the joints are not radiused.

Careful breaking of 1/16" wide or even 1/8" wide purfling shell into the channel takes about 40-60 breaks on mid size guitars and can be done with very tight fits in less than an hour or two at the most. and like I said especially with abalone the pattern changes in the shell makes the joints near in visible to the eye because of the camouflage effect.MichaelP38986.3510416667

Author:  1bordeaux [ Mon Sep 25, 2006 11:48 pm ]
Post subject: 

Alain,

Are you familiar with using the teflon strips inside the purfling?

Paul

Author:  Alain Desforges [ Mon Sep 25, 2006 11:59 pm ]
Post subject: 

Thanks for all your kind comments guys!

Hesh wrote:
Another way to address the inlay is to get a girlfriend who does inlay...

That's exactly what I put on my internet dating site profile; Looking for woman who knows how to lay it down... Do you think I should mention it's shell I'm talking about?

I hadn't really thought about seriously going ahead with the shell inlay until yesterday when I laid it out on the guitar to see what I thought. At first it was just going to be the rosette and then I decided to try the purfling as well.

I'm sure there are many easier ways to go about doing it. I will try the nip and file method for sure. This is shell material I got off of e-bay for very cheap. And being a miser (read poor) it suits my purpose perfectly! I also have that abalam sheet I got from LMI. I think that's going to be my logo material...

This guitar is to be a personnal build. I don't mind taking a bit extra time and effort in putting it together. Plus, if someone wants to buy it, I'll have abundant horror stories about the shell inlaying guaranteed to jack up the price!   

When I run out of shell, then I'll buy some nice pre-shaped stuff from our great sponsors...

Again, thanks!

Author:  Alain Desforges [ Tue Sep 26, 2006 12:03 am ]
Post subject: 

Ooops Paul, we were posting at the same time... Do you mean the strips that replace the shell when it comes to gluing up the binding?

I'm not sure how that works. You glue it in but then remove the teflon? Don't you get squeeze out in the channel?

And what's the best glue for shell?

Thanks a lot for your help.

AlainAlain Desforges38986.3785763889

Author:  Serge Poirier [ Tue Sep 26, 2006 12:16 am ]
Post subject: 

[QUOTE=Alain Desforges]
That's exactly what I put on my internet dating site profile; Looking for woman who knows how to lay it down... Do you think I should mention it's shell I'm talking about?

QUOTE]

No but asking that the girl's name be Shelly with nice curves would set you in tha mood my good friend!

Author:  burbank [ Tue Sep 26, 2006 2:52 am ]
Post subject: 

Personally, I kind of like the Fred Flintstone look.

I too say go with Andy DePaule on the rosette. Your time is worth more than that!

Beautiful, shape, BTW.burbank38986.4953356481

Author:  1bordeaux [ Tue Sep 26, 2006 3:36 am ]
Post subject: 

[QUOTE=Alain Desforges] Ooops Paul, we were posting at the same time... Do you mean the strips that replace the shell when it comes to gluing up the binding?

I'm not sure how that works. You glue it in but then remove the teflon? Don't you get squeeze out in the channel?

And what's the best glue for shell?

Thanks a lot for your help.

Alain[/QUOTE]

You can install teflon filler strips between the purfling
to take the place of the shell when gluing. I believe you can use most any of the traditional glues used for binding/ purfling,(Chime in here guys).
After the glue is set, you peel the teflon out, leaving a nice clean channel for your shell.
I typically level it,(the purfling), close to the top prior to pulling the teflon, for ease of installing the shell,especially if you're breaking the shell in the channel as you go.

I love the shape, by the way!

Author:  Sprockett [ Tue Sep 26, 2006 3:49 am ]
Post subject: 

Teflon doesn't even stick to teflon!!

They way I do it, is I put it in the channel, CA the purfling in and when dry I scrape off the extra glue (just enough to get to the channel). Then I peel out the teflon and put in the abalone, with abalam you only need the pieces to be wide enough to fit in the channel, I find the curved pieces easier. You can crack it in the channel and because of the pattern you will never see it when you get it all glued in.

Cheers

-Paul-

Author:  peterm [ Tue Sep 26, 2006 12:14 pm ]
Post subject: 

Didn't someone here have a thread showing the process? I'm sure many here would love to see it. Including myself!

Author:  Serge Poirier [ Tue Sep 26, 2006 12:38 pm ]
Post subject: 

seconded!

Author:  Michael Dale Payne [ Wed Sep 27, 2006 12:01 am ]
Post subject: 

Think of it this way. If abalone was bendable. How would you install it? Just like a piece of herringbone. Now replace the herringbone with the teflon strip, glue up as normal. When the glue is dry scrape off excess glue and pull out the teflon strips. Take your abalone strips and place in the channel left by the teflon strips. The teflon is only there to take up the space the abalone will occupy during the binding and fine line purfling glue up.

MichaelP38987.3797685185

Author:  Serge Poirier [ Wed Sep 27, 2006 12:18 am ]
Post subject: 

Great post Michael, thanks! saved to file!

Author:  pharmboycu [ Wed Sep 27, 2006 2:46 am ]
Post subject: 

[QUOTE=MichaelP] When the glue is dry... pull out the teflon strips. [/QUOTE]

Which, on the other hand, still leaves us the question... what makes the teflon stick to the pan?????

Author:  Michael Dale Payne [ Wed Sep 27, 2006 2:48 am ]
Post subject: 

[QUOTE=pharmboycu] [QUOTE=MichaelP] When the glue is dry... pull out the teflon strips. [/QUOTE]

Which, on the other hand, still leaves us the question... what makes the teflon stick to the pan?????[/QUOTE]

Magic

Author:  Alain Desforges [ Wed Sep 27, 2006 3:26 am ]
Post subject: 

   Magic indeed!

Thanks for the good explanation Michael and the picture too.

Again, though, the crux of the matter, for me, is that I already have the shell material on hand. I want to use it. I simply can't afford to buy a complete top set of paua shell. By the time the duties and the exchange are done with me that will cost me over 200$.

I'll have to take those large pieces, cut them in half and at the very worst, sand them straight at a 1/16 width.

I do have a carrier board with pivot that I've installed on my press drill (and my 4" radius sanding disc). My next step is to make a little jig to hold the piece of shell as it pivots to the sanding disc.

I want to try and make the 'pivot' movable so that I can easily change the radius I'm sanding. Of course, the shell holding jig will have to be expandable/retractable as well.

I'm thinking that if I can rapidly machine and shape the shell to profile, it won't be so bad. After 130-140 hours, what's a few more?

Thanks guys!


Page 1 of 2 All times are UTC - 5 hours
Powered by phpBB® Forum Software © phpBB Group
http://www.phpbb.com/