Official Luthiers Forum! http://w-ww.luthiersforum.com/forum/ |
|
How to Re-Glue a Bridge http://w-ww.luthiersforum.com/forum/viewtopic.php?f=10102&t=9228 |
Page 1 of 1 |
Author: | LuthierSupplier [ Thu Nov 09, 2006 4:55 am ] |
Post subject: | |
I noticed my Bouzouki bridge was lifting on the edges, so I decided it was a good time to pop it off and refinish the FP top and then reglue. The top is Cedar and the glue is hide glue 192 gram strength. I just used an iron and moist towel to get it off. About 1/2 way through getting it off, it popped up unexpectingly and pulled some of the top with it. My question is, how do you fill these big holes before re-gluing the bridge? I was thinking of just chiseling out a slightly bigger area to clean it up and get rid of the rough edges, and just glue in another piece of cedar, and sand down flush and start over. Is this the preferred method? Here are some pics: Tracy |
Author: | Steve Saville [ Thu Nov 09, 2006 5:05 am ] |
Post subject: | |
I would use epoxy because it fills in gaps beter than any other glue. Even with epoxy it is better not to have gaps. You'll no doubt have people with much more experience than me tell you the right way to do it. |
Author: | JJ Donohue [ Thu Nov 09, 2006 5:18 am ] |
Post subject: | |
Tracy: Hide glue and wood dust would be my recommendation. This happened on my first when I initially installed the bridge and that's how I repaired the divots. Sand it smooth and it's good to go. 4 years later that bridge is as solid as can be. |
Author: | crazymanmichael [ Thu Nov 09, 2006 5:26 am ] |
Post subject: | |
this is probably a result of too much levering upward with your removal tool. when removing i try to get the tool to pass entirely under the bridge to completely break the glue line, leave it in place and slide in another adjacent to it, and so forth. sometimes i end up with five or so pallette knives sticking out from under the bridge before it comes away. but you don't end up losing top wood. but to your problem; as the wood loss is on the front edge, you can probably get away with not worrying about it and just reglue. the stress will be mainly on the back edge which appears to be intact. if you elect to replace the wood you could make a small inlay pattern guide slighly greater in area than the wood loss, then use an inlay matching bit and guide to route out an area to the greatest depth of the wood loss, route a matching patch, glue in, and smooth, then reglue your bridge. make the guide so that the patch edges don't follow grain lines or cross at lines parallel to the straight edges of the bridge to make its removal less likely if the bridge ever has to be removed again. |
Author: | Barry Daniels [ Thu Nov 09, 2006 6:22 am ] |
Post subject: | |
Epoxy, sawdust and/or inlaying new wood is not recommended and is not necessary in your situation. The preferred approach would be to remove the splinters from the bottom of the bridge and glue them back into the voids on the top as carefully as possible. Clean up the top by scraping the bridge footprint with a chisel. Then reglue the bridge with HHG. |
Author: | Michael Dale Payne [ Thu Nov 09, 2006 6:24 am ] |
Post subject: | |
Actually the biggest culprit for tear out on bridge removal is not using your separation knife in the down stream direction of the run-out. Each top is two book-matched halves. one half the run-out is in direction"A" the other half is in direction "B". Knowing the direction of the run-out and going with the run-out will eliminate most tea-rout. this means you need to separate one half the bridge from one direction and the other half from the other. |
Author: | Barry Daniels [ Thu Nov 09, 2006 6:25 am ] |
Post subject: | |
The reason the bridge probably came up is you did not have the finish removed all the way to the edge of the bridge. You can see a 1/16" strip of clean bridge around the perimeter where there was no adhesion to the top. This creates a stress riser and can lead to the bridge peeling up, especially at the back edge. |
Author: | David Collins [ Thu Nov 09, 2006 7:46 am ] |
Post subject: | |
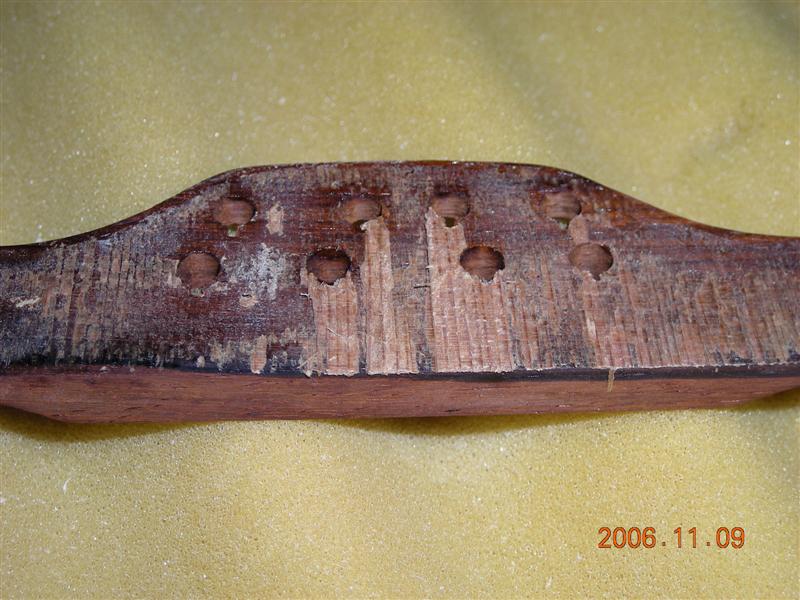
With the amount of tearout you appear to have I would not recommend filling it at all. Epoxy fill would require using epoxy to glue the bridge as well, and would give you relatively low heat resistance, and less creep resistance than hide glue. Using hide glue and sawdust may give peace of mind that there isn't a gap, but won't have much to offer structurally. If the pieces are large enough to cleanly remove from the bridge I feel the best method is to glue them back to the top. In your case I don't know that would be necessary. When I glue bridges I don't remove the finish all the way to the edge. This can be difficult to do cleanly, but my main concern is finish cracking when pressed against the sides of the bridge. This can happen with humidity fluctuations or more often with even minor creeping. It doesn't happen often, and if it is properly glued it should never creep in an ideal world, but if you want it to look good in 20 years you can't always count on ideal conditions through that time. Again, it's not too common a problem, but I do see it occasionally. 
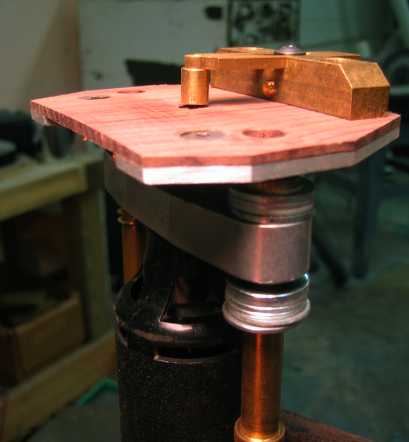
I actually recess a small lip around the edge of the bridge. This way you can have a solid wood to wood contact, with the edge of the bridge kind of floating over the finish around the perimeter. The lip on the bridge should be exactly or very slightly less then the ledge from the top/gluing surface to the finish surface. This addresses the stress riser that Barry mentioned while giving you a very clean look. I think I stole this technique from Collings, but it's been so long that I don't remember. ![]() |
Author: | David Collins [ Thu Nov 09, 2006 7:58 am ] |
Post subject: | |
I suppose I should show the tool I use. Since I never use my dremel for anything else I converted the StewMac base and binding slot jig to a single use tool for this. I put the rosewod cap on the base to give me a radiused surface, otherwise you could only use it for perfectly flat bridges. It's very easy to adjust for individual instruments. ![]() ![]() |
Author: | LuthierSupplier [ Thu Nov 09, 2006 8:11 am ] |
Post subject: | |
Thanks all for the great suggestions! I'm pretty sure I know why it happened. 1. I didn't have the right tool for the job 2. Impatient. That pretty much sums up why all mistakes in Luthierie happen right? Now to fix it...I'll remove the slivers of wood from the bridge very carefully and glue them back in with HHG. I'll try to get most of them in, but not all of them. I'll then sand flat and clean up the rest of the bridge area with a very sharp chisel in a scraping action. I'll also remove more of the finish on the back side of the bridge area so there is more contact on this back side. (just for reference, the back of the bass side wing, was the first to come lose, then it started working its way to the back edge). It will be awhile before I glue it back down because I plan on refinishing the top with FP. David, that is a beautiful job you did on that bridge ledge. There is no way I could get my bridge to look like that. Also, my finish is FP, so the my ledge would be half that deep. Thanks for the great pic. Tracy |
Author: | Dave White [ Thu Nov 09, 2006 8:35 am ] |
Post subject: | |
Tracy, It might also be worth while checking that the bottom of the bridge matches the top profile and if necessary re-profiling it before you glue it back on. The 8 strings of a guitar-bouzouki have a lot of tension and the top may be more domed than when you made it. I attach 120 grit sandpaper over the bridge area of the top with double-sided tape, chalk the bottom of the bridge and then carefully sand until the chalk marks go, then use a sharp scraper on the bottom of the bridge just before gluing. The sandpaper can be carefully peeled off without harming the finish on the top. I think there was a thread on this recently where others described their methods. Hope it goes well. |
Author: | Mark Tripp [ Thu Nov 09, 2006 8:38 am ] |
Post subject: | |
David: Thank you, thank you, thank you! I've been wondering how to do this ever since I saw it in the photo-essay tour of the Collings factory on Frank Ford's site. I've also *retired* my dremel tool, but will be recommissioning it for this task. Thanks again! I LOVE this forum! -Mark |
Author: | Pwoolson [ Thu Nov 09, 2006 9:18 am ] |
Post subject: | |
Tracy, Why do you need to remove all the slivers from the bridge? If you are regluing the same bridge, why not just hit it with more HHG and put it back on. That way, they will all be lined up perfectly where they came off. |
Author: | LuthierSupplier [ Thu Nov 09, 2006 9:40 am ] |
Post subject: | |
Paul, Great point! The only reason I was going to remove it was to reprofile like Dave mentioned. But that will definitely save me a lot of hassle if I don't have to do that. I'll just scrape the other areas to remove any lumps and then reglue. After refinishing the top, of course! Thanks for the suggestion. Tracy |
Author: | tippie53 [ Thu Nov 09, 2006 9:44 pm ] |
Post subject: | |
NO EPOXY !!!!! That isn't the answer for something like this. There are 2 ways to do this proper. 1 You can sand the area and then dome the bottom of the bridge. I use tite bond, Be sure you get all the old glue off and to get all the finish off the top 2 route the area and step the bridge as was mentioned on a previouis post. This is the way it goes in the world of luthiery. Not a big deal. Clamp the brige but don't clamp it so tight that you squeeze all the glue out. I can't tell without touchie feelie but it looks like you either glue starved or didnt get all the finish off the top. good luck john hall |
Author: | David Collins [ Fri Nov 10, 2006 2:02 am ] |
Post subject: | |
Hesh, I think you've got how I use it right, and I just use a straight 3/16 striaght bit in this case. At a cutting depth of less than .010" I doubt that the upcut or downcut spiral would make any difference. The Jig I used before this used an old laminate trimmer and a 1/4" bit. I built a small router table, if you could call it that - more just scraps of wood made in to a box with the trimmer mounted inside. Then radiused the "table", bolted a piece of wood with a 1/4" pin mounted in it as a guide. The clearance holes in the guide block can be more than enough slop to adjust the inset depth of the cut. Then the height was just adjusted at the trimmer base. The cut usually ends up at about .003"-.005" like you said, although I will often make the initial cut slightly deeper to allow for a few thousands to be scraped before glueing. It's a really easy jig to make. You can take any router-like tool mount a plate to it's base or the base to a table, and make some sort of a depth stop. There are plenty of other approaches to a tool for this purpose, and I used this design based on the materials at hand. Mark, I hadn't seen Franks Collings tour, but I'll have to check that out. I think that Steve at Collings told us about this technique about 10 years ago when I was with Bryan. |
Author: | Serge Poirier [ Sat Nov 11, 2006 3:41 am ] |
Post subject: | |
Like Dave White mentions, you definitely want 2 matching and smooth surfaces mating and i'd scrape both surfaces clean and reglue with HHG after making sure the dome is well achieved under the bridge if i make any sense. ![]() |
Page 1 of 1 | All times are UTC - 5 hours |
Powered by phpBB® Forum Software © phpBB Group http://www.phpbb.com/ |