Official Luthiers Forum! http://w-ww.luthiersforum.com/forum/ |
|
buckeye burl build. http://w-ww.luthiersforum.com/forum/viewtopic.php?f=10123&t=30415 |
Page 1 of 3 |
Author: | peters instruments [ Tue Dec 21, 2010 5:54 pm ] |
Post subject: | buckeye burl build. |
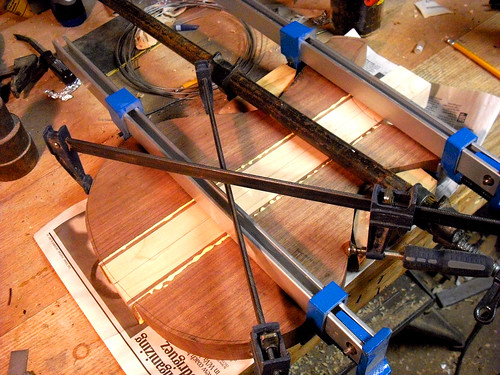
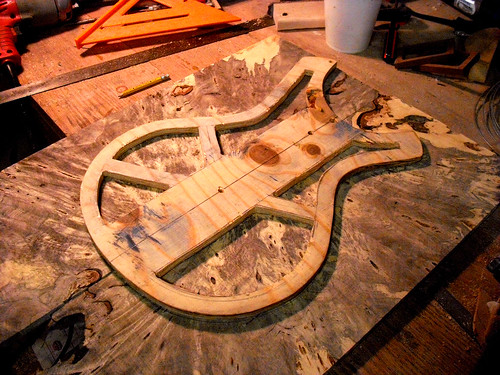
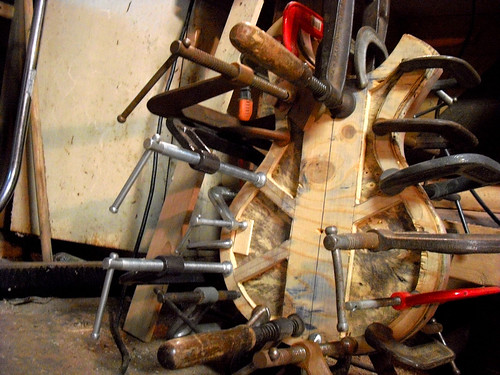
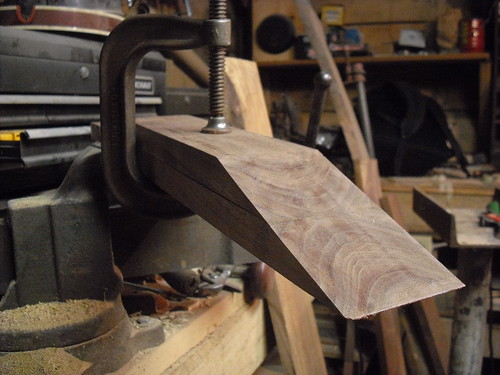
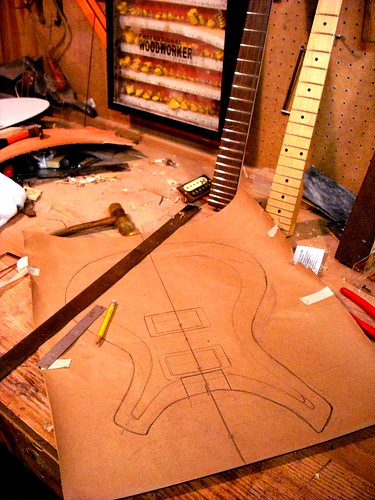
well i couldn't let Fillipo have all the fun, so over the last couple weeks i started on a new build. I've had this buckeye burl for the past year and a half and have been looking for something to do with it. the body has some prs inspiration behind it but its a little more edgy and aggressive . i would be lying if i said that this wasn't influenced some by Fillipos recent build but its also something i have wanted to do for a long time, its really the refined and revamped overhaul of the first guitar that i made. I'm just making it for myself so if any commissions come up it'll have to go to the back burner but for now i'm making pretty steady progress. here what i've got so far. the plans on paper by Peters Instruments, on Flickr all clamped up by Peters Instruments, on Flickr the beasts skeleton by Peters Instruments, on Flickr the many vices that help.... by Peters Instruments, on Flickr scarf joint for the neck by Peters Instruments, on Flickr DSCN3472 by Peters Instruments, on Flickr CIMG1107 by Peters Instruments, on Flickr hard to tell in this photo but the top has been carved though.. |
Author: | Ti-Roux [ Tue Dec 21, 2010 11:58 pm ] |
Post subject: | Re: buckeye burl build. |
Burl carved top always impress me! How will you "pore-fill" the holes? Francis |
Author: | peters instruments [ Wed Dec 22, 2010 12:05 am ] |
Post subject: | Re: buckeye burl build. |
in the past i have filled the pores in buckeye burl with epoxy. why wouldn't your fill them filippo? |
Author: | cphanna [ Wed Dec 22, 2010 9:35 am ] |
Post subject: | Re: buckeye burl build. |
Shad, that is a spectacular choice of wood. I am drooling, just imagining what it will look like under the finish. The body shape really speaks to me, too. Nice, nice, nice! Very inspiring. Keep the progress photos coming. Lots of people are going to be watching! Patrick |
Author: | jimmysux [ Wed Dec 22, 2010 6:57 pm ] |
Post subject: | Re: buckeye burl build. |
When you rout and plane the top like that, how do you get the dropoff angle right to match the neck without a jig? Or is this a trem guitar instead of a TOM |
Author: | peters instruments [ Mon Jan 03, 2011 11:11 pm ] |
Post subject: | Re: buckeye burl build. |
alright, i have been working on this quite a bit hear lately but i feel like i have not really gotten much done. i have spent a disgusting amount of time trying my hand at wood binding, and its been a major headache... granted curly maple on a body with tight curves was probably not the best way to start. in any case i am almost done binding the body, and the fretboard and the headstock are both bound. stated carving the neck this afternoon. all in all its coming along fairly well, just not as quick as i would like, this binding has been a major hold up. neck carve roughed by Peters Instruments, on Flickr headstock shaped by Peters Instruments, on Flickr glueing headstock veneer by Peters Instruments, on Flickr stained and oiled by Peters Instruments, on Flickr matching top and headstock by Peters Instruments, on Flickr head stock bound and stained. by Peters Instruments, on Flickr |
Author: | Gabby Losch [ Tue Jan 04, 2011 1:51 pm ] |
Post subject: | Re: buckeye burl build. |
I gotta agree with Chris V. on this one. BAM!!! |
Author: | peters instruments [ Wed Jan 05, 2011 6:06 pm ] |
Post subject: | Re: buckeye burl build. |
well i made some pretty good progress today, i made a new neck jig based on the myka design, and i got a hunk of claro burl in the mail today so i started work on the bridge and got it roughed out and put some danish on it, soon i will coat it in epoxy to help make it a little more solid. neck jib in the works by Peters Instruments, on Flickr here is my version of the myka neck jig, took me a little while to get everything adjusted right since i was making it up as i went along. still getting the kinks worked out in this photo. neck jig finished by Peters Instruments, on Flickr here it is pretty much all finished up. degree marks on new neck jig. by Peters Instruments, on Flickr walnut burl bridge roughed by Peters Instruments, on Flickr is is the basic idea behind the bridge, its kind of a wierd setup by most standards i guess, it is shaped like a hardtail bridge but is going to function more like i TOM, i plan to run the strings through the back to a tailpeice made from some of the same walnut burl so the tail end of the bridge wont actually carry the string tension like a normal hardtail. hopefullly it will turn out pretty sweet, i figure i'll like it regardless of weather anyone else does or not. walnut burl bridge roughed by Peters Instruments, on Flickr tomorrow should be the first day in a few to see more guitar work and less jig making. hopefully i'll fit the neck to the guitar, as well finish shaping the neck, glue on the fretboard, and epoxy fill the body and headstock.. we'll see how far i get. |
Author: | alan stassforth [ Wed Jan 05, 2011 8:49 pm ] |
Post subject: | Re: buckeye burl build. |
Lookin' good Shad! I like that bridge. Wood binding is a bear. I've been struggling with it for a while now. I be gettin' it though. |
Author: | Gabby Losch [ Wed Jan 05, 2011 11:07 pm ] |
Post subject: | Re: buckeye burl build. |
That bridge is righteous! Fits in great with the overall aesthetic of the guitar. Nice looking piece of burl, too! |
Author: | peters instruments [ Sat Jan 08, 2011 5:30 pm ] |
Post subject: | Re: buckeye burl build. |
filippo, on the bridge those are just some fender style saddles i took off of a hardtail bridge. when its all said and done it will be a sort of funky setup but i think that it will make more sense once i get a little further along and post up some more photos. |
Author: | peters instruments [ Mon Jan 10, 2011 11:09 pm ] |
Post subject: | Re: buckeye burl build. |
well school is back in session now, and i will start my next round of classes tomorrow, so progress is going to slow down a bit on this for now. im a little burnt out working on it anyway. the bridge and tailpeice are giving me grief so i think i will need to rework things a little bit. there is still plenty else to work on though i have been doing a bit of inlay work hear lately now that the binding is done and the fretboard is glued on. |
Author: | Gabby Losch [ Mon Jan 10, 2011 11:32 pm ] |
Post subject: | Re: buckeye burl build. |
Hey Shad, everything looks like it's coming together nicely! You really took on a lot of new things in this build, between the carve top, wood binding, walnut bridge, and just working with that burl top. I'm envious of your courage, and even more impressed by your results. Did you use a roundover bit to rough in the neck blank carve? I've been thinking a lot about using that method. A friend of mine even CNC'ed me a jig for it, but I haven't aligned a router to it yet. Also, I've read tons of different thoughts on the size bit to be used for a comfortable neck carve. Could you explain a bit about how you did it, and post pictures of the jig if you have any? Thanks! |
Author: | peters instruments [ Tue Jan 11, 2011 12:40 am ] |
Post subject: | Re: buckeye burl build. |
Gabby Losch wrote: Hey Shad, everything looks like it's coming together nicely! You really took on a lot of new things in this build, between the carve top, wood binding, walnut bridge, and just working with that burl top. I'm envious of your courage, and even more impressed by your results. Did you use a roundover bit to rough in the neck blank carve? I've been thinking a lot about using that method. A friend of mine even CNC'ed me a jig for it, but I haven't aligned a router to it yet. Also, I've read tons of different thoughts on the size bit to be used for a comfortable neck carve. Could you explain a bit about how you did it, and post pictures of the jig if you have any? Thanks! hey gabby, thanks for the kind remarks, its been my philosophy ever since i started building to jump in head first,and i encourage others to do the same, if you see or think of something that you would like to do its best to just do it, you're never really ready for it until you've done it so no sense in waiting. thats my stance anyway, and i try to encourage others to do the same, it keeps things interesting. in regards to my router set up its actually very simple for me right now, i have a template that is has the right taper for my width at the nut and my width and the 12th fret, and attach it to my neck blank with double sided tape. after trimming the neck on the router with the pattern bit i use a giant thumbnail bit from grizzly while i still have the template attached. i really only use this to take a good chunk of the meat off it still leaves me a fair way to go with the wood files but save me from needing to use the really aggressive rasp much. the nice thing about using a thumbnail bit is that it will actually put a slight taper on the neck since it reaches across the center line at the nut end but it leaves a fairly flat back on it. i really dont have any "jig" per say, i am just using my router table which i think may be the best way to do it. you will have a hard time getting any set up that will leave you with a perfect neck i would think, so it is best in my opinion to use either a thumbnail or round over bit to to remove the bulk of the wood for you and work it down the rest the way by hand. if you would like a good setup for a jig this might be a good way to go http://www.mykaguitars.com/tools/neckca ... efault.htm i dont know how much of a time saver it would be, i have though about trying something like it myself at different points. |
Author: | peters instruments [ Thu Jan 13, 2011 11:57 pm ] |
Post subject: | Re: buckeye burl build. |
thanks for the kind words filippo... at least i think those were supposed to be kind words lol. its definitely encouraging for me to have guys like you and others showing interest in my work, there are definitely a ton of guys on here building circles around and blowing this stuff out of the water it keeps me humble. im just a dweeby college student trying to keep up.. or more often catch up and learn as much as i can... all that to say the kind words mean a lot to me, thanks:) (after re reading this i would like to say that my thanks go out to everyone on here.. not just filippo.) |
Author: | peters instruments [ Wed Jan 19, 2011 12:29 am ] |
Post subject: | Re: buckeye burl build. |
well i worked a good few hours monday in the afternoon before hitting the local pub with a good friend of mine and got a fair amount of work done. doesnt look like much but its a milestone in the build process for me, i have been struggling with figuring out a way to make this bridge and tail piece work correctly. its one thing to doodle an idea in my notebook during history class, and another entirely to make something that is both functionally and aesthetically pleasing in 3 dimensions. after much trouble i think i finally found the balance between the two. all in all this style of bridge is completely impractical, makes little sense, and i doubt that i will do it again, but i does like pretty cool if do say so myself, and looks were really the only reason i decided to do it (although i think this design might actually function as a hardtail bridge if made from something like ebony.. thats for another day). i wanted this bridge to act more like a TOM despite the fact that it looks like a hardtail, to do that and use the tailpiece it needed to stand quite high compared to a normal hardtail, which really just looked rediculous at first and took a fair amount of experimenting to get the height right but still have a normal looking bridge... i had to scrap the first attempt entirely, and almost had to scrap the second one, but it finally worked itself out. its not 100 % perfect, but its close enough for now. appart from all that i did a little wire inlay on the headstock. i'll never use round wire again, i'll just put out the money for the square stuff. |
Author: | Gabby Losch [ Wed Jan 19, 2011 10:09 am ] |
Post subject: | Re: buckeye burl build. |
Shad, this is fantastic work! Your eye for these subtle curves is superb. The bridge and tailpiece look like they came out of a Tim Burton movie. Personally, I think I would've made them out of a more contrasting, solid color wood like ebony so that they don't fight for attention with the buckeye burl top. But the pieces you're using fit in nicely with the whole build, especially once you epoxied them. Keep it up! I can't wait to see this finished! |
Author: | peters instruments [ Wed Jan 19, 2011 10:17 am ] |
Post subject: | Re: buckeye burl build. |
i guess i am not totally sure what you meant by "CA on the insides of the curves", but i can tell you that yes it is proud of the headstock, or at least it was, this is only my second time doing the wire inlay so i am still getting a good method ironed out, but after I get it all inlayed i slather epoxy all over to fill in the gaps, and then sand it down flush with the random orbit. it looks like this now, still not quite done but much better than the first pic. its been a nightmare doin it with round wire, sqaure wire is a breeze though. i'll just do it that way next time. |
Author: | peters instruments [ Wed Jan 19, 2011 10:29 am ] |
Post subject: | Re: buckeye burl build. |
Gabby Losch wrote: Shad, this is fantastic work! Your eye for these subtle curves is superb. The bridge and tailpiece look like they came out of a Tim Burton movie. Personally, I think I would've made them out of a more contrasting, solid color wood like ebony so that they don't fight for attention with the buckeye burl top. But the pieces you're using fit in nicely with the whole build, especially once you epoxied them. Keep it up! I can't wait to see this finished! thanks gabby, i have had some second thoughts about the way that i am doin the bridge and tailpeice so i'm glad you like the curves. i have also wondered if i should have done a more contrasting wood like you were saying, or maybe if it would look better with a more traditional archtop bridge. but the great thing about it is that the bridge will be free floating, the tailpiece essentially is as well, so if i decide that i dont like it, it will not be hard at all to swap it out for something else. |
Author: | alan stassforth [ Wed Jan 19, 2011 11:00 am ] |
Post subject: | Re: buckeye burl build. |
Very very cool Peter!! The headstock is awesome. The whole thing is. |
Author: | peters instruments [ Wed Jan 19, 2011 5:43 pm ] |
Post subject: | Re: buckeye burl build. |
thanks for the remarks allan, im really hoping that it comes together well under finish and everything. and as to your remark filippo, i had one of my roomates who is a swordsmith trying to convince to leave the wire standing proud as well. personally i dont think it would look that good, and it would also be a nightmare, but if you would like to try it sometime i would love to see the results. |
Author: | Danny R. Little [ Tue Jan 25, 2011 11:15 am ] |
Post subject: | Re: buckeye burl build. |
Shad: Just tuned in to your post. This is going to be a beautiful guitar. I love what you are doing with the bridge and tail piece. Maybe a toot on that bridge later? I'm inspired. Danny R. Little |
Author: | peters instruments [ Wed Jan 26, 2011 6:12 pm ] |
Post subject: | Re: buckeye burl build. |
Danny R. Little wrote: Shad: Just tuned in to your post. This is going to be a beautiful guitar. I love what you are doing with the bridge and tail piece. Maybe a toot on that bridge later? I'm inspired. Danny R. Little thanks Danny, im glad you like it so far. i am a little confused though, i dont know what you mean by a "toot" on the bridge. could you help me out with that? |
Author: | turmite [ Wed Jan 26, 2011 9:08 pm ] |
Post subject: | Re: buckeye burl build. |
Shad he is referring to a tutorial. "toot, tut" are short for tutorial. I agree, we need a "toot" on this bridge! Mike |
Author: | peters instruments [ Fri Jan 28, 2011 10:58 am ] |
Post subject: | Re: buckeye burl build. |
well i may do a "toot" on this bridge sometime, but i'm going to hold off for now till i find out if its actually going to work lol. |
Page 1 of 3 | All times are UTC - 5 hours |
Powered by phpBB® Forum Software © phpBB Group http://www.phpbb.com/ |