Official Luthiers Forum!

Owned and operated by Lance Kragenbrink
It is currently Mon May 12, 2025 6:45 pm


All times are UTC - 5 hours


Post new topic Reply to topic  [ 17 posts ] 
Author Message
 Post subject:
PostPosted: Sun Sep 24, 2006 8:43 am 
Offline
Koa
Koa

Joined: Fri Sep 30, 2005 10:33 pm
Posts: 954
Location: United States
I would love to have an electric powered sanding dish, and I might some day, but for now I was hoping someone might have pics of a sanding dish that was powered by hand, but not just one that is hand-held above the rims. Maybe similar to an electric set-up but handles? instead of pulleys and belts. Anybody have anything like this? looking for simple, cheap and effective. To date I have used the dish as a giant sanding block, round and round back and forth on the rims which works, but there has got to be something better.

Thanks,
Greg

_________________
Gwaltney Guitars


Top
 Profile  
 
 Post subject:
PostPosted: Sun Sep 24, 2006 10:18 am 
Offline
Koa
Koa

Joined: Mon May 09, 2005 1:41 am
Posts: 1157
Location: Siloam Springs, AR
I use a small piece of pipe with a pipe flange screwed onto my mold's base. Then I put a crank handle on the dish (it has a metal insert so the handle is removable). Then you crank it round and round, makes pretty quick work of it.

Most people don't use molds like this, but I bet something similar could be worked out for other mold styles.


_________________
______________________________
Jonathan Kendall, Siloam Springs AR


Top
 Profile  
 
 Post subject:
PostPosted: Sun Sep 24, 2006 10:35 am 
Offline
Koa
Koa

Joined: Thu Feb 17, 2005 3:38 pm
Posts: 1542
Location: United States
http://www.bluescreekguitars.com/ar0007.htm
This link will show something very simialr as above. There isn't much you can do as this is as simple as you can be. I do over 100 kits a year with this method, Works great
john hall


Top
 Profile  
 
 Post subject:
PostPosted: Sun Sep 24, 2006 3:49 pm 
Offline
Cocobolo
Cocobolo

Joined: Thu Aug 03, 2006 12:44 pm
Posts: 110
Location: Canada
i don't have any pics handy, but i'll try to explain.
i've drilled two holes near the edge of the dish on opposite sides of the center hole. into those holes i've inserted 1/4" - 20 thread inserts. i use the kind without a shoulder on them so that the whole insert is 'buried' inside the mdf. these cost about .25 at lee valley. then i bought two big plastic knobs with 1/4" - 20 thread on them but don't screw them all the way into the inserts.
with the rims in the mold and the mold centered over a dowel (similar to jon's use of the pipe) i am able to grab the knobs and twist back and forth much more aggressively than if i try to do the twisting/spinning by just holding the edge of the mdf (which also tends to sand the skin off the fingers).
i mark the rims with a contrasting color and check after each 70 twists or so to make sure that my weight and pressure are achieving symetrical results. without checking you could end up with an unintentionally wedged body.
hope that helps. i know it's a lot slower than a full blown electric rig. but in my 10' x 10' workshop, it gets the job done.
phil


Top
 Profile  
 
 Post subject:
PostPosted: Sun Sep 24, 2006 4:31 pm 
Offline
Contributing Member
Contributing Member
User avatar

Joined: Thu May 12, 2005 5:46 am
Posts: 2990
Location: United States
Mine is very similar to John Halls. I have locating holes in my base board that the post is attached to and in my outside mold so everything goes up the same way every time. I also tip the post for sanding the back contour.

_________________
Jim Watts
http://jameswattsguitars.com


Top
 Profile  
 
 Post subject:
PostPosted: Sun Sep 24, 2006 11:16 pm 
Offline
Koa
Koa

Joined: Fri Sep 30, 2005 10:33 pm
Posts: 954
Location: United States
Thanks guys, why didn't I think of that. Do you find that the sandpaper disks are the best option for this operation?

Thanks,
Greg

_________________
Gwaltney Guitars


Top
 Profile  
 
 Post subject:
PostPosted: Sun Sep 24, 2006 11:31 pm 
Offline
Koa
Koa

Joined: Mon May 09, 2005 1:41 am
Posts: 1157
Location: Siloam Springs, AR
I use a 4" wide roll of 80grit with the adhesive on the back and that's worked really well so far.

_________________
______________________________
Jonathan Kendall, Siloam Springs AR


Top
 Profile  
 
 Post subject:
PostPosted: Sun Sep 24, 2006 11:40 pm 
Offline
Koa
Koa

Joined: Fri Sep 30, 2005 10:33 pm
Posts: 954
Location: United States
Thanks Jon...where are you getting your 4" rolls of self-adhesive sandpaper?

Also, do you try to take the sides all the way down to the appropriate dome with the disk, or do you remove a portion of the sides with something else first then finish up with the disk.

Thanks Again,
Greg

_________________
Gwaltney Guitars


Top
 Profile  
 
 Post subject:
PostPosted: Sun Sep 24, 2006 11:41 pm 
Offline
Cocobolo
Cocobolo

Joined: Sun Jul 02, 2006 4:53 am
Posts: 194
Location: United States
Jon,
    Really cool idea there. I am still sanding by rotating the mold on top of the dish to get my radius. I like the idea of your jig a lot. Thanks.

Homeboy


Top
 Profile  
 
 Post subject:
PostPosted: Mon Sep 25, 2006 12:23 am 
Offline
Brazilian Rosewood
Brazilian Rosewood

Joined: Sun Dec 25, 2005 6:32 am
Posts: 7774
Location: Canada
Jon, i like your mold a lot as well as your set up for sanding.

Your mold: Do you glue the pieces of wood around the perimeter of the guitar shape or do you screw them from underneath please?

Thanks

Serge


Top
 Profile  
 
 Post subject:
PostPosted: Mon Sep 25, 2006 12:45 am 
Offline
Koa
Koa

Joined: Mon May 09, 2005 1:41 am
Posts: 1157
Location: Siloam Springs, AR
Mold and jig ideas are courtesy of Harry Fleishman.

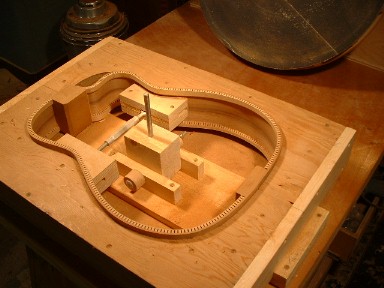
I profile the sides with a handplane first, it would take way too long to sand all of that, especially when you figure in the back taper. I use the mold to mark the profile on the sides as follows:


The general idea is to set the dish up on blocks at the neck/tail blocks and use the compass to transfer the profile. You use different size blocks if you want a taper from front to back. There have been threads about this before, it's worth a search in the archives.

I use Porter Cable sandpaper rolls, I don't know if it's any better or a better value than any other brand. They seem kind of expensive, but the convenience is worth it in my estimation. I have several different grits hanging on a pegboard with shop scissors hanging next to it. The box acts as a dispenser, it's real handy that way. I'm sure non-adhesive rolls would work fine with some 3m spray adhesive.

Serge, I glue the blocks. Just takes a little dab of titebond to hold it in place. Then you can knock them off with a hammer later if you want to make a different body shape. You also have to knock off the blocks near the head and tail when gluing the neck and tail blocks to the sides, then reglue the mold blocks back in place. Pretty primitive, but works well and is cheap and quick to make with limited tools.

_________________
______________________________
Jonathan Kendall, Siloam Springs AR


Top
 Profile  
 
 Post subject:
PostPosted: Mon Sep 25, 2006 7:40 am 
Offline
Brazilian Rosewood
Brazilian Rosewood

Joined: Sun Dec 25, 2005 6:32 am
Posts: 7774
Location: Canada
Thanks much Jon, simple and brilliant at the same time!


Top
 Profile  
 
 Post subject:
PostPosted: Mon Sep 25, 2006 8:38 am 
Offline
Brazilian Rosewood
Brazilian Rosewood
User avatar

Joined: Thu Aug 04, 2005 7:50 am
Posts: 3152
Location: Canada
Greg,

A few of the sponsors, me included, sell one piece pressure adhesive sandpaper. A MUST for powered rim sanders like mine and I would think probably much better in the long run for even hand ones. If an edge comes up it can cause damage......don't ask how I know . Never had an issue with one piece 24 inch discs. Mine are 80 grit and I like them a lot!

Shane

_________________
Canada


Top
 Profile  
 
 Post subject:
PostPosted: Mon Sep 25, 2006 8:40 am 
Offline
Brazilian Rosewood
Brazilian Rosewood
User avatar

Joined: Thu Aug 04, 2005 7:50 am
Posts: 3152
Location: Canada
Doubled up again.....sorry!Shane Neifer38985.7369791667

_________________
Canada


Top
 Profile  
 
 Post subject:
PostPosted: Mon Sep 25, 2006 8:42 am 
Offline
Brazilian Rosewood
Brazilian Rosewood

Joined: Sun Dec 25, 2005 6:32 am
Posts: 7774
Location: Canada
Greg, i havesome of Shane's sandpaper discs and it's a treat to work with!


Top
 Profile  
 
 Post subject:
PostPosted: Tue Sep 26, 2006 5:48 pm 
Offline
Cocobolo
Cocobolo
User avatar

Joined: Fri Jul 28, 2006 4:06 pm
Posts: 170
Location: United States
Here's mine I just used it today.
I don't do the round and round thing. I grab the dish
and rotate it left and right. after a dozen or so times
I rotate the dish a 1/4 turn. and repeat.
the pivot pin angle adjusts to do the back taper.


Tom

_________________
http://www.moriciguitar.com


Top
 Profile  
 
 Post subject:
PostPosted: Tue Sep 26, 2006 9:57 pm 
Offline
Brazilian Rosewood
Brazilian Rosewood

Joined: Sun Dec 25, 2005 6:32 am
Posts: 7774
Location: Canada
Hey thanks for that tip Tom, i was doing it just like you, 1/4 turn at at time, left and right, and was looking for just an idea like this! Serge Poirier38987.2925347222


Top
 Profile  
 
Display posts from previous:  Sort by  
Post new topic Reply to topic  [ 17 posts ] 

All times are UTC - 5 hours


Who is online

Users browsing this forum: No registered users and 17 guests


You cannot post new topics in this forum
You cannot reply to topics in this forum
You cannot edit your posts in this forum
You cannot delete your posts in this forum
You cannot post attachments in this forum

Jump to:  
Powered by phpBB® Forum Software © phpBB Group
phpBB customization services by 2by2host.com