Official Luthiers Forum!

Owned and operated by Lance Kragenbrink
It is currently Mon May 12, 2025 6:36 pm


All times are UTC - 5 hours


Post new topic Reply to topic  [ 21 posts ] 
Author Message
 Post subject:
PostPosted: Tue Oct 10, 2006 2:23 am 
Offline
Walnut
Walnut

Joined: Fri Sep 01, 2006 12:32 pm
Posts: 23
Location: Canada
Hello fellows,

been a while since I posted my first bracing pics. I've been working every week-ends ever since, except for one time I completly cracked up on side and had to reorder a set 
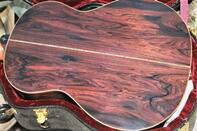
. Anyways, building this thing up, swearing once in a while , I can finally say that it looks like a guitar. I closed the back and trimmed the overhangs yesterday. I'm quite proud, but not statisfied... I've done plenty of avoidable mistakes and I hopefully wont repeat them in the future. I also didn't respect the plans carefully. My sides are a little higher than intended. Depth at the heel/peak/tail are 90/94.5/99mm instead of 87/91.5/95 according to the Santos Hernandez 1933 plans.

Here are some pics... and I'll post some questions below as I need some guidance.


So, next week-end, I want to route the purfling and binding ledge. I have the StewMac bit and bearings kit. But I have some questions about the bindings size. Mines are from the LMII serviced flamenco kit and made of Indian Rosewood. The thing is, they are as thick as the sides. Is that normal? I've also heard that with that StewMac kit, you had to route the purfling first, why is that so?

Best Regards,


Top
 Profile  
 
 Post subject:
PostPosted: Tue Oct 10, 2006 2:38 am 
Offline
Site Admin
User avatar

Joined: Mon Dec 27, 2004 5:02 am
Posts: 8553
Location: United States
First name: Lance
Last Name: Kragenbrink
City: Vandercook Lake
State: Michigan
Zip/Postal Code: 49203
Country: USA
Focus: Build
Status: Semi-pro
Its normal for the bindings to be as thick or thicker than the sides. What you want to do is determine how thick you want them and cut your binding ledge to that size, glue them in full thickness and scrap flush.
As for top purflings, I always cut that ledge first, then the binding ledge.

Hope this helps
By the way, your guitar is lookin Great!

_________________
Support the OLF! Bookmark our STEWMAC link Today!
Lance@LuthiersForum.com


Top
 Profile  
 
 Post subject:
PostPosted: Tue Oct 10, 2006 2:38 am 
Offline
Koa
Koa

Joined: Sat Jun 17, 2006 8:29 am
Posts: 960
Location: Northern Ireland
First name: Martin
Last Name: Edwards
Focus: Build
Status: Amateur
[QUOTE=DoctorX2k2] I'm quite proud, but not statisfied... I've done plenty of avoidable mistakes and I hopefully wont repeat them in the future. I also didn't respect the plans carefully. My sides are a little higher than intended.

yup, been there, done that!!

[QUOTE=DoctorX2k2]The thing is, they are as thick as the sides. Is that normal? [/QUOTE]
yup. the binding channel often cuts all the side away and the linings are visible. Not an issue.

[QUOTE=DoctorX2k2]I've also heard that with that StewMac kit, you had to route the purfling first, why is that so?
[/QUOTE]

I'm guessing that it's to give the bearing a true side to roll along to cut a consistant depth. If you go to strwmac's site they have all the instructions for their kits as free downloads.

_________________
My soundclick xx luthier blog xx luthier soundclick


Top
 Profile  
 
 Post subject:
PostPosted: Tue Oct 10, 2006 2:55 am 
Offline
Walnut
Walnut

Joined: Fri Sep 01, 2006 12:32 pm
Posts: 23
Location: Canada
[QUOTE=martinedwards]

I'm guessing that it's to give the bearing a true side to roll along to cut a consistant depth. If you go to strwmac's site they have all the instructions for their kits as free downloads.[/QUOTE]

I'm not using one of their kit (they don't sell any classical kit). Thanks for the answers though :)


Top
 Profile  
 
 Post subject:
PostPosted: Tue Oct 10, 2006 3:12 am 
Offline
Brazilian Rosewood
Brazilian Rosewood

Joined: Sun Dec 25, 2005 6:32 am
Posts: 7774
Location: Canada
Are you sure you need guidance? My oh my, it looks awesome and neat already!

Like Lance,I cut the purfling ledge first also, i think it's easier that way because you don't have the binding ledge in the way, preventing you to index fully from the sides but someone else might have a more intelligent answer!

Nice job Alexandre, Bravo mon homme!


Top
 Profile  
 
 Post subject:
PostPosted: Tue Oct 10, 2006 3:42 am 
Offline
Koa
Koa

Joined: Sat Jun 17, 2006 8:29 am
Posts: 960
Location: Northern Ireland
First name: Martin
Last Name: Edwards
Focus: Build
Status: Amateur
[QUOTE=DoctorX2k2]
I'm not using one of their kit [/QUOTE]
doesn't matter!! go look at thier steel string instructions!!!

_________________
My soundclick xx luthier blog xx luthier soundclick


Top
 Profile  
 
 Post subject:
PostPosted: Tue Oct 10, 2006 7:42 am 
Offline
Walnut
Walnut

Joined: Fri Sep 01, 2006 12:32 pm
Posts: 23
Location: Canada
[QUOTE=Hesh1956] Doc you are doing GREAT!! Your guitar looks first class in all respect! Nice job!
[/quote]
Thanks! Very encouraging


[quote]Martin's advice is excellent as well. Spend some time with a sanding block the spans the width of the side to level and smooth the sides before cutting the binding/purfing channels. The bearing on the bit has to ride on the side and any imperfections to the sides will be mirrored by the bit and translate into imperfections in the binding/purfing channels.[/quote]

Oh... haven't thought about this one, great tip.

[quote]It's important too to check out the steel string instructions (free for download) from Stew-Mac and follow what they tell you about the directions to go with the laminate trimmer and the bit to avoid tear-out. This works very well and has worked very well for me for 10 guitars now.[/quote]

Yeah I've read it. I actually used this method to trim the top overhang to get a feel of what routing the ledges will be. It seems rather secure as there was no tear outs toward the top, but I still wonder how that will work out for small ledges.

[quote]Lastly some sealer on the top prior to cutting the channels can help avoid tear-out too. I have never done this but others here do with great results reported.[/quote]

Can you elaborate please? I'm clueless about finishing products. One thing at a time was what I told myself prior to starting this project.

[quote]If you are intent on exactly recreating the plan/design that you have the thickness of the guitar would be an issue. Otherwise I would not worry about it. Often guitars come out with a different thickness than intended but it's close enough. And there is a one in two chance that you may have improved the design too.... [/quote]

Yeah, I call it my personnal twist 
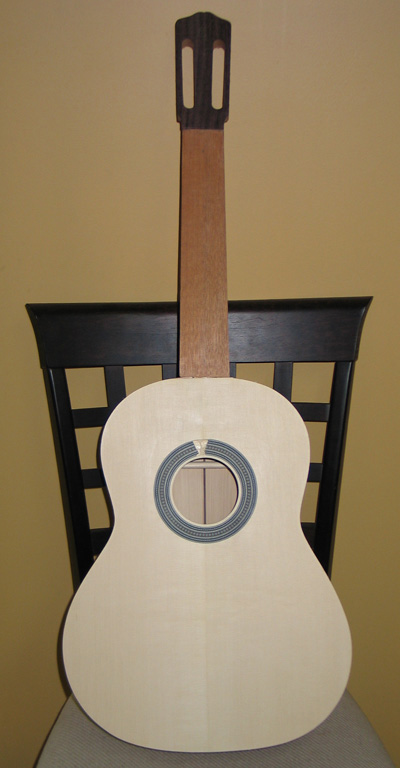
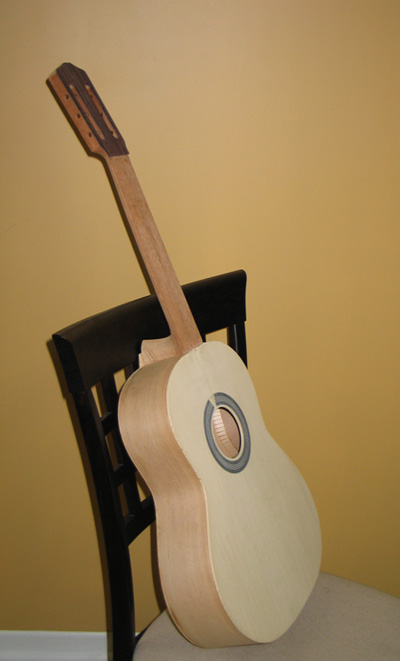
. I don't really mind though. Flamenco guitars usually have smaller bodies than classicals, but who knows what the result will be. Anyways, I'm no Santos Hernandez and achieving a perfect Santos 1933 sound is nearly impossible for me on a first attempt... and I don't have the original guitar to compare haha. (wished I did)

[quote]It feel good when it starts to look like a guitar eh?[/QUOTE]

Indeed! Last week-end, all I wanted to do is finish boxing the guitar instead of studying my exam for tomorow . I couldn't help it, I was thrilled.


Top
 Profile  
 
 Post subject:
PostPosted: Tue Oct 10, 2006 7:49 am 
Offline
Walnut
Walnut

Joined: Fri Sep 01, 2006 12:32 pm
Posts: 23
Location: Canada
By the way, the closer I get to completion, the more I wonder about finishing products...

I was leaning toward French Polishing, but it seems rather laborious and long, although the result (if done well) is worth all the trouble.

I've also heard mixed reviews about KTM-9... heard it could get cloudy/foggy, but it's easier to apply than French Polish and I've got the feeling that it is less vulnerable.

Then there are oils and lacquer I know absolutly nothing about...

Maybe I should buy a book on wood finishes.

Regards,


Top
 Profile  
 
 Post subject:
PostPosted: Tue Oct 10, 2006 8:11 am 
Offline
Brazilian Rosewood
Brazilian Rosewood

Joined: Sat Jun 17, 2006 3:48 am
Posts: 2094
French Polish is my favourite finish, yet I do not currently have the patience to endure it, mainly because the instrument gets played 7/8ths of the way to completion, due to impatience...

I need a quick finish, fast, and as a total guitarmaking beginner, I used Danish Oil, applied per the finishing schedule recommended to me by RussellR, where you apply lighter coats. Some people apply shellac as a base coat to protect from too much finish seeping into the wood and compromising tone, but I have 5 coats of danish on the top (base coat 50/50 white spirit and danish oil), and soon a 6th on the back and sides, and the tone of the guitar is great!!

It depends also on the look of the guitar. There are many great spray on-finishes around, but I'll back off now, because there are some Masters on this forum who know way more than me.   :-)


Sam Price39000.7164583333


Top
 Profile  
 
 Post subject:
PostPosted: Tue Oct 10, 2006 8:20 am 
Offline
Walnut
Walnut

Joined: Fri Sep 01, 2006 12:32 pm
Posts: 23
Location: Canada
Oh... did I mention that I do not have spraying equipment?

How long does it take for one to except a good French Polish finish?

I'm such a newb, I don't even know what curing is .

Regards


Top
 Profile  
 
 Post subject:
PostPosted: Wed Oct 11, 2006 9:00 am 
Offline
Brazilian Rosewood
Brazilian Rosewood
User avatar

Joined: Mon Mar 06, 2006 10:10 pm
Posts: 2485
Location: Argyle New York
First name: Mike/Mikey/Michael/hey you!
Last Name: Collins
City: Argyle
State: New York
Zip/Postal Code: 12809
Country: U.S.A. /America-yea!!
Focus: Build
Status: Professional
I just spent 20 minutes typing a reply to help you & it disappeared as soon as I uploaded it!
I'll try again tomorrow-I'm out for the day!
sorry
MikeMike Collins39001.7526736111

_________________
Mike Collins


Top
 Profile  
 
 Post subject:
PostPosted: Wed Oct 11, 2006 10:21 pm 
Offline
Brazilian Rosewood
Brazilian Rosewood
User avatar

Joined: Thu Jan 06, 2005 7:29 am
Posts: 3840
Location: England
As it's a classical it would be a shame to finish it in anything other than French Polish, it's not as difficult as people make out. Buy some of the Zinser seal coat or some Liberon Blonde de-waxed French polish and get to it, a little bit of DA and some olive oil and you'll have it finished in no time. Follow the Milburn guide, just don't pumice fill use and epoxy fill and life will be simple.

Colin


_________________
I don't believe in anything, I simply make use of a set of reasonable working hypotheses.


Top
 Profile  
 
 Post subject:
PostPosted: Thu Oct 12, 2006 8:40 am 
Offline
Walnut
Walnut

Joined: Fri Sep 01, 2006 12:32 pm
Posts: 23
Location: Canada
Yeah I'll probably go with FP. It's always a valuable skill when building or repairing a classical guitar.

I have another question about routing the binding ledges.
StewMac's guide say that you need the router base to be at a 90 degree angle to the sides of the guitar. Cumpiano's book is telling me the same. Robbie's DVD says square to the top or the back. 2 different things there... confusing me.

The thing is, the angle required to make it square varies from the Tail block to the heel block so it kinda looks impossible to keep everything perfectly square. On the other hand, I was thinking that if I left a bit of binding and purfling overhanging, I could just trim them flush with a cabinet scraper or something and everything about making it square would be useless... but every info I have say otherwise. I'm very confused.

Please enlighten me :)

Best regards,


Top
 Profile  
 
 Post subject:
PostPosted: Thu Oct 12, 2006 9:06 am 
Offline
Walnut
Walnut

Joined: Fri Sep 01, 2006 12:32 pm
Posts: 23
Location: Canada
Thanks Hesh!

I hadn't thought about thickness from top and back views, you're absolutly right.

As for the Donut thing... how can everything be square if the angle isn't constant? This is something I just can't figure out. Even if I had a laminate trimmer with a tilt base, I'd have to reajuste depending of the part I'm at. This angle is bigger in the lower bout than it is toward to heel(almost square). Is there something wrong?


Top
 Profile  
 
 Post subject:
PostPosted: Thu Oct 12, 2006 9:46 am 
Offline
Walnut
Walnut

Joined: Fri Sep 01, 2006 12:32 pm
Posts: 23
Location: Canada
But the wedge angle is constant once again... so what is it good for if you already have a tilt base? I have a hard time picturing the rotating trimmer + wedge motion. Gah, I know now why they call it Binding Hell.

I don't know if that info is of any use for you butmy bindings wont be fancy of any sort. I'll just glue a B/W purfling to a rosewood binding of the same height. The purfling width is about 1mm and the binding is 2mm for a total of 3mm. So no purfling ledge here. I don't know if the simplicity of this can compensate for the angle variations and still look alright.

Regards,


Top
 Profile  
 
Display posts from previous:  Sort by  
Post new topic Reply to topic  [ 21 posts ] 

All times are UTC - 5 hours


Who is online

Users browsing this forum: No registered users and 19 guests


You cannot post new topics in this forum
You cannot reply to topics in this forum
You cannot edit your posts in this forum
You cannot delete your posts in this forum
You cannot post attachments in this forum

Jump to:  
Powered by phpBB® Forum Software © phpBB Group
phpBB customization services by 2by2host.com