Official Luthiers Forum!

Owned and operated by Lance Kragenbrink
It is currently Wed Apr 23, 2025 8:47 am


All times are UTC - 5 hours


Post new topic Reply to topic  [ 19 posts ] 
Author Message
 Post subject:
PostPosted: Thu Aug 04, 2005 3:45 am 
Offline
Cocobolo
Cocobolo
User avatar

Joined: Tue Jan 11, 2005 12:01 am
Posts: 234
It was good to see John H was able to get some decent photos based on some ideas that came about from this forum. I think they looked really good.


I recommended using Halogen lights and there was only a couple of reasons for that. Because that's what I had here. The other reason is that those "worklights" come on stands that make it easy to adjust your lights. Someone mentioned that lighting is the most important thing in photographing guitars. I would agree. The Hologens are hot and there probably is better solutions, but for me the adjustable stands were nice to have and like I said I already had one of the worklinghts here.

Now I know very little about photography and I am just hoping to get decent shots for the web and stuff without going to a studio each time.

I did want to go to Frank Ford's photography class at the Symposium, but I went to another class ... can't be in 2 places.

Anyway I need to try some experimentation (photographing) on a couple of guitars that I just strung-up. We'll see how it goes, maybe I'll learn something new.johno38568.605625


Top
 Profile  
 
 Post subject:
PostPosted: Thu Aug 04, 2005 5:03 am 
Offline
Contributing Member
Contributing Member
User avatar

Joined: Mon Jan 03, 2005 7:40 am
Posts: 2694
Location: United States
First name: John
Last Name: How
City: Auburn
State: Ca
Country: USA
Definately, experimentation is in order. I think I need to change he color of my diffuser/reflectors a little cause all my guitars are starting to look like they were finished in old oil varnish. Too much yellow light. Maybe I'll do better next time.

_________________
Tickle your guitar daily, and it'll tickle you back.


Top
 Profile  
 
 Post subject:
PostPosted: Thu Aug 04, 2005 5:32 am 
Offline
Old Growth Brazilian

Joined: Tue Dec 28, 2004 1:56 am
Posts: 10707
Location: United States
ADD BLUE


Top
 Profile  
 
 Post subject:
PostPosted: Thu Aug 04, 2005 6:00 am 
Offline
Cocobolo
Cocobolo

Joined: Fri Jan 07, 2005 3:46 pm
Posts: 372
Location: Golden, Colorado
First name: Roger
Last Name: Labbe
John,

Two things. First, set the white balance of the camera. The camera has no idea of what the color of the light is, unless you set it. Generally, you will put something white (like a sheet of paper) in the light that the guitar will be in, put the camera in 'white balance' mode, and take a picture of the white object. The camera analyzes it so it knows how to interpret the lighting. Consult your camera manual.

Second, make sure you aren't using multiple light sources of different light. Halogen is quite close to tungsten (regular light bulbs), but is a few degrees off. Lights like florescent, the sun, etc, are radically different. If the scene includes multiple different light sources, you will never be able to balance the lighting correctly.

If you are shooting film instead of digital, use tunsten film for shooting with halogen lights. Again, don't use more than one kind of light source.


Top
 Profile  
 
 Post subject:
PostPosted: Thu Aug 04, 2005 7:16 am 
Offline
Brazilian Rosewood
Brazilian Rosewood
User avatar

Joined: Mon Dec 27, 2004 9:42 pm
Posts: 4217
Location: Buffalo, NY
First name: Robert
Last Name: Cefalu
City: Buffalo
State: NY
Zip/Postal Code: 14217
Country: US
So would blue diffusers work? I also find the halogen lamps to be too yellow/orange. I don't have room for all those umbrellas so I was going to make a couple of frames that swing up out of the way and attach fabric to them.

_________________
Beautiful and unusual tone woods at a reasonable price.
http://www.rctonewoods.com/RCT_Store
The Zootman
1109 Military Rd.
Kenmore, NY 14217
(716) 874-1498


Top
 Profile  
 
 Post subject:
PostPosted: Thu Aug 04, 2005 8:05 am 
Offline
Brazilian Rosewood
Brazilian Rosewood

Joined: Tue Feb 15, 2005 10:31 am
Posts: 3134
Location: United States
The good news: Your local photo supply store will have color-corrected bulbs that will screw into any regular socket. Your camera will think it's seeing sunlight.

The bad news: They're kinda pricey, and have a comparatively short lifespan.

They do work, though, so it's just one other alternative. As mentioned above, don't mix 'em with other types of light source.


Top
 Profile  
 
 Post subject:
PostPosted: Thu Aug 04, 2005 1:30 pm 
Offline
Brazilian Rosewood
Brazilian Rosewood
User avatar

Joined: Sun Feb 27, 2005 10:11 am
Posts: 2199
Frank Ford has an article on his website about photograhing instruments.
He uses home made pvc frames with sheets for diffusers and flourescent bulbs for light.


Top
 Profile  
 
 Post subject:
PostPosted: Sat Aug 06, 2005 3:32 pm 
Offline
Koa
Koa
User avatar

Joined: Wed Jun 08, 2005 1:00 pm
Posts: 1644
Location: United States
City: Duluth
State: MN
Country: USA
Focus: Build
Status: Amateur
If you only have a single type of light bulb in all of your light fixtures (clamp lamps, or whatever), you'll be able to easily get the color corrected, regardless if all the bulbs are one type of fluorescent, or all one type of color-corrected incandescent, or all one type of halogen.

(I know I'm the third person to mention this. It's that important.)

Now, take your shots, and then get them into your "digital darkroom" (some type of photo processing software.) You don't need Photoshop CS to do this next step. In fact, I'll demonstrate it using Paint Shop Pro v8.1, which is about $25 on Ebay.

I grabbed a photo of one of John Mayes' guitars, posted here. (I hope that's OK, John. 
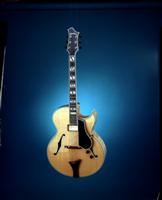
) I noticed that the shot is a bit too blue. My best guess is that the carpet in the background is tan, with no bluish cast, so I adjusted the color until the carpet looked "right." Obviously, you will be adjusting the color to match what your eyes see as the correct color for the guitar, but I only had the photo (not the actual guitar) to look at.

In the Paint Shop Pro Menu, I clicked:
Adjust
Color Balance
Automatic Color Balance

That brings up the color correction dialog: the small window showing the guitar's waist twice (before and after.) I zeroed in on the waist area because it showed both the carpet and the wood.


There is a slider in that dialog from "Warmer/orange" to "Cooler/blue", and I moved the slider to the left toward warmer until the carpet lost the blue.

To recap, that was 3 clicks of my mouse to invoke the Automatic Color Balance dialog, and moving the slider. Pretty darn easy. And, I have it set to show me in "real time" what changes I am about to make, so I can play around with the settings all I want before clicking "OK" to accept the changes. So, the large picture of John's awesome guitar is showing the effect of the current settings.

Easier to do than to explain. This would probably not have worked, or would not have been easy to do, if the photo was taken under a combination of different types of light bulbs. Yes, it's really that important. Oh, yes, turn off your flash - you'll only get uncontrollable glare. Just use lights (no flash), and move them around until you do not see glare on the guitar. Of course, your camera is on a tripod.

Hope this helps!

Dennis

_________________
Dennis Leahy
Duluth, MN, USA
7th Sense Multimedia


Top
 Profile  
 
 Post subject:
PostPosted: Sat Aug 06, 2005 4:23 pm 
Offline
Koa
Koa

Joined: Sun Jun 12, 2005 9:38 am
Posts: 1059
Location: United States
Guys,

In a past life I was a professional photographer. I even wrote a book on cameras and accessories -- McBroom's Camera Bluebook

When I was scrounging the camera shows and camera shops looking for cameras to include in my book, I had to develop a flexible picture taking style. Rather than reinvent the wheel, I looked at what many photojournalists do or used to, at least, and adapted some of their techniques with great results.

Now, if you're shooting digital with a built in flash, well never mind. But if you have an 35mm SLR and a flash that has bounce capability, pay attention. This might just be the ticket you're looking for.

What I often had to do was take pictures of cameras on the spur of the moment. Sometimes that meant laying a sheet over a chair, setting the camera on the sheet and snapping the photo. But what made the shot work was the bounce setup I used.

Think of a ping-pong paddle. I cut a ping-pong paddle shaped piece of material out of a piece of white posterboard, and then would rubberband the handle of the paddle to my camera's bounce flash. The paddle part of the piece ended up being a reflector sitting directly behind the flash head. This acts as a diffuser for your subject.

When shooting pix of cameras on location, using this setup, I would typically set the flash's head to about 75 degrees from horizontal. This would give a well lit scene with very soft shadows. Which is what you want!

Here's an example taken from the latest edition of my book:


Note the evenly lit scene and the soft shadows.

Also, please note that this technique works for small items as well as large ones. Really, the main thing that you need to consider when using this sort of flash technique for a guitar-sized object is to make sure you have a large enough piece of background material so that extraneous visual "noise" does not detract from the subject.

Best,

Michael

_________________
Live to Play, Play to Live


Top
 Profile  
 
 Post subject:
PostPosted: Sat Aug 06, 2005 11:28 pm 
Offline
Koa
Koa
User avatar

Joined: Wed Jun 08, 2005 1:00 pm
Posts: 1644
Location: United States
City: Duluth
State: MN
Country: USA
Focus: Build
Status: Amateur
Good points, Michael. When I say "don't use flash", I should be saying, "if using a camera's built-in flash (firing directly at a shiny subject), expect glare in the photos."

Flash units are designed to produce light as "white" as possible (closest to sunlight as possible.) So, the light produced by flash units are the best artificial light sources you can use, in terms of getting the color correct without fidgeting with color correction. The downside is that only a very experienced photographer can predict correctly what the momentary flash will look like when you press the shutter release and the flash fires. Even then, that pro photographer cannot change the physics of light, and the problem of creating glare on a shiny object.

So, about the only things a photographer or photojournalist with a flash unit can do "on the fly", are to either diffuse (soften) the harsh flash, or bounce it. Obviously, Michael likes the technique of bouncing the light from a separate flash unit mounted on the camera's "hot shoe" - not the built-in uncontrollable flash. Some photographers buy a bracket that mounts on the camera's hot shoe that will hold one or two flash units off to the side, rather than having the flash unit mounted directly above the lens. The other technique is to diffuse the flash, so it is not so harsh. For flash units mounted on the camera (as opposed to being on their own light stands), you can get a small, wraparound "soft box" like this: LumiQuest Mini Softbox

You still have to deal with the fact that your subject is not properly lit while you are composing the photo. The only time the subject may be properly lit is when the flash fires, and you won't know until after you take the shot. That's why most pros in a studio environment would not use a camera-mounted flash unit (even bounced or diffused) to shoot shiny objects.

Some pros do use "strobe" flash units, on light stands, with either softboxes or umbrellas to diffuse or bounce-diffuse the flash. But, those expensive strobes also have a modelling light which can be turned on to allow the photographer to aim each light, and thus to see the overall scene's lighting (eliminating glare, unwanted reflections, and getting the highlights and shadows just right.) When ready, the modelling lights are turned off the the strobes are fired. That's a great way to go if you have at least a $1500 budget for lighting alone.

Most amateur photographers need an inexpensive way to get results as close to a pro photographer's as possible. Lighting is just one aspect of photography, but many pro photographers will tell you that lighting is also the most important part of photography.

Try Michael's diffused bounce flash technique, and/or try setting up several "studio lights" and color correct the results. Your studio lights can be as down-and-dirty as a few of the same type of bulbs in clamp lamps, or you could spend as little as $350 for a couple of 1000 watt lights with stands and softboxes. Softboxes eliminate glare and harsh shadows. (Search on Ebay using the word "softboxes", or here's an example: Studio Lighting)

Hope this helps!

Dennis

_________________
Dennis Leahy
Duluth, MN, USA
7th Sense Multimedia


Top
 Profile  
 
 Post subject:
PostPosted: Sun Aug 07, 2005 1:08 am 
Offline
Cocobolo
Cocobolo

Joined: Fri Apr 15, 2005 11:38 am
Posts: 200
Location: United States
I'll cast another vote for Paint Shop Pro. It really is easy to learn, and once you have sorted out the fix for your particular lighting system, whatever it is, you can just hop through the same sequence each time and it's done.


Top
 Profile  
 
 Post subject:
PostPosted: Sun Aug 07, 2005 4:10 am 
Offline
Koa
Koa

Joined: Sun Jun 12, 2005 9:38 am
Posts: 1059
Location: United States
A quite thorough and accurate explanation, Dennis.

Something I didn't see mentioned above, which might just be the easiest way for most folks to go, is to buy color correction filters. You can get them for different tungsten color temps as well as fluorescent. This enables you to use existing indoor lighting, which might give the photographer a bit more flexibility in terms of setup. However, since you would be shooting indoors with a correction filter, you definitely do not want to handhold the camera. You'll have to mount it on a tripod and trip the shutter either with a cable release or the self timer.

Me, I never had the room for all the studio lighting gear, so I never bought any. Back in the old days, when Spiratone was still around, I bought one of their collapsible light boxes, and ended up using it a lot. Basically all it is is a square sheet of difussion material, about 18" on a side or so, that hooks into a metal frame that has four arms sticking out to hold the material. Then it has a post at the rear that can be mounted in a adapter which will sit on a lightstand or tripod. The open framework may have caused a little bit of light loss, but I was shooting through the material with some big flashes -- Metz and Braun, each with ISO 100 guide numbers of 200 or so -- and it was never a problem.

The results are very pleasing. I wonder if anybody still makes anything like that anymore?

Best,

Michael

_________________
Live to Play, Play to Live


Top
 Profile  
 
 Post subject:
PostPosted: Sun Aug 07, 2005 8:43 am 
Offline
Koa
Koa
User avatar

Joined: Wed Jun 08, 2005 1:00 pm
Posts: 1644
Location: United States
City: Duluth
State: MN
Country: USA
Focus: Build
Status: Amateur
Underscore Michael's re-mention of a tripod, and using a self-timer is indeed a great way to keep your hands off of the camera/ tripod assembly when shooting. I don't have enough experience with color correction filters to know if you could get the color just right in the initial shoot, without the need to modify the color balance in your digital darkroom software.

The softboxes like the ones I mentioned above (and gave a link to an example) would be big, clumsy units if they were permanently set up. Thankfully, they collapse and store well. (The kits usually come with a duffel bag for storage.)

The softbox is actually a 4-sided, heavy, flameproof, cloth box with a reflective silver interior. That gets assembled, like a backpacker's tent, with 4 flexible metal rods that are held in a metal frame. The metal frame holds a halogen lamp or a strobe, and mounts on a light stand. The frame pivots and allows you to rotate the whole lightbox into position, and lock it. On the front of the softbox, a white transluscent screen is mounted with velcro. It's easier to assemble than it is to explain, and you can get the light stands and softboxes assembled in a matter of a few minutes. I have a set like the ones I linked to, and they are well worth the money. I am sure you could rig something up similar, with a pair of 1000watt halogen lights on stands. But, remember the tremendous heat that a 1000watt halogen puts off, and you will probably want to spray a Flame Retardant on the cloth.

You could follow Frank Ford's Photo Studio example, using an array of fluorescent bulbs. But, I'm guessing that there's not a tremendous savings over the $350 kit price for a pair of softboxes, lights, and stands. Frank's setup has to be a lot cooler running though! And, in either case you'll still need to tweak the color in your digital darkroom.

Dennis

_________________
Dennis Leahy
Duluth, MN, USA
7th Sense Multimedia


Top
 Profile  
 
 Post subject:
PostPosted: Mon Aug 08, 2005 12:47 am 
Offline
Cocobolo
Cocobolo
User avatar

Joined: Tue Jan 11, 2005 12:01 am
Posts: 234
Ya see ... I just wanted "decent" photos of my guitars without having to go to a studio each time I completed one. I really would like to set-up, take the shots and "process" them in a reasonable amount of time and get back to what I know better... building guitars.

I do appreciate the explainations you guys give for sure and will certainly keep in mind the things you talked about.

BTW anybody know what a nice Roleiflex is worth these days?


Top
 Profile  
 
 Post subject:
PostPosted: Mon Aug 08, 2005 4:45 am 
Offline
Brazilian Rosewood
Brazilian Rosewood

Joined: Wed Dec 29, 2004 5:10 am
Posts: 2020
Location: Argentina
[QUOTE=DennisLeahy]try setting up several "studio lights" and color correct the results.

Your studio lights can be as down-and-dirty as a few of the same type of bulbs in clamp lamps,

or you could spend as little as $350 for a couple of 1000 watt lights with stands and softboxes.
Dennis[/QUOTE]

Okay, over in the over thread on photosetup failure, I was using a total of 1000 watts. Here Dennis is recommending two 1000 watt units for a total of 2000 watts. That's what I just returned home with. two of 'em.

Get this, I found them at Tractor Supply Company, TSC, $31.08 each. 2 500 watt lamps per stand. Results to follow....


Top
 Profile  
 
 Post subject:
PostPosted: Mon Aug 08, 2005 4:57 am 
Offline
Koa
Koa
User avatar

Joined: Wed Jun 08, 2005 1:00 pm
Posts: 1644
Location: United States
City: Duluth
State: MN
Country: USA
Focus: Build
Status: Amateur
Bruce, hopefully the umbrellas you ordered were the "shoot through" type, rather than the reflector type (so you won't end up dissatisfied with the harsh light.) You'll need to devise clamps for the umbrellas if you didn't buy some. A good trick is to take two spring clamps and bolt them together through the small holes near the tips of the handles. Use a wing nut.

Dennis

_________________
Dennis Leahy
Duluth, MN, USA
7th Sense Multimedia


Top
 Profile  
 
 Post subject:
PostPosted: Mon Aug 08, 2005 5:35 am 
Offline
Brazilian Rosewood
Brazilian Rosewood

Joined: Wed Dec 29, 2004 5:10 am
Posts: 2020
Location: Argentina
Dennis, yes these are shoot through, but it says you may use them for reflector shooting as well. I bet if we keep stirring this pot we'll come up with an ideal setup for luthiers-on-a-budget.

So far I've spent:
$62 for two 1000 watt lamp setups (4 500 watt fixtures mounted on tripod bases, tractor supply place

$20 for the two 48" shoot-thru umbrellas, $6 shipping

$3 for clamps to mount the umbrellas

Now I need extension cords with a switch to get it all powered up, two 9 footers should do. $4

And a switch, a multi strip with a heavy cord, since this thing is pulling 16 2/3 amps 120V.

Total is 100 bucks or pretty close. I have two digital cameras, will try both and see the results....


Top
 Profile  
 
 Post subject:
PostPosted: Mon Aug 08, 2005 5:38 am 
Offline
Brazilian Rosewood
Brazilian Rosewood
User avatar

Joined: Sat Feb 12, 2005 1:07 am
Posts: 2281
Location: Jones, OK
Bruce, where did you get your 48" shoot-through umbrellas?

_________________
Dave Rector
Rector Guitars


Top
 Profile  
 
 Post subject:
PostPosted: Mon Aug 08, 2005 5:53 am 
Offline
Brazilian Rosewood
Brazilian Rosewood

Joined: Wed Dec 29, 2004 5:10 am
Posts: 2020
Location: Argentina


Here is a link to the photo on Frets.com. Frank uses a jillion 100 watt corkscrew florescents. Look at the lighting on that guitar will ya?


Top
 Profile  
 
Display posts from previous:  Sort by  
Post new topic Reply to topic  [ 19 posts ] 

All times are UTC - 5 hours


Who is online

Users browsing this forum: No registered users and 26 guests


You cannot post new topics in this forum
You cannot reply to topics in this forum
You cannot edit your posts in this forum
You cannot delete your posts in this forum
You cannot post attachments in this forum

Jump to:  
Powered by phpBB® Forum Software © phpBB Group
phpBB customization services by 2by2host.com