Official Luthiers Forum!

Owned and operated by Lance Kragenbrink
It is currently Fri Apr 25, 2025 12:42 am


All times are UTC - 5 hours


Post new topic Reply to topic  [ 21 posts ] 
Author Message
 Post subject:
PostPosted: Mon Nov 07, 2005 10:06 am 
Offline
Cocobolo
Cocobolo

Joined: Wed Dec 29, 2004 7:25 am
Posts: 458
Location: Southern Ohio

Here's a couple of pics of my first FP attempt. Of course it's hard to get a good shot of the gloss in a photo (at least it is for me), but I'm really pleased with how this one turned out. It's much nicer than it looks in these pics, and much, much better than the waterborne I used on my first two. I really like the feel and look of FP shellac.

Many thanks to those who have offered FP advice, and special thanks to MichaelP who always had an answer for me, no matter how dumb my questions

I've really got to put together a good photo set-up...


Top
 Profile  
 
 Post subject:
PostPosted: Mon Nov 07, 2005 10:46 am 
Offline
Brazilian Rosewood
Brazilian Rosewood
User avatar

Joined: Mon Dec 27, 2004 3:50 pm
Posts: 4662
Location: Napa, CA
Beautiful finish, Bruce.

Notice how the reflection of the blue sky gives it a blue cast. Is this what we may be causing the people to report on waterborne blues?

What woods?

Tell us more about your neck attachment design.

_________________
JJ
Napa, CA
http://www.DonohueGuitars.com


Top
 Profile  
 
 Post subject:
PostPosted: Mon Nov 07, 2005 10:59 am 
Offline
Koa
Koa
User avatar

Joined: Wed Dec 29, 2004 3:48 pm
Posts: 1478
First name: Don
Last Name: Atwood
City: Arlington
State: Virginia
Country: USA
Focus: Build
Status: Amateur
Bruce, the reflection of towel in the back says it all. 
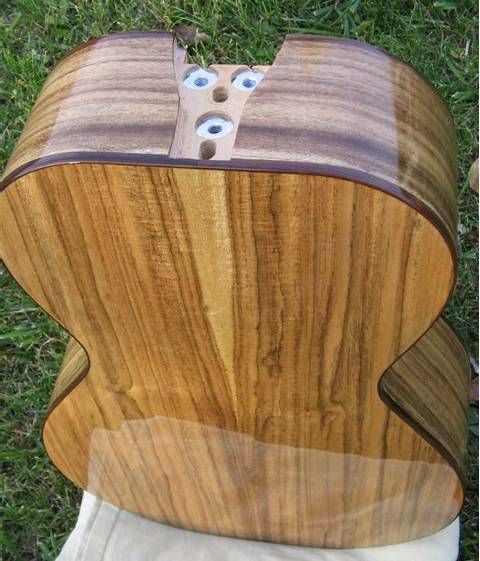
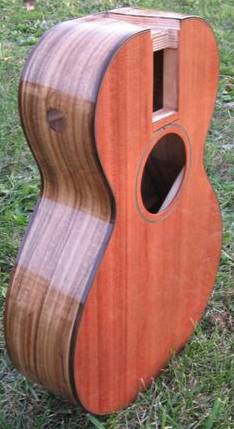
Very nicely done. You folks are eventually going to convince me to give it a try. I'd also like to hear more about the wood and neck attachment.

_________________
Don Atwood
Arlington, VA


Top
 Profile  
 
 Post subject:
PostPosted: Mon Nov 07, 2005 11:17 am 
Offline
Brazilian Rosewood
Brazilian Rosewood

Joined: Wed Jan 19, 2005 5:23 am
Posts: 2353
Location: United States
Looks great!!! Wanna tell us about that neck joint?


Top
 Profile  
 
 Post subject:
PostPosted: Mon Nov 07, 2005 12:08 pm 
Offline
Koa
Koa
User avatar

Joined: Thu Feb 24, 2005 4:53 am
Posts: 1584
Location: PA, United States
[QUOTE=Don A] Bruce, the reflection of towel in the back says it all. [/QUOTE]

Reflection? I thought the guitar was transparent!

Looks great! More details?


Top
 Profile  
 
 Post subject:
PostPosted: Mon Nov 07, 2005 12:10 pm 
Offline
Cocobolo
Cocobolo

Joined: Wed Dec 29, 2004 7:25 am
Posts: 458
Location: Southern Ohio
Thanks, guys.

JJ - Interesting observation about the blue cast. I assure you that there is no blue at all in this guitar, so it had to be the reflection. My house has blue siding and this pic was taken about 15' away from the house. I'm sure that skewed the color also. The top is not nearly this red either. However, the Target 9000 that I used earlier also had a bluish/plasticy cast indoors.

The top is a piece of redwood used as a packing scrap for the redwood tops I got from Hank in the OLF group buy. I used it because I wanted to learn to work with redwood without ruining a nice top. It's a three piece top.

The b/s are South American Laurel. Bindings are EIR.

I've included a pic of the neck so that you can see the other half of the neck joint. It's my version of an adjustable neck joint. The neck is attached with threaded inserts. I reinforced the stacked heel with a 1/2 dowel as per Mario's approach. (Thanks Mario)

A part of the neck extends to nearly the end of the fretboard and the top is cut out to match. The FB sits on top of the top and hides the cutout.


Adjusting bolts screw into the tee nuts you see in the neck block and adjust the angle and centerline alignment of the neck. The slotted holes in the neck block allow up and down adjustment of the neck. The neck fits in to the cutout in the neck block and allows for about 1/8" for and aft movement to tweak intonation.

Four braces run from the neck block to the transverse brace. Two run straight from the neck block to the TB along the side of the cut out and two more run at a 45 degree angle to meet the TB where it joins the sides. We'll soon see it it works.

When you look at the rough construction of my neck joint, consider that this was meant to be a quick, cheap, and crude prototype and not meant to be a nice guitar.


Top
 Profile  
 
 Post subject:
PostPosted: Mon Nov 07, 2005 3:59 pm 
Offline
Koa
Koa
User avatar

Joined: Wed Jun 08, 2005 1:00 pm
Posts: 1644
Location: United States
City: Duluth
State: MN
Country: USA
Focus: Build
Status: Amateur
Bruce,

A really beautiful finish! I have seen some FP that looked like oiled wood. This doesn't. This looks lacquered, or shellaced, or shellaquered or... I mean there's a very substantial finish on this guitar, which I think really shows what you can do with FP if you work at building up the finish.

Dennis

_________________
Dennis Leahy
Duluth, MN, USA
7th Sense Multimedia


Top
 Profile  
 
 Post subject:
PostPosted: Mon Nov 07, 2005 6:01 pm 
Offline
Koa
Koa
User avatar

Joined: Thu Aug 25, 2005 4:49 pm
Posts: 1209
Location: Ukiah, CA
Bruce, great looking finish. How long did it take to do? I'm thinking of trying it out myself sometime soon. What did you do for pore filing?

_________________
Ken Franklin
clumsy yet persistent
https://www.kenfranklinukulele.com


Top
 Profile  
 
 Post subject:
PostPosted: Mon Nov 07, 2005 6:42 pm 
Offline
Koa
Koa

Joined: Thu Aug 11, 2005 7:38 pm
Posts: 697
Location: United States
Very nice finish. It really does look transparant in the towel shot. WTG!


Top
 Profile  
 
 Post subject:
PostPosted: Tue Nov 08, 2005 1:05 am 
Offline
Cocobolo
Cocobolo

Joined: Wed Dec 29, 2004 7:25 am
Posts: 458
Location: Southern Ohio
Ken,
It took me several weeks to do this, but I only worked on it a little at a time. I'd do a 5-10 minute session and then let it dry. Most of my time was spent fixing mistakes since this was my first attempt.

I filled with Z-poxy 30-minute epoxy. I used a razor blade and had everything dead level before I started.


Top
 Profile  
 
 Post subject:
PostPosted: Tue Nov 08, 2005 1:25 am 
Offline
Old Growth Brazilian

Joined: Tue Dec 28, 2004 1:56 am
Posts: 10707
Location: United States
Super job Bruce I can see the gloss very nice

No such thing as a dumb questionMichaelP38664.3945138889


Top
 Profile  
 
 Post subject:
PostPosted: Tue Nov 08, 2005 1:50 am 
Offline
Site Admin
User avatar

Joined: Mon Dec 27, 2004 5:02 am
Posts: 8553
Location: United States
First name: Lance
Last Name: Kragenbrink
City: Vandercook Lake
State: Michigan
Zip/Postal Code: 49203
Country: USA
Focus: Build
Status: Semi-pro
Nice work Bruce!
I also have a Redwood Packing top from Hank!
Great idea!

_________________
Support the OLF! Bookmark our STEWMAC link Today!
Lance@LuthiersForum.com


Top
 Profile  
 
 Post subject:
PostPosted: Tue Nov 08, 2005 2:12 am 
Offline
Koa
Koa
User avatar

Joined: Fri Jan 14, 2005 2:01 am
Posts: 542
Location: United States
Nice Guitar!! Love the finish.


Top
 Profile  
 
 Post subject:
PostPosted: Tue Nov 08, 2005 2:43 am 
Offline
Koa
Koa

Joined: Sun Jan 16, 2005 1:48 am
Posts: 571
Location: United States
Looking good Bruce. Be sure to post it when it's completed and let us know how it sounds.


Top
 Profile  
 
 Post subject:
PostPosted: Tue Nov 08, 2005 4:30 am 
Offline
Old Growth Brazilian

Joined: Tue Dec 28, 2004 1:56 am
Posts: 10707
Location: United States
So your pitch and roll adjustments are from inside, through the sound hole, and your fretboard extension free floats in the body?

Boy I can think of all sorts of questions on this. 
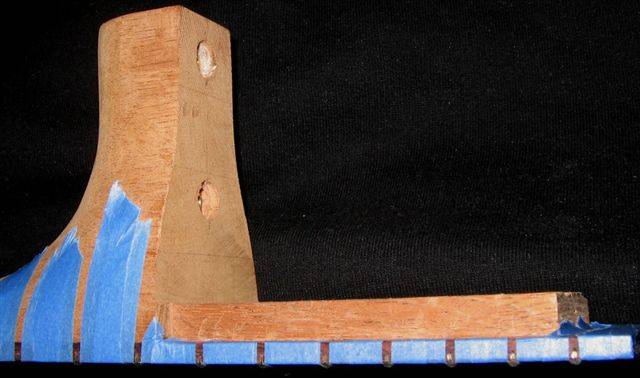
I like the Idea of two axis adjustment. So I gather that the heal is the tendon. How mush play in the mortise do you leave for the off center adjustment?
I want to se finished pictures of this. If the neck to body joint looks good, I may have to give this a try once.
MichaelP38664.5346990741


Top
 Profile  
 
 Post subject:
PostPosted: Tue Nov 08, 2005 6:14 am 
Offline
Brazilian Rosewood
Brazilian Rosewood
User avatar

Joined: Tue Jul 05, 2005 10:53 pm
Posts: 2198
Location: Hughenden Valley, England
Bruce,

That's a gorgeous finish and a sweet guitar. I really like the way French polish lets the wood shine through as well as the guitars's sound. Also your neck joint looks really interesting. Do the 3 ajustable tee bolts butt against the heelblock wood or have you put brass rod inserts in the heel block where they meet? Am I right in thinking that you set the adjustments with the 3 tee bolts and then fix the neck by tightening the 2 bolts that go into the heel? To alter the neck angle I suppose you have to first loosen the two holding bolts to give room for adjustment. Let us know how it works in practice. I think it's very exciting.

I am with you on the free-floating neck idea. I think that the box has it's own structural integrity and movements and that trying to fix the neck/fingerboard in two dimensions (perpendicular AND parallel to the top) either by glueing the fingerboard extension down or bolting it to an extension of the neck block will have the fingerboard and box "fighting" to some degree rather than doing what both can do best in combination.

I've never been convinced by the argument that the neck joint to the body is important for transfering maximum string energy to the body. I can't wait for the day when thechnology can enable a neck to be held to the body with say magnetic or other force that lets there be a tiny air gap between the two but with the neck firmly held with no contact to the body at all. I suspect such a guitar would sound great.

I like the idea of the soundbox construction keeping the neck block rigid to resist the string pull and possible flattening of the back arch via flying buttress braces, and the neck being free floating with fingerboards being supported as part of the neck construction (rather than a neck block extension) with an adjustment system bolting on the front to allow for movements in time to bring action back on track.

I am currently making a guitar/bouzouki with a similar arrangement to yours but using a version of Mike Doolin's adjustable neck system with the bottom bolt held "captive" in the neckblock under tension against a washer to adjust the neck angle. This means you can do the adjustment with strings under full tension. I also like the way that you can extend the carbon fibre rods and truss rod in the part of the neck that supports the fingerboard extension:


To support the neck block I use carbon fibre buttress braces and A frame top braces:


Many thanks to people like Rick Turner, Mike Doolin and Howard Klepper for sharing their ideas and pointing me in this direction and kudos to people like you Bruce for trying out such ideas.

_________________
Dave White
De Faoite Stringed Instruments
". . . the one thing a machine just can't do is give you character and personalities and sometimes that comes with flaws, but it always comes with humanity" Monty Don talking about hand weaving, "Mastercrafts", Weaving, BBC March 2010


Top
 Profile  
 
 Post subject:
PostPosted: Tue Nov 08, 2005 11:31 am 
Offline
Cocobolo
Cocobolo

Joined: Wed Dec 29, 2004 7:25 am
Posts: 458
Location: Southern Ohio
Michael – Yes the neck adjusts from the inside and the fb extension free floats. There will be a slight gap on each side of the neck where it enters the body – maybe .015 gap, but I think its impact could be minimized by installing a strip of black purfling on each side of the neck opening. I didn’t worry about it on this build since it’s a prototype.

Dave – I agree that the FP really lets the wood shine through. When I see it, I think “wood” instead of “plastic.”

Your description of how this neck joint works is correct. The three adjustable tee bolts butt against the wood of the neck heel. I did not install any brass rod inserts into the neck, but I can see how that might be a better way to go. Sharpened bolts into brass inserts would really hold the neck securely. I’ll let you know how this works.

Thanks for the encouragement and the pics. I thought about using the flying buttress braces, but on this parlor the upper bout was so small that I didn’t think that I would be giving up much by making it strong enough to take the pressure from the neck block. I think that the next time I’ll try the flying buttress idea, but I wonder if one running from the top would be enough. Martin uses bolt on necks and the bottom of the neck block is connected to the back by only the width of the kerfed lining.

Anyway, since I’ll never be a master builder, it sure is fun to experiment.

I’ll give you guys a full report when I finish this thing.


Top
 Profile  
 
 Post subject:
PostPosted: Tue Nov 08, 2005 11:55 am 
Offline
Brazilian Rosewood
Brazilian Rosewood

Joined: Thu Jun 16, 2005 10:31 am
Posts: 2103
Location: United Kingdom
Bruce and Dave Wow

Really interesting stuff, absolutely brilliant.

Much Respect to both of you, for pushing the envelope.

Dave on the neck extension does that just free float in its pocket ?

Does the fingerboar sit flush to the top ?


Top
 Profile  
 
 Post subject:
PostPosted: Tue Nov 08, 2005 6:24 pm 
Offline
Brazilian Rosewood
Brazilian Rosewood
User avatar

Joined: Tue Jul 05, 2005 10:53 pm
Posts: 2198
Location: Hughenden Valley, England
Bruce,

I was thinking more that the small pieces of brass rod in the neck provides a pivot point and stops the tee bolts pressing into the wood under string pressure and hence changing your adjustment. I got the idea from Mike Doolin.

My reasoning on the pairs of flying buttress braces is that you have two different forces - compression at the top of the neck block and tension at the bottom. I definitely want to stop the tension from flattening the back arch and changing neck angle so have one pair fixed on the bottom. Equally with some of the top of the neck block taken away for the fingerboard extension I want support at the top - hence the extra pair. The weight is negligible with carbon fibre, and (although I could be wrong) one pair of braces going from the bottom of the sides to the top of the neck block could still allow some flattening in time of the back arch. I suppose you could call it a "belt and braces" approach

As I say let us know how your system works out.

_________________
Dave White
De Faoite Stringed Instruments
". . . the one thing a machine just can't do is give you character and personalities and sometimes that comes with flaws, but it always comes with humanity" Monty Don talking about hand weaving, "Mastercrafts", Weaving, BBC March 2010


Top
 Profile  
 
 Post subject:
PostPosted: Tue Nov 08, 2005 6:27 pm 
Offline
Brazilian Rosewood
Brazilian Rosewood
User avatar

Joined: Tue Jul 05, 2005 10:53 pm
Posts: 2198
Location: Hughenden Valley, England
[QUOTE=RussellR]
Dave on the neck extension does that just free float in its pocket ?

Does the fingerboar sit flush to the top ? [/QUOTE]

Yes

That's the plan but obviously as you do adjustments you could get a small gap. Visually I don't really think this will be a problem. The biggest challenge is to get the neck heel to look good sitting in the inset pocket at the front. We'll see

_________________
Dave White
De Faoite Stringed Instruments
". . . the one thing a machine just can't do is give you character and personalities and sometimes that comes with flaws, but it always comes with humanity" Monty Don talking about hand weaving, "Mastercrafts", Weaving, BBC March 2010


Top
 Profile  
 
Display posts from previous:  Sort by  
Post new topic Reply to topic  [ 21 posts ] 

All times are UTC - 5 hours


Who is online

Users browsing this forum: No registered users and 21 guests


You cannot post new topics in this forum
You cannot reply to topics in this forum
You cannot edit your posts in this forum
You cannot delete your posts in this forum
You cannot post attachments in this forum

Jump to:  
Powered by phpBB® Forum Software © phpBB Group
phpBB customization services by 2by2host.com