Official Luthiers Forum!

Owned and operated by Lance Kragenbrink
It is currently Sat Apr 26, 2025 5:57 am


All times are UTC - 5 hours


Post new topic Reply to topic  [ 34 posts ]  Go to page 1, 2  Next
Author Message
 Post subject:
PostPosted: Tue Jan 03, 2006 5:44 am 
Offline
Cocobolo
Cocobolo

Joined: Fri Jan 07, 2005 3:17 am
Posts: 183
Hi all -

I've levelled/sanded and buffed out the KTM-9 finish on my instrument. After careful inspection of the surface (it passed!), I quit for the day. The next morning, I resume only to find several odd, curved lines perhaps 1/16" wide on the back’s finish. It looks like a finely blistered finish, but upon closer examination with a loupe, I'm somewhat certain that it's pitting, not blistering. The photo below is prior to buffing (the only good photo I have).


At first I thought that I could have missed the problems on the previous inspection. But, now I’m convinced that’s not the case. After a complete inspection in all kinds of lighting, more seem to be popping up in new places as I work on the instrument. The top has been immune, until yesterday that is, when several of those lines appeared there also (a couple of days after buffing). The sides don't show any of these marks - yet at least.

That got me to thinking ... the instrument has been mainly resting on the back, and rarely on the top the last several days. When not holding it during final sanding and buffing, it's been lying on the bench with a scrap of carpet on the benchtop, and an old (but laundered) sheet on top of the carpet. I also had a piece from the same sheet over the carpeted cauls of my body vise which I used when doing the sides.

Could somehow “something” invisible that can pit KTM-9 got deposited on the laundered sheets in the geometry of slightly curved lines about 1/16” wide? To me, it sounds a little far fetched. Does anyone know of a substance that might cause this on the KTM-9? Does KTM-9 react with DEET (though I have no clue on how lines of DEET would have become deposited on a laundered sheet)? Any suggestions on how to troubleshoot to help me figure this out so I can prevent it in the future?

Thanks,
Pete


Top
 Profile  
 
 Post subject:
PostPosted: Tue Jan 03, 2006 6:12 am 
Offline
Old Growth Brazilian

Joined: Tue Dec 28, 2004 1:56 am
Posts: 10707
Location: United States
My first though while looking at the photo is that the patterns seam to be parallel an not at all random. I would think that this is either cause by something it was resting on or something it came into contact with that would leave a foot print matching the pattern. Is there any vinyl around where the guitar was?MichaelP38720.5926041667


Top
 Profile  
 
 Post subject:
PostPosted: Tue Jan 03, 2006 6:53 am 
Offline
Cocobolo
Cocobolo

Joined: Fri Jan 07, 2005 3:17 am
Posts: 183
More information per your request:

1) The angles of the lines in general are random, though the ones in the photo are indeed parallel and at about 30 degrees to the grain. In other instances, they go across the grain as one or more lines, and in some places, with the grain. I did not see any correlation in the overall picture.

2) No vinyl around that I can think of. Would vinyl affect KTM-9 like it does nitro lacquer?

3) Pore filling was performed with ZPoxy 15 minute resin (all I could find in a pinch), and not the Finishing Resin most of you use. While I may have applied the epoxy at a slight angle, the squeegeeing off was done with the grain as that's what worked best for me.

4) The finish was brushed on with a foam brush. That went EXTREMELY well, in fact I was hard pressed to produce any bubbles at all. A sample of KTM-9 grafted coatings sent me a couple of years ago, was much more bubble prone, but that may have been the foam pads I was using to apply it to the relatively small test swatches.

Also, the finish was given a full month to cure before final levelling, sanding, and buffing. (3M Fre-Cut, StewMac Micro Finishing Abrasives, and Menzerna Fine followed by Glans Wachs).

Pete


Top
 Profile  
 
 Post subject:
PostPosted: Tue Jan 03, 2006 7:01 am 
Offline
Cocobolo
Cocobolo

Joined: Fri Jan 07, 2005 3:17 am
Posts: 183
The sheet that was used under the instrument to protect the finish did reside in a plastic shopping bag (Stop & Shop most likely) for many months prior to being cut up for the guitar. Is there any vinyl content in these shopping bags?


Top
 Profile  
 
 Post subject:
PostPosted: Tue Jan 03, 2006 7:06 am 
Offline
Old Growth Brazilian

Joined: Tue Dec 28, 2004 1:56 am
Posts: 10707
Location: United States
Humm??!!!I have never finished over the Zpoxy adhisive resign before. It might be the problem

Are all the patches like the pic and in a consistant width. The pic looks kind of like wheel tracks. I do undersand that the patterning is not as consistantly paralle as the pic shows, but are all the patterns stipes like the picture shows?


Top
 Profile  
 
 Post subject:
PostPosted: Tue Jan 03, 2006 7:16 am 
Offline
Cocobolo
Cocobolo

Joined: Fri Jan 07, 2005 3:17 am
Posts: 183
About the only consistent thing is a slight curve to them. Some are single stripes, some are double, and some even have triple. Some are barely 2" long, others are 6" long. Some are very faint and narrow (1/32"?), others are more pronounced like in the photo. Those might be over 1/16" wide.


Top
 Profile  
 
 Post subject:
PostPosted: Tue Jan 03, 2006 7:48 am 
Offline
Old Growth Brazilian

Joined: Tue Dec 28, 2004 1:56 am
Posts: 10707
Location: United States
I have been useing KTM-9 over shellac over Zpoxy finishing resin for over a year now. I have had no issues any where near like this. The fact that it is apearing in stripes leads me to believe that it is a contact contamination issue. Just what the contaminate is, without knowing all that the guitar may have had contact with is hard to say. My first instint would be to level, add two more coats level and see if it reappears. If you do this I ould hang the guitar durring cure and when not buffing. It has to be something it came in contact with.


Top
 Profile  
 
 Post subject:
PostPosted: Tue Jan 03, 2006 7:52 am 
Offline
Cocobolo
Cocobolo

Joined: Fri Jan 07, 2005 3:17 am
Posts: 183
Do you see any relationship between your foam brush technique and the directions of the lines? Perhaps the handle of the brush in the foam had a reaction with KTM9. Or if you did not use a new brush for every coat (not that I would either mind you...) perhaps what you used to clean the brush with remained in the foam.

I used two brushes of different sizes, and did reuse them for the whole job. Between coats, I just rinsed in warm running water until the runoff was clear. Kept the brushes in individual Zip-Loc bags when not using them.

Something interesting comes to mind ... I think I used the smaller brush for the sides, and the larger one for the top/back. So far, only the top/back has these marks. Hmmmmm.

But I still don't get why the surface would come out as it's supposed to and then develop these defects after an inspection verified the defects were not initially present. Could there be a mechanism in the finish which would allow contaminents trapped in the finish to cause damage after a buff-out with initially good results?

Pete Licis38720.6634722222


Top
 Profile  
 
 Post subject:
PostPosted: Tue Jan 03, 2006 8:22 am 
Offline
Contributing Member
Contributing Member

Joined: Thu Jan 06, 2005 12:19 pm
Posts: 1051
Location: United States
And there is no possibility of silicone contamination such as the larger brush sitting on a shelf near silicon spray or something like that?

Have you tried calling up LMI and talking to someone there?...as the sole distributor of KTM-9 they have probably heard or seen every anomaly...they are usually very helpful.


Top
 Profile  
 
 Post subject:
PostPosted: Tue Jan 03, 2006 9:19 am 
Offline
Brazilian Rosewood
Brazilian Rosewood

Joined: Sat Jan 15, 2005 12:50 pm
Posts: 3933
Location: United States
From what I understand, silicone oil is a near-ubiquitous plasticizer these days. It's what they use in vinyl; PVC without it is the hard stuff they make plumbing pipe out of. However, I've been told that it works so well in all sorts of plastics that it's used everywhere, often without anybody being told about it.

If that's the case it's possible that there was some in the brush you used on the top and back. It may alos be that there is some in the scrap f carpet, and it's being transfered by the sheet as you shake it out and move it. Just another example of 'better living through chemistry'.


Top
 Profile  
 
 Post subject:
PostPosted: Tue Jan 03, 2006 11:07 am 
Offline
Brazilian Rosewood
Brazilian Rosewood
User avatar

Joined: Mon Dec 27, 2004 9:42 pm
Posts: 4217
Location: Buffalo, NY
First name: Robert
Last Name: Cefalu
City: Buffalo
State: NY
Zip/Postal Code: 14217
Country: US
Pete I had something similar happen but it was because I forgot a bench lite with reflector on al nite about 18 to 20" above the body. Guess it got too hot overnite. Sure looks like the same marks.

_________________
Beautiful and unusual tone woods at a reasonable price.
http://www.rctonewoods.com/RCT_Store
The Zootman
1109 Military Rd.
Kenmore, NY 14217
(716) 874-1498


Top
 Profile  
 
 Post subject:
PostPosted: Wed Jan 04, 2006 2:48 am 
Offline
Cocobolo
Cocobolo

Joined: Fri Jan 07, 2005 3:17 am
Posts: 183
Did a test overnight. I took one of the test swatches I had done with KTM-9, which does not have this problem. I placed it on the same carpet/sheet as the guitar while it was being worked. I also added a piece of the plastic bag that the sheet had been stored in. On another piece I placed the plastic bottle that I had transferred the KTM-9 to.

All results were negative - no marks. Granted, this swatch is a couple of years old, so it has cured more than the month of the guitar, but I would think you'd at least see some effect if any of those items were the problem.

I currently have the swatch sitting on a different portion of the carpet/sheet, and also against the foam brush that I used on the top/back. Al, for what it's worth, the brush has a wooden handle, but does contain some plastic that holds the foam to the wood.

Bob, I did use an infrared lamp to speed drying, but that was about 18" away from the body only while hung from the ceiling between coats (1 hour). I don't think heat from the lamp is the problem judging by feel. I was very careful about that, having damaged some test swatches with the lamp too close. But, just in case, let me ask you: did your anomalies show up immediately as you were completing the finish, or did they show up over the course of several days like mine did?

Still searching for answers ... as I've got to figure this out prior to fixing the finish. I also have an email in to Grafted Coatings, but haven't heard back from them yet.Pete Licis38721.4551851852


Top
 Profile  
 
 Post subject:
PostPosted: Wed Jan 04, 2006 3:51 am 
Offline
Walnut
Walnut

Joined: Thu Nov 03, 2005 4:10 am
Posts: 9
Location: United States
First name: Matthew
Last Name: Lawrence
City: Stratford
State: CT
Zip/Postal Code: 06615
Country: USA
Pete,

We sent an email out to you a little while ago. May be slow connection.

If possible, post a few more pictures as you mention they're more random areas as well. It may help give us a better idea or understanding of whats going on.

The picture supplied containing the bluish cast, would mean the coating was applied to heavily to fast or to many coats to fast without proper cure between. If 3mil wet was applied, it will leave 1.5mil - 1 hour under IR will definitely cure enough for next coat.

mattKTM938721.4958912037

_________________
Matthew Lawrence
R&D Technical Support
Grafted Coatings Inc.
www.graftedcoatings.com


Top
 Profile  
 
 Post subject:
PostPosted: Wed Jan 04, 2006 3:56 am 
Offline
Site Admin
User avatar

Joined: Mon Dec 27, 2004 5:02 am
Posts: 8553
Location: United States
First name: Lance
Last Name: Kragenbrink
City: Vandercook Lake
State: Michigan
Zip/Postal Code: 49203
Country: USA
Focus: Build
Status: Semi-pro
Hi Matt - Great to see you here!

_________________
Support the OLF! Bookmark our STEWMAC link Today!
Lance@LuthiersForum.com


Top
 Profile  
 
 Post subject:
PostPosted: Wed Jan 04, 2006 3:56 am 
Offline
Walnut
Walnut

Joined: Thu Nov 03, 2005 4:10 am
Posts: 9
Location: United States
First name: Matthew
Last Name: Lawrence
City: Stratford
State: CT
Zip/Postal Code: 06615
Country: USA
Besides cure time, what kind of prepping was done between coats? We recommend DA as it will neutralize the surface prior to next application. Contamination could be another issue - that would cause the contamination to float to the top resulting it the effect you see.


matt

_________________
Matthew Lawrence
R&D Technical Support
Grafted Coatings Inc.
www.graftedcoatings.com


Top
 Profile  
 
 Post subject:
PostPosted: Wed Jan 04, 2006 3:57 am 
Offline
Walnut
Walnut

Joined: Thu Nov 03, 2005 4:10 am
Posts: 9
Location: United States
First name: Matthew
Last Name: Lawrence
City: Stratford
State: CT
Zip/Postal Code: 06615
Country: USA
Hey Lance,

Hope you and the rest had a great New Year and all the great possiblities of 2006 as well.

We are very interested in the "blistering/pinning/bubbling" of the picture. Looking forward to getting this fixed for him.

matt

_________________
Matthew Lawrence
R&D Technical Support
Grafted Coatings Inc.
www.graftedcoatings.com


Top
 Profile  
 
 Post subject:
PostPosted: Wed Jan 04, 2006 3:59 am 
Offline
Brazilian Rosewood
Brazilian Rosewood
User avatar

Joined: Mon Dec 27, 2004 9:42 pm
Posts: 4217
Location: Buffalo, NY
First name: Robert
Last Name: Cefalu
City: Buffalo
State: NY
Zip/Postal Code: 14217
Country: US
Pete my sincere apologies. I checked my notes and it wasn't KTM-9 but Targets WB shellac. Not a fault of the product but my own stupidity. I have had excellant results from KTM-9!!

_________________
Beautiful and unusual tone woods at a reasonable price.
http://www.rctonewoods.com/RCT_Store
The Zootman
1109 Military Rd.
Kenmore, NY 14217
(716) 874-1498


Top
 Profile  
 
 Post subject:
PostPosted: Wed Jan 04, 2006 5:04 am 
Offline
Cocobolo
Cocobolo

Joined: Thu Jul 28, 2005 5:52 am
Posts: 334
Location: United States
Hi Pete,
the order of events isn't exactly clear to me, so let me see if I understand
correctly (you know what it takes to penetrate a thick Irishman!). You said
the pits started showing the next day after you sanded and buffed the
finish, so I assume nothing showed from the time you finished applying
the KTM9 to the time you sanded/buffed. How long did you allow the
finish to cure before you sanded/buffed? If it was several days I would be
almost certain it's not anything in the filler or finish because it would have
shown up much sooner. It's more likely being caused by external contact
with some sort of plasticizer or solvent. Just MHO.
Craig


Top
 Profile  
 
 Post subject:
PostPosted: Wed Jan 04, 2006 7:12 am 
Offline
Cocobolo
Cocobolo

Joined: Fri Jan 07, 2005 3:17 am
Posts: 183
I checked my notes and it wasn't KTM-9 but Targets WB shellac

No problem, Bob! Interestingly, I have a shellac test swatch that has huge craters in it from being over-heated by a halogen lamp back in my younger and more naive days. Yeah right ... it'll probably happen again tomorrow!

;-)


Top
 Profile  
 
 Post subject:
PostPosted: Wed Jan 04, 2006 7:18 am 
Offline
Cocobolo
Cocobolo

Joined: Fri Jan 07, 2005 3:17 am
Posts: 183
the order of events isn't exactly clear to me, so let me see if I understand
correctly (you know what it takes to penetrate a thick Irishman!).


Yes, I do! I'll send you a keg of Guiness!

Seriously, you have the sequence mostly right. Some of the lines started forming near the end of the sequence (after Finesse It II was applied), and some, like the two lines on the top, happened a full two or three days after final buff out with Menzerna Glans Wachs, while several lines appeared between those two times.

For the last day and a half, the guitar has been kept in it's case, and no new lines seem to have formed, but it's tough to say on the back, which has many now.

Pete Licis38721.6456597222


Top
 Profile  
 
 Post subject:
PostPosted: Wed Jan 04, 2006 7:26 am 
Offline
Cocobolo
Cocobolo

Joined: Fri Jan 07, 2005 3:17 am
Posts: 183
As you now know, Jim and Matt from Grafted Coatings have been giving me help in parallel via email. It's getting a little confusing doing this in two paths, one of which is private, so I thought I'd get everyone on the same boat with the same information by copying from my latest email to Jim into this post. Also I'd like to thank all those who have helped out thusfar.

Here's the email:


**************************************************
Jim,

Thanks for being so willing to help. Here's the information you requested:

1) Finish Method:

a) The instrument (Indian Rosewood and Engelmann Spruce) was sealed and pore filled with epoxy ala Doolin. I did not use his (SB3??) epoxy, though, I used ZPoxy 15 minute formula. Doolin felt that any epoxy should yield good results, and I shouldn't worry too much about which one I used. I intended to use the ZPoxy Finishing Resin as a filler like most of the users on the Luthier's Forum use, but could only find their 15 minute adhesive locally, and didn't have time for mail order. The ZPoxy was scraped on with a razor blade, even the top, as epoxy brings out the depth in the grain better than shellac in my observation. The epoxy filler/sealer was applied in straight lines with the grain. With the razor blade, 99% of the epoxy went in the pores, and an imperceptible amount stayed on the surface, evidenced only by the much darker and richer color of the wood. Only a scuff sanding here and there was needed for a couple of very minor epoxy ridges. The angles of the "blistering"/pitting do not correspond the the angle of epoxy application.

b) The KTM-9 was applied during the following two days (basically per Doolin's schedule) with two foam brushes - a wider one for the top/back, and a narrower one for the sides. It was applied with a method similar to Turko method you sent me. Prior to starting, I transferred the finish from the quart can into several plastic bottles obtained from a plastics dealer. I'm not sure of the material (I may be able to figure it out if I kept invoices), but I know at least some were meant for chemicals and such. Using a squeeze top on one of the bottles (roughly 8 oz capacity), the finish was squeezed onto the end of the foam brush and applied to the instrument. Perhaps it's because of this way of wetting the end of the brush that I got what I thought were surprisingly thin coats. Each linear pass of the brush was refreshed with more KTM-9, and delivered slowly and evenly. No problem with bubbles (a pleasant surprise!). Application temperature was at about 72 - 76 degrees, and relative humidity was at about 40% or a few points lower at the high end of the temperature range.

c) After each coat, the finish was allowed to dry with the instrument suspended and a fan a few feet away, and an infrared lamp (??Watts?) about 18 " away. The fan imparted a swinging/spinning motion to the instrument, so all sides got some infrared and direct breeze. Between coats the foam brush was rinsed with warm water until the runoff was clear and no finish was seen when squeezing the brush. It was then placed in a zip-loc bag after shaking excess moisture from it. Six coats were applied the first day, each on the hour.

d) The second day I leveled the surface with 3m Fre-Cut 220 or 320 through perhaps 600 grit by hand using a hard block. After leveling the surface was wiped with alcohol to clean and neutralize. I believe I used ETHANOL rubbing alcohol (hard to find), or I may have used isopropyl. Six more coats of KTM-9 were applied in the manner described above. The second day, I may have done a very minor leveling with finer grit prior to the last three coats ... I don't recall. If I did, I probably wiped the sanding dust off with a water moistened paper towel.

e) The instrument was then hung up to cure for what ended up being a whole month at room temperature (60's). For a lot of that time, a set a small fan blowing on it from a few feet away in hopes of aiding off-gassing.


One month later ...

f) After the cure, I did final leveling and buffing. Due to mental fatigue and a temporary lapse of judgment (or just totally being out of my mind), I began the final leveling with 3M Free-Cut 320 - way too coarse. As a result, I was never able to recover from the sandpaper scratches completely. The scratches are a separate issue, one that I'm not puzzled by; I know the cause and solution. The leveling progressed through Free-Cut 800, and then went on to StewMac Micro Finishing Papers 1000 - 2000 grit, these used wet with soapy water, and each grit in alternating directions (0/45/90 degrees). No finish anomalies were noted up to this point ... not even the scratches (which do not seem to be related to the problem in question).

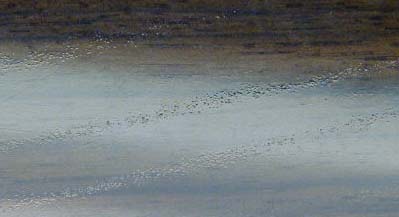
g) The next step was using 3M Finesse It II, applying by hand with a cotton rag (T-Shirt). At this point a gloss started to form. With the slight gloss present, the scratches became evident, but no sign of the problem in question. But, after doing the rest of the guitar, the mysterious problem became evident in one area of the previously worked back. The problem, in a longer view than in the photo provided at the top of this thread, was in the form of a line or several lines (like in the photo) that were a couple to perhaps 6-8 inches long, and with a gentle curve to them. I worked those areas particularly hard with the Finesse It II, and was able to reduce some of the defect, but not eliminate it. That was the stopping point for the day.

h) The next morning I resumed, inspecting the guitar relatively early in the process below. Surprisingly, several more of these lines had formed, in varying angles across and with the grain. They don't seem to correspond well to any angles that were used in the application of finish or filler/sealer. I then applied Perfect It II, which bought the finish to a higher gloss. A few more lines appeared on the back (none on the front yet). At this point I was thinking if there was a contaminant on the carpet/sheet under the instrument, rotating the guitar as I work on the top could account for the various angles of the lines.

i) I wasn't very satisfied with the gloss, so I tried an alternative approach that has worked in the past on my KTM-9 test swatches. I powered up a hand drill with a new 6" loose flannel buff, and applied Menzerna Fine compound. This was a step backward in grit, so the Perfect It II gloss became a little hazy. The anomalous lines seemed to diminish slightly with application of the Menzerna Fine.

j) Afterwards, with a separate buff only used for Menzerna Glans Wachs, I applied that in the same manner. This restored the gloss, and perhaps reduced the lines a little more. To remove any Glanz Wachs residue, I used a dry paper towel, which seemed to do a better job than cloth
.

This left the instrument glossy but with minute scratches and the defect in question. Neither of these can be seen in the long shot below. They become very evident with closer inspection.


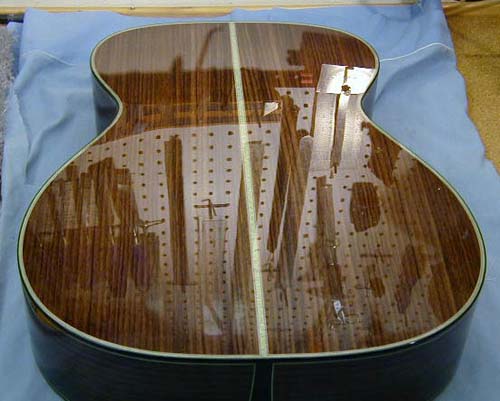
At this point I considered the finish "done", though I was not satisfied with the results. Because I have a well known luthier visiting me in a couple of weeks, I was motivated to get this instrument done before his arrival. (That plan has since gone by the wayside, as I've decided to try to fix the finish). With the finish considered done (at the time), I went on to fit the neck. This involved handling the instrument and changing it's position on the blue sheet/carpet shown. Over the next day I noticed a couple of more new "lines" in place previously OK. On the third day after buffing I noted two lines on the TOP this time. Regarding potential transference from the blue cloth, I will say that the instrument has spent 90% of the time on it's back, and only occasionally lying on its top. Hmmmmm ... is that why there are far more lines on the back than the front? Interestingly, NO LINES have appeared on the sides. The guitar has only rested on it's sides for seconds on a few occasions. I don't know if that's important, but it's something to consider.

2) Regarding the effect from the carpet/sheet ... I really don't know. My last few sentences above, though, might indicate some involvement. The carpet is some unused carpet from when my house was built about 15 years ago. It's been rolled up in the basement for that time. It was rigorously vacuumed with a Fein Shop Vac prior to use. I have no clue what a carpet might exude, and if it still would do so after 15 years. Regarding edges, the carpet has a pretty thick nap (is that the right word?), so there are no real sharp edges. If it were pressure concentrated on the edge of the carpet and imprinting through the sheet, I'd expect it to be a lot more diffuse, and not 1/16" wide. Also, some of the lines go through the center portions of the guitar, and I NEVER had the instrument lying half off the carpet/sheet such that the carpet edge would be at the center of the guitar.

By the way, you see the line of white "trim" in the blue sheet (actually pillowcase) above? Thinking that might be the cause (it's about the right width), I placed one of my test swatches directly over that and weighted it overnight. No defect in the test finish this morning. But then, the test swatch is a couple of years old ... perhaps curing that long it would not be susceptible? Also I placed test swatches on that very same carpet/sheet last night, as well as contacting the plastic bottle that dispensed the KTM-9, and those did not come out with any defects. Again, the swatches were a at least a year old.

3) Regarding problems in the substrate ... there is a glue line down the middle of the back ... actually a whole strip of inlay. The defect lines appear everywhere, including across that. So it's not that. Resin in the substrate? Well, probably 100%, as I filled/sealed with epoxy. But maybe a cured epoxy is not considered a resin? Other than those two things, there is nothing that was done in the construction (intentionally at least) that would cause substrate problems where the lines actually are.

Well, I've written a WHOLE LOT for you here, hopefully not too much! But I guess the answer is in one of these details somewhere, or perhaps a detail I haven't pieced together or remembered yet.

I truly appreciate your support, Jim.

Thank you so much,
Pete
Pete Licis38721.6492824074


Top
 Profile  
 
 Post subject:
PostPosted: Wed Jan 04, 2006 10:12 am 
Offline
Brazilian Rosewood
Brazilian Rosewood

Joined: Sat Jan 15, 2005 12:50 pm
Posts: 3933
Location: United States
One thought: if the problem _is_ silicone oil, it will disperse into the finish and be less noticable over time. It's still there, just spread thinner and so having less of an effect.


Top
 Profile  
 
 Post subject:
PostPosted: Thu Jan 05, 2006 12:53 am 
Offline
Cocobolo
Cocobolo

Joined: Fri Jan 07, 2005 3:17 am
Posts: 183
One thought: if the problem _is_ silicone oil, it will disperse into the finish and be less noticable over time. It's still there, just spread thinner and so having less of an effect.

Al, I'm curious - can you suggest a timeframe for the dispersion? Weeks, years?

Though I'm grasping at straws at this point, I'm beginning to lean toward something in the application method. As I stared at and pondered the problem yesterday, The following occurred to me. I applied the finish at angles of 0/45/90 to the grain, in order to "randomize" the slight ridges between brush strokes. The lines in the finish don't really correspond well to these angles, but, if you open up the tolerance to say +/- 10 or 15 degrees, then the vast majority of the lines fall within the tolerance band. I'm sure I didn't apply at exactly 0/45/90 degrees, so perhaps there is some correlation to the angles of the brush strokes after all.

Also, last night I purposely tried to make more lines by resting the guitar on the carpet/sheet and carefully marking all edges and orientations and let it rest overnight. Far as I can tell, I failed to create any more lines. If this is truly the case, then perhaps imprinting contaminants is not the problem.


Top
 Profile  
 
Display posts from previous:  Sort by  
Post new topic Reply to topic  [ 34 posts ]  Go to page 1, 2  Next

All times are UTC - 5 hours


Who is online

Users browsing this forum: No registered users and 19 guests


You cannot post new topics in this forum
You cannot reply to topics in this forum
You cannot edit your posts in this forum
You cannot delete your posts in this forum
You cannot post attachments in this forum

Jump to:  
Powered by phpBB® Forum Software © phpBB Group
phpBB customization services by 2by2host.com