Official Luthiers Forum!

Owned and operated by Lance Kragenbrink
It is currently Sat May 03, 2025 2:51 pm


All times are UTC - 5 hours


Post new topic Reply to topic  [ 13 posts ] 
Author Message
 Post subject:
PostPosted: Wed Jul 05, 2006 12:03 am 
Offline
Contributing Member
Contributing Member
User avatar

Joined: Fri Sep 09, 2005 7:51 am
Posts: 3786
Location: Canada
I thought I would post a couple pix of how I make a bridge, using simple to make jigs that simplify the operations, seeing as I had to make a couple myself !!!

So first up, it doesnt get much easier, is a hold down to shape the back curved edge - simply lock in the blank with the toggle clamp, noting where you have marked your centre line, and route on the table using a bearing guided bit which rides on the jig edge. I usually mark the edge first by pencil, then cut off the excess on the bandsaw, leaving about 1/16 for the router to take off. In order to stop any tearout, the route is done fromteh top of the curve down on both sides - so the left (or treble side) is a climb cut - but since you are taking off so little , its easy to control.


_________________
Tony Karol
www.karol-guitars.com
"let my passion .. fulfill yours"


Top
 Profile  
 
 Post subject:
PostPosted: Wed Jul 05, 2006 12:09 am 
Offline
Contributing Member
Contributing Member
User avatar

Joined: Fri Sep 09, 2005 7:51 am
Posts: 3786
Location: Canada
next up is the slot - I made two of these jigs, one right hand, the other left, as i had to make a lefty a coupel years back. The bridge blak is wedged in against the fence, and sits lower than the side platforms whcih the PC lam trimmer will sit on. The angle of the slot is already taken into account by how the bridge is held in relative to the right most fence against which the lam trimmer rides. A couple stops are clamped on to limit the travel of the router, hence giving the desired slot length, and position. I only route down about 1/16 or so at a time, this makes it easier to control/hold the router, and keep the slot nice and even side to side. When making bridges, i usually will do about 10 at a time, might as well, its all in the setup here. The final depth is set so that about 1/8 inch is left between the bottom of the bridge and the slot bottom. My bridges are about 5/16 thick, so you get 3/16 of saddle in the slot.


_________________
Tony Karol
www.karol-guitars.com
"let my passion .. fulfill yours"


Top
 Profile  
 
 Post subject:
PostPosted: Wed Jul 05, 2006 12:26 am 
Offline
Contributing Member
Contributing Member
User avatar

Joined: Fri Sep 09, 2005 7:51 am
Posts: 3786
Location: Canada
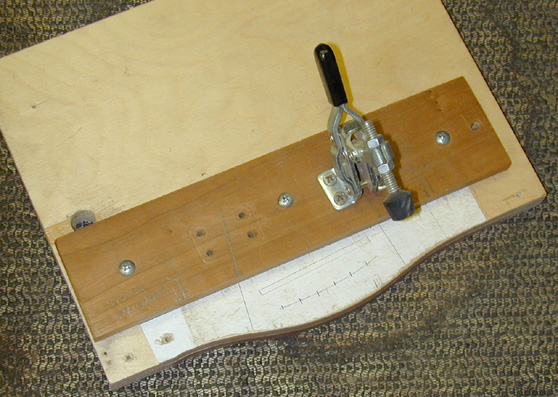
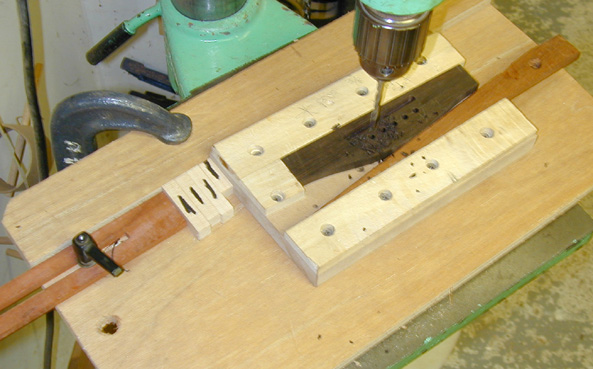
I forgot to mention above, the slot on this one is 3/16 wide, for a multiscale (you can see the pencil lines indicating the lie of the bridge on centreline). I use a 3/16 downcut spiral for these and baritones, 1/8 for normal guitars.

Next up is the pin holes. Its a two part jig, one a simple fence and table with an adjustable stop for the drill press table, the other to hold the bridge, again at the desired angle of your bridge slot (mine angles 1/8 inch over 70mm). The pin holes on my bridges are inline, so the holder jig is set to keep the pin holes equidistant behind the slot, I like them to be 3/8 back on centre. Mark out the line of the holes, and then put marks 35mm out from the centreline of the bridge - these mark you two E string holes, although ony one is needed (you will see why in a sec). Clamp the jig to the table in position so that teh drill bit is in line with the line of the pin holes on the bridge. Set the adjustable stop on the jig such that the sled with the bridge is now ready to drill the high E hole.


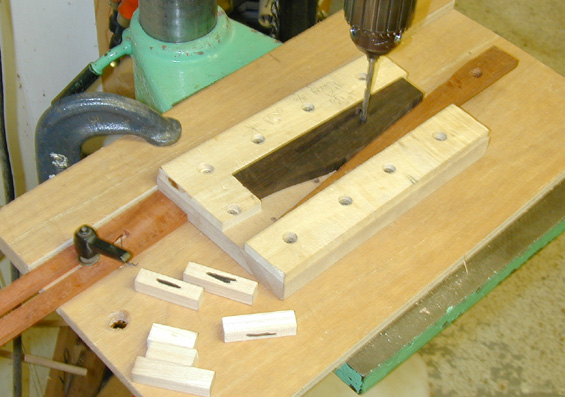
now using spacers that have been planed to the pin hole spacing you use (mine are 11mm - 55mm bridge spacing is my std - you can always use additional shims if needed to widen the spacing), place a spacer in between the stop and the sled, and drill the next hole - continue on until all six are done. I made this jig after guitar 3 because it was tough to get the pin holes straight, and evenly spaced - this is pretty much foolproof - a good thing !!!


Now you can bevel the pin holes with a countersink bit (in the same jig), and the bridge is good to get final shaped. I rough cut the wings to thickness on the bandsaw, then sand them to shape by hand on an oscillating drum sander. I also rough shape the 28 radius for the bridge bottom on the drum, then finish that up on a piece of wood that was sanded to 28 ft in the bowl. A quick scrape of the bottom and its all ready to glue on the guitar.

_________________
Tony Karol
www.karol-guitars.com
"let my passion .. fulfill yours"


Top
 Profile  
 
 Post subject:
PostPosted: Wed Jul 05, 2006 1:04 am 
Offline
Contributing Member
Contributing Member
User avatar

Joined: Fri Aug 26, 2005 5:49 pm
Posts: 2915
Location: Norway
Thanks for the pictures, Tony! I have been meaning to jig up for bridge making for some time, so this is a big help. I especially like your metod for spacing between the pin holes, it should make sure you get even distances between the holes every time, and (as you say) it makes it easy to change the distance between the holes should you want that. I have been using shop made drill guides, but even making these accurate enough can be a problem!

_________________
Rian Gitar og Mandolin


Top
 Profile  
 
 Post subject:
PostPosted: Wed Jul 05, 2006 1:32 am 
Offline
Brazilian Rosewood
Brazilian Rosewood
User avatar

Joined: Thu Aug 18, 2005 2:21 am
Posts: 2924
Location: Changes when ever I move..Australia
Focus: Build
Status: Amateur
Thanks very much Tony, your method looks to make the process very simple indeed. Quick and effective is always best as it leaves the least room for error.

Very nice of you to take the time to share once again.

Cheers

Kim


Top
 Profile  
 
 Post subject:
PostPosted: Wed Jul 05, 2006 1:48 am 
Offline
Brazilian Rosewood
Brazilian Rosewood
User avatar

Joined: Mon Dec 27, 2004 3:50 pm
Posts: 4662
Location: Napa, CA
Thanks for the tutorial, Tony. Nice jugs!

_________________
JJ
Napa, CA
http://www.DonohueGuitars.com


Top
 Profile  
 
 Post subject:
PostPosted: Wed Jul 05, 2006 1:52 am 
Offline
Contributing Member
Contributing Member
User avatar

Joined: Fri Sep 09, 2005 7:51 am
Posts: 3786
Location: Canada
nice jugs ?? .. there must be something in those pictures I am not seeing !!!!

Thanks to all, guys (and gals out there), just trying to make someones life a little easier and less frustrating. Its not CNC .. its TKC !!!!

_________________
Tony Karol
www.karol-guitars.com
"let my passion .. fulfill yours"


Top
 Profile  
 
 Post subject:
PostPosted: Wed Jul 05, 2006 1:55 am 
Offline
Brazilian Rosewood
Brazilian Rosewood
User avatar

Joined: Sat Feb 12, 2005 1:07 am
Posts: 2281
Location: Jones, OK
Thanks Tony! I have been shaping my bridges that same way you are doing it, but the pin hole spacing idea solves a continuing problem I have with that issue.

_________________
Dave Rector
Rector Guitars


Top
 Profile  
 
 Post subject:
PostPosted: Wed Jul 05, 2006 4:12 am 
Offline
Brazilian Rosewood
Brazilian Rosewood

Joined: Sun Dec 25, 2005 6:32 am
Posts: 7774
Location: Canada
Very timely Tony as i am near doing this step so this thread is saved bud, thank you very much!


Top
 Profile  
 
 Post subject:
PostPosted: Wed Jul 05, 2006 8:42 am 
Offline
Koa
Koa

Joined: Sat Feb 11, 2006 10:40 am
Posts: 1286
Location: United States
Excellent bit of information, thanks Tony for sharing, think I will make me one.

Mike
White Oak, Texas


Top
 Profile  
 
 Post subject:
PostPosted: Wed Jul 05, 2006 10:06 am 
Offline
Contributing Member
Contributing Member
User avatar

Joined: Fri Sep 09, 2005 7:51 am
Posts: 3786
Location: Canada
I knew you would Serge !!!!


_________________
Tony Karol
www.karol-guitars.com
"let my passion .. fulfill yours"


Top
 Profile  
 
 Post subject:
PostPosted: Thu Jul 06, 2006 2:35 am 
Offline
Koa
Koa

Joined: Sun Jan 16, 2005 1:48 am
Posts: 571
Location: United States
Thanks Tony. I'm getting ready to build some bridge jigs too so this is very timely.


Top
 Profile  
 
Display posts from previous:  Sort by  
Post new topic Reply to topic  [ 13 posts ] 

All times are UTC - 5 hours


Who is online

Users browsing this forum: No registered users and 13 guests


You cannot post new topics in this forum
You cannot reply to topics in this forum
You cannot edit your posts in this forum
You cannot delete your posts in this forum
You cannot post attachments in this forum

Jump to:  
Powered by phpBB® Forum Software © phpBB Group
phpBB customization services by 2by2host.com