Official Luthiers Forum!

Owned and operated by Lance Kragenbrink
It is currently Sat Nov 30, 2024 2:33 am


All times are UTC - 5 hours


Forum rules


Be nice, no cussin and enjoy!


Post new topic Reply to topic  [ 19 posts ] 
Author Message
PostPosted: Fri Jun 13, 2008 8:44 am 
Offline
Walnut
Walnut

Joined: Fri Jun 13, 2008 8:26 am
Posts: 9
Hi folks, let me first introduce myself, since this is my first post here !
I am from France, and keen on woodworking (electronics engineering (RF) by trade) as a hobby. cabinet making is my main thing !
but since i also play the guitar, i have always fancies making one. i am still waiting for some mahogany to make myself a lespaul !
anyway, in the meantime, i recently aquired a cheap epiphone SG (G400, set neck), to play, and mess about with.
the electronics needed rewiring, which i promptly managed.. now to the fun stuf: the neck needs straigtening.
before i put my tools to it, i still need to study that bow a little more, and understand exactely what's going on and which way it's curving (its more like an S and a bow). It seems to come from the very short overhang of the neck on the body.. hardly an inch. My initial play with the truss rod indicates that it cant be cured by simple truss-rod tension. my guess is that it needs replaning.

my question is : how would you proceed: should i remove all the frets (they are in good condition) and plane from the top ? or should i unglue the fretboard, plane the neck straight, and reglue the fretboard ?
the mop inlay may suffer if i choose the first solution..
My gut feeling tells me to pick the first option (remove the frets, plane, and refret), but i thought i'd ask the professionals first !


Top
 Profile  
 
PostPosted: Fri Jun 13, 2008 10:01 am 
Offline
Cocobolo
Cocobolo

Joined: Tue Jun 03, 2008 1:12 pm
Posts: 466
Location: Plainfield, IL (chicago)
It all depends on how bad it is. For the most part, You should be able to remove the frets and use a radius block to level it back out. If it needs a lot, start with about 120 grit on the radius block. It will cut fast, so only use the 120 until the entire board looks like it has been touched. (It should get a little milky looking compared to areas that are not sanded which will stay darker). Once you see 95% of it looking level, switch to 180 until you see the other 5% looking flat. Finally, switch to 220 and smooth the entire fingerboard to taste. Some like to even go into the 300 grit range depending on final finish you are looking for.

Severe cases could need a block or smooth plane, but very little I have seen have not been cureable with a radius block. The longer the block the better. I use the 7" version for most work, but a nice 12" would work even better.

JD

_________________
Joe


Top
 Profile  
 
PostPosted: Fri Jun 13, 2008 12:18 pm 
Offline
Walnut
Walnut

Joined: Fri Jun 13, 2008 8:26 am
Posts: 9
i'd say it's pretty bad. i had a good look, and it's really bending, and bottoming on the 7th fret.
i tried to take some pictures:
Image
Image
Image
Image

not sure if they illustrate the bend that well, but anyway.
to me, i could easily see that it needs 1 or 2mm shaving off ! sounds extreme !


Top
 Profile  
 
PostPosted: Fri Jun 13, 2008 2:47 pm 
Offline
Walnut
Walnut

Joined: Fri Jun 13, 2008 8:26 am
Posts: 9
ok, these are better pictures:
strings slacken (not pulling) the ruler rests on the first and last fret:
Image

And here is the gap in the middle. hard to say, but i'd evaluate it at 2mm.
Image


Top
 Profile  
 
PostPosted: Fri Jun 13, 2008 3:28 pm 
Offline
Contributing Member
Contributing Member

Joined: Mon Dec 27, 2004 11:25 pm
Posts: 7202
Location: United States
Looks like this is a simple truss rod adjustment. You think you're seeing an S because the portion over the body has remained in it's normal state. Start by tensioning the rod slowly and work the bow out before you panic and start pulling frets and stuff.

_________________
"I want to know what kind of pickups Vince Gill uses in his Tele, because if I had those, as good of a player as I am, I'm sure I could make it sound like that.
Only badly."


Top
 Profile  
 
PostPosted: Fri Jun 13, 2008 10:42 pm 
Offline
Walnut
Walnut

Joined: Wed May 28, 2008 4:26 pm
Posts: 16
Do you know what type of truss rod it has? Seems to me, if the rod is working properly, it should fix your problem easily.


Top
 Profile  
 
PostPosted: Sat Jun 14, 2008 2:00 am 
Offline
Walnut
Walnut

Joined: Fri Jun 13, 2008 8:26 am
Posts: 9
yes, i would have thought so, but it doesnt seem to make much of a difference. i went to full tension, using a fair bit of tork without straigtening the bow. i am afraid to damage the allen socket/rod if i use anymore tork. (or is it me who is a bit of a wimp ?)
The truss rod is one that i had never seen before though. it's got an allen socket, within a fixed tube.

i straigtened strats before, and the truss rod was a breeze to adjust. the neck would react before i had to tork really hard.


bear in mind that the bow seen on the pics is without string tension. it gets worse as the strings start pulling. i would have thought that the neck had to be straight to start with, without any string or truss-rod tension, one compensating for the other..

with a better look, i have a feeling that it's a fingerboard off job.


Top
 Profile  
 
PostPosted: Sat Jun 14, 2008 3:20 am 
Offline
Brazilian Rosewood
Brazilian Rosewood
User avatar

Joined: Thu Aug 18, 2005 2:21 am
Posts: 2924
Location: Changes when ever I move..Australia
Focus: Build
Status: Amateur
Stef,

Sounds like you should try taking off the strings, backing of the nut a little, clamping the body securely with some protection for the finish to a bench top, placing a cushioned support mid way up on the underside of the neck and the pushing down on the headstock with your hand to take the bow out. Once you have the tension off the rod, THEN and only then, tightening the nut until the neck has a slight backbow. Then refit the strings and have a look. It may also be a good idea to first clean and lubricate the adjustment nut/hex and thread with a little candle wax before you start. If you still cannot bring the nut up to tension even after you have taken the load off of it by hand, you may need to add a washer or two to the end of the thread.

When fooling with truss rods, it is best to keep in mind that they are only designed to HOLD the neck in position by countering the pull of the strings. They should never be relied upon to pull a large bow from a neck. They do work OK for very minor adjustments and you may get away with pulling a larger bow out a few times, but sooner or later, you will discover why you should take the bow/load out by hand before you adjust and it can be a truly unpleasant and somewhat expensive lesson to learn.

Cheers

Kim


Top
 Profile  
 
PostPosted: Sat Jun 14, 2008 5:41 am 
Offline
Contributing Member
Contributing Member

Joined: Mon Dec 27, 2004 11:25 pm
Posts: 7202
Location: United States
The more I hear, the more I think you should take this to a professional repair person to deal with.

_________________
"I want to know what kind of pickups Vince Gill uses in his Tele, because if I had those, as good of a player as I am, I'm sure I could make it sound like that.
Only badly."


Top
 Profile  
 
PostPosted: Sat Jun 14, 2008 5:42 am 
Offline
Walnut
Walnut

Joined: Fri Jun 13, 2008 8:26 am
Posts: 9
larkim wrote:
Stef,

Sounds like you should try taking off the strings, backing of the nut a little, clamping the body securely with some protection for the finish to a bench top, placing a cushioned support mid way up on the underside of the neck and the pushing down on the headstock with your hand to take the bow out. Once you have the tension off the rod, THEN and only then, tightening the nut until the neck has a slight backbow. Then refit the strings and have a look. It may also be a good idea to first clean and lubricate the adjustment nut/hex and thread with a little candle wax before you start. If you still cannot bring the nut up to tension even after you have taken the load off of it by hand, you may need to add a washer or two to the end of the thread.

When fooling with truss rods, it is best to keep in mind that they are only designed to HOLD the neck in position by countering the pull of the strings. They should never be relied upon to pull a large bow from a neck. They do work OK for very minor adjustments and you may get away with pulling a larger bow out a few times, but sooner or later, you will discover why you should take the bow/load out by hand before you adjust and it can be a truly unpleasant and somewhat expensive lesson to learn.

Cheers

Kim


that sounds like a good idea,
not sure about washers on the truss rod though. The way it's made, i only have an allen socket in the headstock, i am not even sure i could unscreew the rod completely out of the neck.


Top
 Profile  
 
PostPosted: Sat Jun 14, 2008 7:51 am 
Offline
Walnut
Walnut

Joined: Fri Jun 13, 2008 8:26 am
Posts: 9
ok, i rigged up the SG like this:
Image
worked great. i didnt need that much pressure to get the neck straight, and not so much either to get it slightly over. i got it to about 1mm over (1mm space between the 1st fret and the straight edge) and tightened the truss rod.
i torked it pretty hard. then released the clamp.
the neck went straight back to where it was before...about 2mm gap at the 7th fret.

i unscrewed the truss rod as far as possible, and this came out:
Image
Image
(the allen socket at the bigger end rotates inside that cylinder. the other side is threaded (and turns with the allen socket)

I am wondering if it isnt broken, since there are some sort of metal shearing marks on it (on the outer sleave). regardless, i really dont understand how it works !
(the allen socket is now knackered anyway, so it needs changing..)


Top
 Profile  
 
PostPosted: Sat Jun 14, 2008 8:15 am 
Offline
Brazilian Rosewood
Brazilian Rosewood
User avatar

Joined: Thu Aug 18, 2005 2:21 am
Posts: 2924
Location: Changes when ever I move..Australia
Focus: Build
Status: Amateur
stef wrote:

that sounds like a good idea,
not sure about washers on the truss rod though. The way it's made, i only have an allen socket in the headstock, i am not even sure i could unscrew the rod completely out of the neck.


Stef,

A couple of things to consider, first and foremost a little "bow" or relief is necessary to avoid fret buzz. This is because of the oscillation of a vibrating string. The string when vibrating presents the most movement midway between the back of it's nut slot and the front of it's bridge piece. It is here, at this mid point where greater clearance or relief is a required. Sure, it can be argued that some electric players have a dead flat fretboard and this works for them because they are mainly shredders who spend a lot of there time right up the neck, with this style, fewer open note are played. For the majority of us though, a dead flat neck, whilst great for fast action, becomes a bugbear when we quickly tire of the noise.

The next thing to think about is that the truss rod tensioning system of your guitar could not have been put together from inside out. Someone must have put this together in such a way that will allow you to undo it without pulling the board. I think you will find that you may have a relatively short hex bolt which screws into an internal rod within an external sleeve (Korean). What can happen is that people try to adjust an excessive amount of relief out with this type of rod and in the process, they crush the wood between the shoulder of the hex head bolt and the external sleeve. In doing so, this reduces the effective force that the rod can apply, hence my advice to add a washer or two to give you back the travel. If you suspect that the wood behind the bolt has indeed been crushed, it may pay to firm it up VERY CAREFULLY with a couple of drops of thin CA glue.

Just two other things. Before you take any of the advice I offer, it sounds to me like you need to spend a bit of time at Frank Fords amazing website http://frets.com/ and after that, if you still don't have joy, consider our wise friend Don's advice and seek out a Pro...don't pull the board. The last thing, welcome to the OLF M8 :D

Cheers

Kim


Top
 Profile  
 
PostPosted: Sat Jun 14, 2008 8:34 am 
Offline
Brazilian Rosewood
Brazilian Rosewood
User avatar

Joined: Thu Aug 18, 2005 2:21 am
Posts: 2924
Location: Changes when ever I move..Australia
Focus: Build
Status: Amateur
Sorry Stef you posted while I was typing. You nee to look in the hole where the hex nut came from. As described above, I think you will find that the previous owner, or his learned mate has cranked down sooooo hard on the hex that he/she has crushed the wood behind the shoulder and thereby reduced the effectiveness of the rod. Now that you have it apart, you NEED to wax the thread. For now, you should be OK to get an identical hex nut made up, or in a pinch, try wrapping some ali foil around the hex key to take the slack and screw it down. Rule ONE, if you need to crank down on ANY truss rod system, there is either something wrong with the tech or the mechanism. If it is the former, read and learn before you proceed, if it is the later, STOP and find out what it is before you strip something out.

Anyhow, your on the right track now so just go easy.

cheers

Kim


Top
 Profile  
 
PostPosted: Sat Jun 14, 2008 3:32 pm 
Offline
Walnut
Walnut

Joined: Fri Jun 13, 2008 8:26 am
Posts: 9
well, thanks for all the info !
i am slowly making progress (remember rule number 1, remember rule number 1...)
i followed your advice, and managed to work something out with the sleeve i had pulled out:
i sliced the top off, and made a slit with the dremel, so that i can use a flat screw driver to drive it on the thread. that's step number one.
next, i manufactured some sort of spacer, to press on the shoulder in the wood a little earlier. (if i got it right, that was the idea behind your suggestion of using washers.)
so far so good.
I drove the new bit in the neck, but the spacer was too long, i couldnt get a grip on the rod. so i pulled the lot out, and by magic, the rod came out too !
so i guess i have the whole lot out of the neck. but it doesnt look like i would have expected :
the rod is inside a plastic sleeve, and there is also a piece of square metal that runs alongside it, inside the sleeve. so the tross rod is effectively a 2 part thing.
the shearing i had seen on the first bit i took out was supposed to be attached to that square piece.
now i dont really understand how those bits work together ! i would have expected an anchor at the bottom of the neck, for the rod, but there isnt such a thing after all !
here is a poor picture of what this lot looks like:
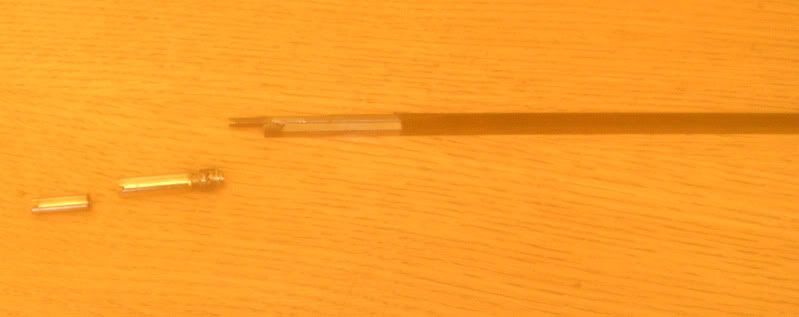
Image
from left to right: the long "nut", originally with allen socket, now with slit for flat driver.
the sleeve, with a spacer on the end, to press earlier on the shoudler, and the truss rod assembly.
from the shearing, it looks like the sleave should be attached to the square piece.

i am off to try and find out out this works.


Top
 Profile  
 
PostPosted: Sat Jun 14, 2008 4:18 pm 
Offline
Cocobolo
Cocobolo
User avatar

Joined: Mon Jan 28, 2008 6:13 pm
Posts: 228
Location: Newtown, CT
I would venture to guess that you or someone else adjusted the rod in the wrong direction, to the point where it ran out of thread and finally broke. The rod appears to be a double action type rod which means the nut and the rod are one piece. When you turn the nut the entire rod turns.
Good news is that you can get a new truss rod to replace that one and it should be relatively easy to install.

_________________
Rich S

"The inconvenience of poor quality will linger long after the thrill of a bargain has been forgotten"


Top
 Profile  
 
PostPosted: Sat Jun 14, 2008 11:01 pm 
Offline
Brazilian Rosewood
Brazilian Rosewood
User avatar

Joined: Thu Aug 18, 2005 2:21 am
Posts: 2924
Location: Changes when ever I move..Australia
Focus: Build
Status: Amateur
Rich S wrote:
The rod appears to be a double action type rod which means the nut and the rod are one piece. When you turn the nut the entire rod turns.
Good news is that you can get a new truss rod to replace that one and it should be relatively easy to install.


Yes it does look like a double action rod but I would be surprised if you will find a swap out replacement for the original, but, it's worth a look around. If a direct replacement is not available, I would be wanting to pull the fretboard to adjust the rebate to accept the more readily available and probably more reliable Allied rod and also to enable the replacement rod to be secured with epoxy to stop any rattle as they are meant to be.

You could however try leaving the fretboard in place and just slipping an Allied rod into the existing rout and then rely on tension to hold it there, but I don't like your chances of avoiding a rattle, or indeed of the Allied rod fitting into the rebate anyhow. The adjustment system is different on the existing rod to that of the Allied units so you are not going to know if this is doable until you have both rods side by side.

Here is a link to the relevant Allied page: http://www.alliedlutherie.com/truss_rods.htm

Anyhow Stef, when replacing the rod, just make sure the square section is positioned so that it will rest against the underside of the fretboard. From memory, Frank Ford offers advice on how to remove the board with a heat blanket but in a pinch, some heavy alloy, a heat gun and a palette knife will do the trick, heat and wiggle, heat and wiggle :)

Cheers Kim


Top
 Profile  
 
PostPosted: Sun Jun 15, 2008 5:23 am 
Offline
Walnut
Walnut

Joined: Fri Jun 13, 2008 8:26 am
Posts: 9
hooray !
got it sorted.
i managed to silver braze the sleeve to the square. i then filled the nut with brazed and improved th strength of the slit for the screw driver.
i checked it worked, and inserted the lot back in the guitar. a quick turn of the screw driver and hey presto, all back in line !

there is still a bit of relief, as i wanted, but it's now all in spec. i have a little fret buzz (hardly anything) which i might cure by raising the saddle.. although i might leave it this way.

I did find some replacement rods, btw, for around 10dollars.. but my fix works, so for now, i am happy.
all in all, a success !
thank you all, i stopped me from putting the tools to a perfectly fine guitar !


Image
Image


Top
 Profile  
 
PostPosted: Sun Jun 15, 2008 5:47 am 
Offline
Brazilian Rosewood
Brazilian Rosewood
User avatar

Joined: Thu Aug 18, 2005 2:21 am
Posts: 2924
Location: Changes when ever I move..Australia
Focus: Build
Status: Amateur
Great work Stef, very happy that it all worked out OK for you, now you can move on to an acoustic yes???

P.S. where did you find the replacements rods??

Cheers

Kim


Top
 Profile  
 
PostPosted: Sun Jun 15, 2008 6:21 am 
Offline
Walnut
Walnut

Joined: Fri Jun 13, 2008 8:26 am
Posts: 9
here:
http://www.guitarpartscentral.com/dual- ... p-343.html

well, my takamine is nicely setup thank you ;)
as i said, i am really concidering making a lespaul.
the hardest bit is to find some slabs of mahogany for a decent price !
i guess it's easy enough to get it from specialist supply, but they dont come cheap, and since i really doubt the guitar would be as good as a epi, for example, i'd rather spend the same amount on the real thing. But i am missing on the pleasure of actually making it.
i have some good oak stock, but i doubt it sounds too good !


Top
 Profile  
 
Display posts from previous:  Sort by  
Post new topic Reply to topic  [ 19 posts ] 

All times are UTC - 5 hours


Who is online

Users browsing this forum: TimAllen and 77 guests


You cannot post new topics in this forum
You cannot reply to topics in this forum
You cannot edit your posts in this forum
You cannot delete your posts in this forum
You cannot post attachments in this forum

Jump to:  
Powered by phpBB® Forum Software © phpBB Group
phpBB customization services by 2by2host.com