Official Luthiers Forum!

Owned and operated by Lance Kragenbrink
It is currently Thu Apr 24, 2025 2:46 am


All times are UTC - 5 hours


Post new topic Reply to topic  [ 31 posts ]  Go to page 1, 2  Next
Author Message
 Post subject:
PostPosted: Fri Sep 09, 2005 3:44 am 
Offline
Koa
Koa

Joined: Sun Jan 09, 2005 12:12 pm
Posts: 688
Location: United States
I'm confused I thought I had this all figured out, but now I'm wondering if I really do understand.

This is the process of preparing my sides...I'm not using a side template that has the radius cut. I just leave my sides at 5", bend, glue in the head and tail block leaving the back side of the blocks proud and the top side blocks flush with the sides.

Ok, now here is the question...I then put my sides in the 28' radius dish and sand until there is no daylight keeping it even all the way around by measuring every few times all the way around to make sure I'm not taking too much off of one side. After I'm done my top now has a 28' radius. This means that the upper bout and lower bouts are lower than the middle. If that is the case, when the fretboard extension comes up to the soundhole, won't it be going uphill because of the radius? If that is the case, won't the end of the FB extension hit wood near the soundhole and the neck joint should have a gap. I know a lot of you sand this area flat with one of those fancy jigs, but it just looks like a huge gap from the middle of the side to the head block. Should this not be very much of a gap? By the way, this is not happening on my guitar, but I'm helping others and I see it happening on other guitars. I'm wondering when we go to glue the FB extension if this will be a problem. Can someone comment on the distance from the middle bout to the head block on the top side with a 28 or 30 ft radius if you hold a straigedge flat? How much gap should there be?
Tracy


Top
 Profile  
 
 Post subject:
PostPosted: Fri Sep 09, 2005 4:09 am 
Offline
Old Growth Brazilian

Joined: Tue Dec 28, 2004 1:56 am
Posts: 10707
Location: United States
You are correct I get past this issue by shimming the upper bout so that from just past the upper waist through upper bout are not radiused on the tops. Also on the back I gradually pivot the axis of the sanding bowl to achieve a radiused taper starting at 2" low of the waist center through the upper bout to achieve the final upper bout tapper heitht on the back to side joint.

P.S. I am hand snding using a sanding bowl that is suspended on a all-thred rod screwed into a barrel nut seated in a slot cut in my bench. This allows me to pivot the the sanding bowl as required while maintaining constant perpendicularity to the sides.

clear as mud?


Top
 Profile  
 
 Post subject:
PostPosted: Fri Sep 09, 2005 4:22 am 
Offline
Koa
Koa

Joined: Thu Aug 11, 2005 7:38 pm
Posts: 697
Location: United States
Michael
Could you explain that again. I'm having the same problem. Makes the top of my guitar look like a bunny ski slope.


Top
 Profile  
 
 Post subject:
PostPosted: Fri Sep 09, 2005 5:03 am 
Offline
Koa
Koa

Joined: Sun Jan 09, 2005 12:12 pm
Posts: 688
Location: United States
Clear as mud! I understand what you mean. I was thinking of making my upper bout flat too on my next. So does that mean put a piece of wood under the upper bout as I radius the top side in the radius dish?
Tracy


Top
 Profile  
 
 Post subject:
PostPosted: Fri Sep 09, 2005 5:49 am 
Offline
Old Growth Brazilian

Joined: Tue Dec 28, 2004 1:56 am
Posts: 10707
Location: United States
i believe you are speaking of the upper transvers brace and the upper trans vers graft. I put no radius on these braces. I radius the x-braces tone bars and finger braces but not the upper transvers braces.


second explanation:
I have a 1/2" barrel nut that swivels on one axis mounted in the work benck. Screwed into that barrel nut is a 12" long 1/2" all-thread. I have a 33/64" hole in the center of my sanding bowles. I put a two nuts, 1/2"id x 1"od washer, sanding bowl, washer and nut. This is the sanding machine. I put the rim in the mold and assemble the sanding machine. adjust the height of the saning bowl amd center location along the centerline on the rim assembly so that I sand the portion of the rim desired equally perpendicular to the centerline of the rim assembly. On the back I move the center locaion of the sanding bowl to 2" rear of the waist and no titlt and sand till the tail block is fully radiused. then a bit at a time I tilt the sanding bowl towoard the upper bout sanding as I go till I get to the required height and the bottom of the neck block is fully radiused at the neck/upper bout joint this gives a good clean radiused transition from the lower bout height to the neck joint height. My rim is pre profiled for the back so there is really not a bunch of sanding to do. The top square profiled and the procedure is pretty much the same except I dont radius much past the waist toward the upper bout.

Now I am sure this is really muddy


Top
 Profile  
 
 Post subject:
PostPosted: Fri Sep 09, 2005 5:57 am 
Offline
Old Growth Brazilian

Joined: Tue Dec 28, 2004 1:56 am
Posts: 10707
Location: United States
[QUOTE=tl507362] Clear as mud! I understand what you mean. I was thinking of making my upper bout flat too on my next. So does that mean put a piece of wood under the upper bout as I radius the top side in the radius dish?
Tracy[/QUOTE]

Tracy

I know I said i shim and I use to but now days I just tilt the bowl a bit towoard the lower bout (not much maybe 1/2 deg) and slowly work the tilt toward the upper bout, adjustin the sanding bowl height as I go till I get to where I want to stop the radius That way I don't have shim, but I do have to touch up the blend between radius and no radius by hand that takes a whole 2 min by hand. MichaelP38604.6267361111


Top
 Profile  
 
 Post subject:
PostPosted: Fri Sep 09, 2005 6:39 am 
Offline
Old Growth Brazilian

Joined: Tue Dec 28, 2004 1:56 am
Posts: 10707
Location: United States


Top
 Profile  
 
 Post subject:
PostPosted: Fri Sep 09, 2005 6:54 am 
Offline
Brazilian Rosewood
Brazilian Rosewood

Joined: Thu Jun 16, 2005 10:31 am
Posts: 2103
Location: United Kingdom
Michael

Am I correct in thinking the radius dish can rock backwards and forwards ?


Top
 Profile  
 
 Post subject:
PostPosted: Fri Sep 09, 2005 7:12 am 
Offline
Old Growth Brazilian

Joined: Tue Dec 28, 2004 1:56 am
Posts: 10707
Location: United States
Yes but the way my tie downs are set up I can lock it in any position as long as I dont yank real firm. I have pins that locate an lock the mold in position on the benck Dawgs as it were.


Top
 Profile  
 
 Post subject:
PostPosted: Fri Sep 09, 2005 7:17 am 
Offline
Koa
Koa

Joined: Sun Jan 09, 2005 12:12 pm
Posts: 688
Location: United States
Michael,
I think I know what you are talking about. In that picture, which side is the lower bout? Right or Left? Also, we are talking the TOP of the sides where the top will go right? I understand the back angle and radius okay, but it was the top that was throwing me. Am I correct in thinking that if if you radius your top in the upper bout, then the fb extension will hit the top just in front of the sound hole leaving a gap at the body/neck joint? If you set the neck angle to get rid of this gap, then won't the neck angle be too extreme, meaning that the bridge would have to be too tall to play comfortably?

Also, if you don't radius the upper transverse brace and the graft, then do you glue on a flat surface in the go-bar deck?
Tracytl50736238604.68


Top
 Profile  
 
 Post subject:
PostPosted: Fri Sep 09, 2005 7:48 am 
Offline
Old Growth Brazilian

Joined: Tue Dec 28, 2004 1:56 am
Posts: 10707
Location: United States
The sketch is more of a reprasentation of doing the back. on the top the tilt almost neglisable like I said a 1/2 deg at the most. If you tilted more than that the bridge would set atifically low.


Top
 Profile  
 
 Post subject:
PostPosted: Fri Sep 09, 2005 7:59 am 
Offline
Brazilian Rosewood
Brazilian Rosewood

Joined: Thu Jun 16, 2005 10:31 am
Posts: 2103
Location: United Kingdom
Thanks Michael

I think I have it.

So once the dish angle is set you can hold the plane as long as the dish is not rocked too much ?

Russell


Top
 Profile  
 
 Post subject:
PostPosted: Fri Sep 09, 2005 8:11 am 
Offline
Old Growth Brazilian

Joined: Tue Dec 28, 2004 1:56 am
Posts: 10707
Location: United States
yep. I made my barrel nut 1" in dia my tie downs have less than full radius so the tighter I tighten the tie downs the firmer it holds. They are held down with 4 1/4-20unc bolts. The barrel nut by the way is brass and knerled where the tie downs cross it


Top
 Profile  
 
 Post subject:
PostPosted: Fri Sep 09, 2005 12:10 pm 
Offline
Contributing Member
Contributing Member
User avatar

Joined: Tue Jan 04, 2005 10:03 am
Posts: 6680
Location: Abbotsford, BC Canada
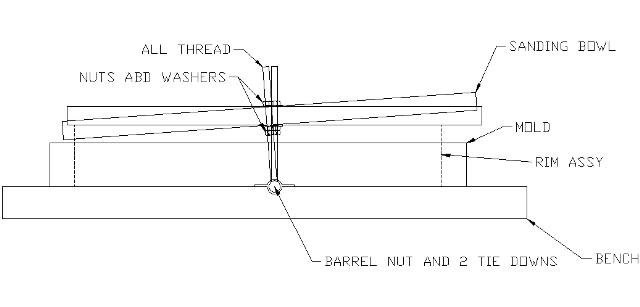
So Tracy, if I understand your question/problem right, your worried about the gap at the front of the body between the underside of the fretboard and the top due to the climbing of the radius you have put in the rims and now transfered to the top once glued on. So, I layed this out on cad and the average distance from the front of the sound hole to the front of the body is 3.8-4" respectivly. If you have a 28' (336") radius sanded into that top, the distance between the curve of the radius and a straight line from the front of the body to the top of the sound hole measure out to 0.005" which I am sure will close up once you install the neck so no gap should be there, let alone visible. You could wipe your rough fingers inbetween the two points to bring that amount of wood down. You Don't need a fancy jig to get this area flat, just a 6-8" length of hardwood run over the jointer with sandpaper will do.

If that is the case, won't the end of the FB extension hit wood near the soundhole and the neck joint should have a gap. I know a lot of you sand this area flat with one of those fancy jigs, but it just looks like a huge gap from the middle of the side to the head block. Should this not be very much of a gap?

if you rock the fb extension over the radius from one point to the other, there should be a maximum gap of 0.010" hardly much if you ask me. Just make sure that the top is flat (relative to the radius of course) when you glue down the fb extension.

So, as far as I can see, it's just easier to sand that area flat and be done with it.

PS, how do you guys get that fancy board and quote from a previous post into your post??

Guitars, no problem, forum editing that's my big problem. Rod True38604.885625

_________________
My Facebook Guitar Page

"There's really no wrong way, as long as the results are what's desired." Charles Fox

"We have to constantly remind ourselves what we're doing....No Luthier is putting a man on the moon!" Harry Fleishman

"Generosity is always different in the eye of the person who didn't receive anything, but who wanted some." Waddy Thomson


Top
 Profile  
 
 Post subject:
PostPosted: Fri Sep 09, 2005 1:45 pm 
Offline
Brazilian Rosewood
Brazilian Rosewood

Joined: Wed Jan 19, 2005 5:23 am
Posts: 2353
Location: United States
I think what Tracy is talking about is a scenario that happened in my guitar building class last night. Here is the issue...We are putting a 15 foot radius on the back and a 30 foot on the top. When glueing the sides together we leave our heelblock and tail blocks oversized by 5mm. The heel block would be 85mm and the end block 105mm. These will be planed down to a final measurement of 80mm and 100mm. We then plane the back of the rims down flush with the blocks and then use the radius dish to get to a 15 foot radius. We then turn the rims over and raius the top side of the rims to a 30 foot radius. Well, last night I had a couple of guys get heavy handed when sanding and the depth at the end block came out to 100mm and the heel block 72mm after radiusing the back and top of the rims. Here is the question... even though the depth of the rims is more than the standard 20mm difference from rear to front (end block to heel block) the guitar will be playable. The only thing we will need to do is put a larger neck angle on the neck to get the desired approx 3/8 inch gap at the bridge area. Is this correct? Instead of a standard 1 or 2 degree angle we would need a 4 or 5 degree angle for example. Comments????   


Top
 Profile  
 
 Post subject:
PostPosted: Fri Sep 09, 2005 2:00 pm 
Offline
Contributing Member
Contributing Member
User avatar

Joined: Tue Jan 04, 2005 10:03 am
Posts: 6680
Location: Abbotsford, BC Canada
But if you are radiusing the entire top area, you could theoreticall sand an inch off and still have the same radius in the rim right?

I think i'm in for some educating here, but if we are talking about the radius of the top, it really doesn't matter what the back does right, none of us make ovations which have very small radius' indeed. So, lets just get the back out of the equation if it doesn't need to be conserned with the problem . If I am wrong here, please correct me.

_________________
My Facebook Guitar Page

"There's really no wrong way, as long as the results are what's desired." Charles Fox

"We have to constantly remind ourselves what we're doing....No Luthier is putting a man on the moon!" Harry Fleishman

"Generosity is always different in the eye of the person who didn't receive anything, but who wanted some." Waddy Thomson


Top
 Profile  
 
 Post subject:
PostPosted: Fri Sep 09, 2005 2:05 pm 
Offline
Contributing Member
Contributing Member
User avatar

Joined: Tue Jan 04, 2005 10:03 am
Posts: 6680
Location: Abbotsford, BC Canada
Of course if you lean the sanding board to the head of the body more than the tail, than the angle will change. So how do you guys with motorized sanding wheels ensure that you have taken the correct amount off of the front so as not to introduce a larger set angle?

Measure twice, sand once kind of thing?

_________________
My Facebook Guitar Page

"There's really no wrong way, as long as the results are what's desired." Charles Fox

"We have to constantly remind ourselves what we're doing....No Luthier is putting a man on the moon!" Harry Fleishman

"Generosity is always different in the eye of the person who didn't receive anything, but who wanted some." Waddy Thomson


Top
 Profile  
 
 Post subject:
PostPosted: Fri Sep 09, 2005 2:39 pm 
Offline
Koa
Koa

Joined: Sun Jan 09, 2005 12:12 pm
Posts: 688
Location: United States
What I was referring to was more of the radius, and you are right about there not being very much to sand. But what Robbie said is what I was looking at and that is why I was getting confused.
Rod, you are correct, we are talking about the top radius. But what happened in the class to a few students was that they sanded more heavily on the head block, and therefore introduced a back angle onto the top. So now it looks like they have a back angle on the top and back! So if there is that much of a angle from the back to the front(on the top), won't you have to compensate by making the neck angle greater?
By the way, the spinning disks that I saw usually lay flat and you just hold the sides in the mold against the spinning dish. So you can tilt it any way you want. Michael's setup is much more different than I have seen before, so I'm not sure how his will work in this situation.
Tracytl50736238604.9860532407


Top
 Profile  
 
 Post subject:
PostPosted: Fri Sep 09, 2005 3:42 pm 
Offline
Contributing Member
Contributing Member
User avatar

Joined: Tue Jan 04, 2005 10:03 am
Posts: 6680
Location: Abbotsford, BC Canada
John Mayes use to have pics on his site of his shop and there was a pic of his rim sander setup.

John, any chance you could show us some pics of your setup for sanding the radius into the rims?

_________________
My Facebook Guitar Page

"There's really no wrong way, as long as the results are what's desired." Charles Fox

"We have to constantly remind ourselves what we're doing....No Luthier is putting a man on the moon!" Harry Fleishman

"Generosity is always different in the eye of the person who didn't receive anything, but who wanted some." Waddy Thomson


Top
 Profile  
 
 Post subject:
PostPosted: Fri Sep 09, 2005 4:04 pm 
Offline
Koa
Koa

Joined: Sun Jan 09, 2005 12:12 pm
Posts: 688
Location: United States
Rod,
FWIW, I don't think John radius' the sides before putting the kerfed linings on. That is why in his video, he raises the linings up in the middle about 1/16" and tapers them down to the headblock. Then he radius' the kerfed linings. I think the reason he does this is because he has a side template that he uses to cut the side radius into sides before bending. I don't do it that way because I have never built the same body style more than once, so I don't have a template to go by. Anyway, I was at his shop but don't remember seeing the sanding machine. Fess up John, where were you hiding it?
Tracy


Top
 Profile  
 
 Post subject:
PostPosted: Fri Sep 09, 2005 7:12 pm 
Offline
Brazilian Rosewood
Brazilian Rosewood

Joined: Wed Jan 05, 2005 6:25 pm
Posts: 2749
Location: Netherlands
FWIW, you're talking about a very minimal amount of arch under the fingerboard, one which can be 'sanded out' with Lance's jig quite easily. Make sure you leave your top a little on the thicker side in that area if you're really worried about it (which shouldn't be a problem, because the part of the top with a fingerboard glued/bolted to it isn't going to be the most acosutically active).

This said, I've seen several different approaches. There's Michael's, which is leave the rims un-radiussed/flat, but angled back slightly above the waist, generally coupled with non-radiused bracing in the upper bout. I've also seen people who 'merely' don't radius the upper bout's bracing, but to radius to rims, people (like me, and I *think* Al Carruth) who radius all the bracing, and radius the whole rimset.

All of the methods work, just find the one that works best for you. Quite a few discussions on this topic in the MIMF library as well.

As for sides, I don't have profiling templates, because it just seems like an extra bit of hassle to me (lining them up correctly, etc. etc.), and it really only takes about 20 minutes, total, to get the sides trimmed (block plane) and radius sanded. I do this before I glue in the lining, because I feel it's much quicker and easier to chisel/saw/plane the rim down to roughly where it should be, clean up on the radius dishes in a few minutes, THEN glue the lining in slighly proud, and re-radius until the lining matches the rims (sanding only). Maybe 10 minutes at most for both top and back. Half an hour's work, excluding lining gluing time, and it lets me vary the depth easily, add a more or less dramatic wedge, no problems.


Top
 Profile  
 
 Post subject:
PostPosted: Fri Sep 09, 2005 10:40 pm 
Offline
Koa
Koa

Joined: Thu Feb 17, 2005 3:38 pm
Posts: 1542
Location: United States
    I have some pictures of my sanding set up
http://www.bluescreekguitars.com/ar0007.htm
    As you can see the set is in the mold.I have it centered . I also pre form my set before bending so I don't have so much work to do. I first edge the rim with chalk so I know when I have it trued, and I also have a few reference marks so I can get it square and the proper wedge.
   Once the edge is true I glue in the kerfing just a tad over the rim and clean that up the same way.    john hall


Top
 Profile  
 
 Post subject:
PostPosted: Sat Sep 10, 2005 12:32 am 
Offline
Brazilian Rosewood
Brazilian Rosewood

Joined: Thu Jun 16, 2005 10:31 am
Posts: 2103
Location: United Kingdom
Thanks John

Cool system.


Top
 Profile  
 
Display posts from previous:  Sort by  
Post new topic Reply to topic  [ 31 posts ]  Go to page 1, 2  Next

All times are UTC - 5 hours


Who is online

Users browsing this forum: No registered users and 13 guests


You cannot post new topics in this forum
You cannot reply to topics in this forum
You cannot edit your posts in this forum
You cannot delete your posts in this forum
You cannot post attachments in this forum

Jump to:  
Powered by phpBB® Forum Software © phpBB Group
phpBB customization services by 2by2host.com